

MyDHL+ can import shipment data contained within a CSV file. This enables the user to create one or many shipments automatically.
There are 2 sections to this guide:
1. Creating a Mapping option – this needs to be done before you can upload your CSV file.
2. How To Upload a Shipment CSV File – this is how to upload your CSV file, once you have created the Mapping Option.
You first need to configure and save a Mapping Option by matching the fields required by MyDHL+ to those in your CSV file.
Browse to Ship > Upload a Shipment File and select Create or Edit Mapping Options
Select Create New from the Create/Edit Mapping Options list.
Give the Mapping a name
Select Use from File
Select the Field delimiter and Text Delimiter
Select if the shipments will be Package shipments or not.
The example in this guide will be for Package shipments being sent Internationally.
Minimum Required Fields
23 fields are already configured in MyDHL+ when you click Create New
You need to add fields 24 - 40 shown in the table below.
There are two ways to add a field
Click the blue Add Field text to the right of an existing field. Type the name of the new field or select it from the list. The new field will be inserted under the existing field.
Click Add Field at the bottom and then type the field name or scroll through the list.
You can move the fields by clicking the blue up or down arrows on the left.
Click Save once you have finished.
The 40 fields below allow for the shipment details for 1 Customs Invoice Line Item (fields 29 – 40).
If your shipment contains multiple Customs Invoice Line Items, there are 2 options…
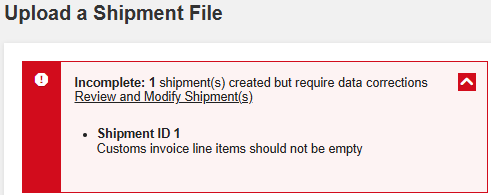
Option 1 - Leave fields 29 – 40 empty. The shipment data will import and you will be advised that the Customs invoice Line Items should not be empty. You must then edit the shipment and enter the Line Items manually.
Option 2 - Investigate using a different DHL Shipping tool. Please contact the CFIT Helpdesk cfituk@dhl.com to discuss options.
| # | Field Name | Notes |
| 1 | Name (Ship FROM) (Required) | |
| 2 | Company (Ship FROM) (Required) | |
| 3 | Address 1 (Ship FROM) (Required) | |
| 4 | City (Ship FROM) (Required) | To check valid Postcode and Town / City combinations, check DCT. |
| 5 | Country Code (Ship FROM) (Required) | A list of Country Codes can be found by clicking here and selecting Country Codes. |
| 6 | Email Address (Ship FROM) (Required) | |
| 7 | Phone Country Code (Ship FROM) (Required) | |
| 8 | Phone Number (Ship FROM) (Required) | |
| 9 | Name (Ship TO) (Required) | |
| 10 | Company (Ship TO) (Required) | |
| 11 | Address 1 (Ship TO) (Required) | |
| 12 | City (Ship TO) (Required) | To check valid Postcode and Town / City combinations, check DCT. |
| 13 | Country Code (Ship TO) (Required) | A list of Country Codes can be found by clicking here and selecting Country Codes. |
| 14 | Phone Country Code (Ship TO) (Required) | |
| 15 | Phone Number (Ship TO) (Required) | |
| 16 | Account Number (Shipper) (Required) | |
| 17 | Total Weight (Required) | |
| 18 | Declared Value Currency (Required) | e.g. GBP, EUR, USD A list of currency codes by clicking here and selecting Currency Codes. |
| 19 | Declared Value (Required) | |
| 20 | Product Code (3 Letter) (Required) | WPX = Non Doc / Dutiable DOX = Doc / Not Dutiable ESI = Economy Select TDK= Express 9 Doc TDT= Express 12 Doc TDL= Express 10:30 Doc TDM= Express 10:30 Non Doc TDE= Express 9 Non Doc TDY= Express 12 Non Doc |
| 21 | Summary of Contents (Required) | General description of the shipment |
| 22 | Shipment Type (Required) | P = Package (Non Doc / Dutiable) D = Document (Doc / Dutiable) |
| 23 | Total Shipment Pieces (Required) | |
| 24 | ZIP/Postal Code (Ship FROM) | To check valid postcode and Town / City combinations, check DCT. |
| 25 | ZIP/Postal Code (Ship TO) | To check valid postcode and Town / City combinations, check DCT. |
| 26 | Piece Length | (CM) |
| 27 | Piece Width | (CM) |
| 28 | Piece Height | (CM) |
| If Shipment Type (field 22) is D, then the following fields can be left empty. | ||
| 29 | Reason for Export | For example Sold to Receiver Intercompany Goods |
| 30 | Invoice Type | COM = Commercial PRO = Proforma |
| 31 | Trade Term | DAP |
| 32 | Item Description | Detailed Description of the item |
| 33 | Quantity | Number of items |
| 34 | Item Units | PCS A list of Units (Unit of Measure) can be found be clicking here and selecting Unit Codes. |
| 35 | Item Value | 10.00 |
| 36 | Item Value Currency | e.g. GBP, EUR, USD A list of currency codes by clicking here and selecting Currency Codes. |
| 37 | Commodity Code / HS Code | Optional |
| 38 | Country of Origin (Customs Invoice) | A list of Country Codes can be found by clicking here and selecting Country Codes. |
| 39 | Net Weight | (KG) e.g. 0.25, 5.0 Must be less than or equal to the ‘Total Weight (Required)’ |
| 40 | Digital Customs Invoice – Y/N (Paperless) | Y |
Additional Optional fields
There are many other fields you can select for your Mapping Option
Below are the most commonly used.
| Field Name | Notes |
| Shipment Reference 1 | |
| Address 2 (Ship FROM) | |
| Address 3 (Ship FROM) | |
| Address 2 (Ship TO) | |
| Address 3 (Ship TO) | |
| Suburb (Ship TO) | |
| State/Province (Ship TO) | |
| State/Province Code (Ship TO) | |
| VAT/Tax ID (Ship FROM) | |
| VAT/Tax ID (Ship TO) | |
| EORI Number (Ship FROM) | |
| EORI Number (Ship TO) | |
| Account Number (Duty/Tax) |
Sample Files
Minimum Required Fields + Line Item Data Fields (40 Fields)
Note: Depending on your browser settings, the contents of the file may be displayed in a new browser tab instead of downloading as a file.
If this happens, copy the text from the browser tab and paste it into a new Excel workbook. Then save the Excel workbook as a (CSV UTF-8 (Comma Delimited) (*.csv) file.
Shipping within Great Britain and to N. Ireland
When shipping within Great Britain
The fields Product Code (Local) and Product Code (Global) need to be included in the Mapping Option.
| Field Name | Notes |
| Shipment Type | D |
| Product Code (3 Letter) | DOM = Express Domestic DOK = Express Domestic 9 DOT = Express Domestic 12 |
| Product Code (Local) | C = DOM / Express Domestic O = DOK / Express Domestic 9:00 1 = DOT / Express Domestic 12:00 |
| Product Code (Global) | N = DOM / Express Domestic I = DOK / Express Domestic 9:00 1 = DOT / Express Domestic 12:00 |
| Shipment Details fields (29 – 40) | Leave empty |
When shipping from Great Britain to N. Ireland
The fields Product Code (Local) and Product Code (Global) need to be included in the Mapping Option.
Documents
| Field Name | Notes |
| Shipment Type | D |
| Product Code (3 Letter) | DOM = Express Domestic DOK = Express Domestic 9 DOT = Express Domestic 12 |
| Product Code (Local) | C = DOM / Express Domestic O = DOK / Express Domestic 9:00 1 = DOT / Express Domestic 12:00 |
| Product Code (Global) | N = DOM / Express Domestic I = DOK / Express Domestic 9:00 1 = DOT / Express Domestic 12:00 |
| Shipment Details fields (29 – 40) | Leave empty |
Packages
| Field Name | Notes |
| Shipment Type | P |
| Product Code (3 Letter) | DOM |
| Product Code (Local) | 3 |
| Product Code (Global) | 3 |
| Shipment Details fields (fields 29 – 40) | Complete |
Sample Files
Note: Depending on your browser settings, the contents of the file may be displayed in a new browser tab instead of downloading as a file.
If this happens, copy the text from the browser tab and paste it into a new Excel workbook. Then save the Excel workbook as a (CSV UTF-8 (Comma Delimited) (*.csv) file.
How To Upload a Shipment CSV File
Once you have created your mapping option, you can upload your CSV files.
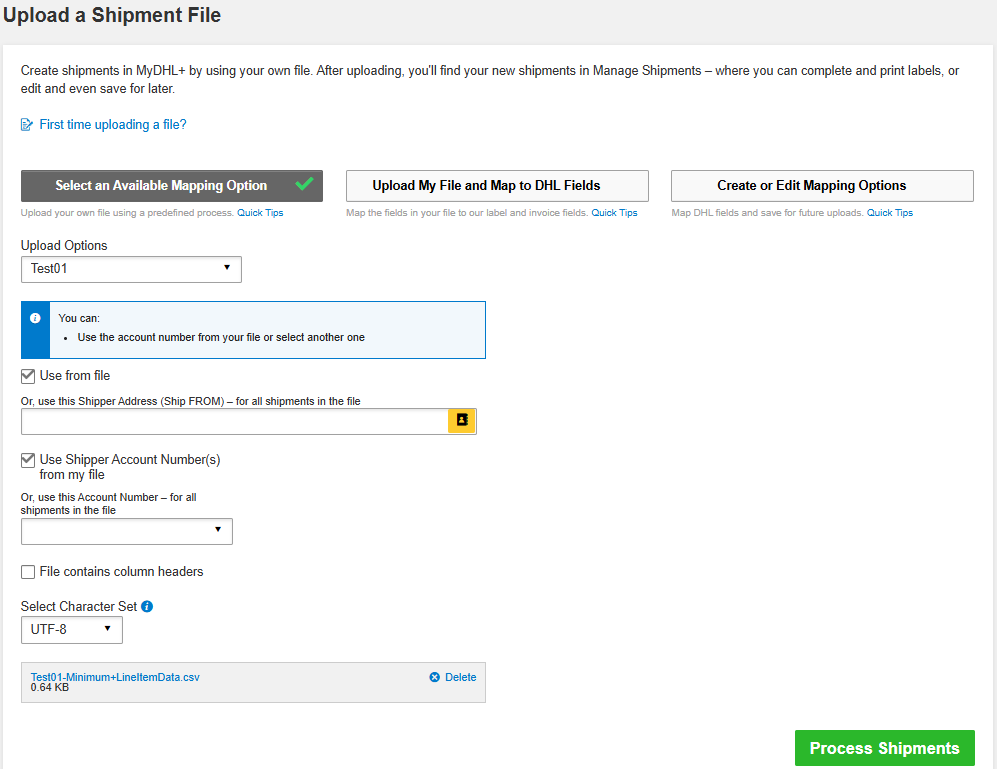
Browse to Ship > Upload a Shipment File
Click Select an Available Mapping Option
Select your Mapping options name from the Upload Options list
If your file contains columns headers, tick the File contains column headers box
Click Select File and browse to the CSV file
Click the green Upload button
Click process shipments
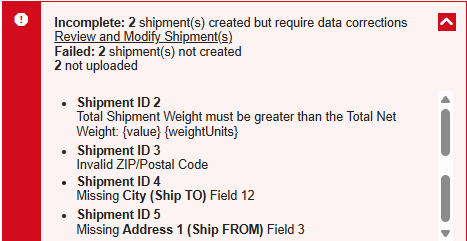
The Successful and Failed results will be displayed at the top of the page
If there are any errors, expand the message to see more details.
The error will give the shipment number and a general description of the issue.
Sample error screenshots

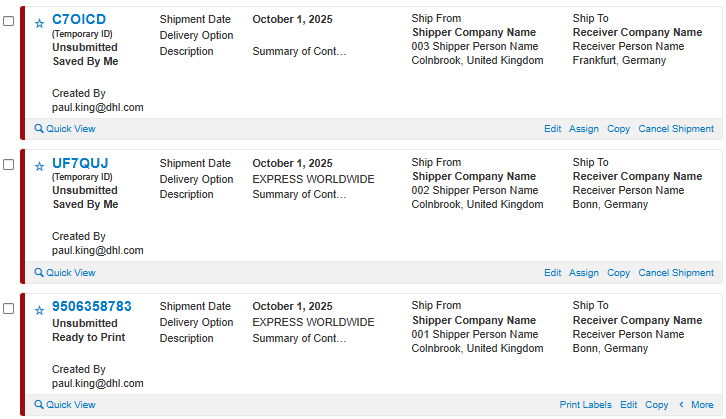
The created shipments will be in the Manage Shipments list (Manage Shipments > All Shipments)
Ready to Print means the labels are ready to be printed.
Saved By Me means more information is required before the label can be printed. Click Edit to complete the shipment.
Similar Stories


