

If you upload your shipment data into MyDHL+ using the Upload a Shipment File option, there are some changes you can make if you wish to include EUDR and / or EUCR data in the file.
If you do not wish to make any changes, you can edit the shipment after it has imported in Manage Shipments and manually enter the details before completing the shipment.
Which Upload Options Do You Use?
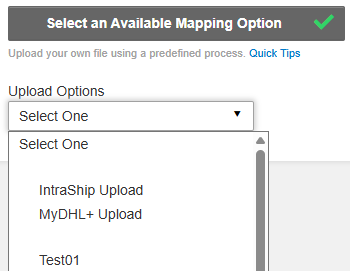
To import a CSV file, you will browse to Ship > Upload a Shipment File and then click on Select an Available Mapping Option.
You will then select from the Upload Options list (screenshot below).
If you select either MyDHL+ Upload or IntraShip Upload, please go to the MyDHL+ Upload section.
If you do NOT select MyDHL+ Upload or IntraShip Upload, continue to Custom Mapping Option.
Custom Mapping Option
EUDR
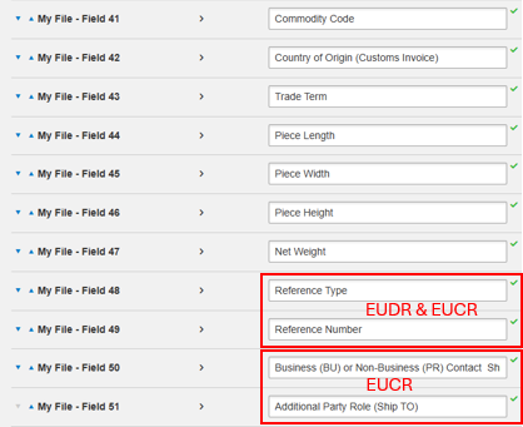
If you need to declare a Due Diligence Statement Reference Number (DDS) or EUDR TARIC Document Code (TARIC) for your shipment, you can add the following fields to your existing mapping and file. This may be applicable when shipping a Package shipment from the UK to an EU27 Country.
Field Name: Reference Type
The Reference Type should be empty or contain DDS or TAR.
If you need to declare both, they should be separated with a semi-colon. e.g. DDS;TAR
Field Name: Reference Number
The Reference Number should be empty or contain the Due Diligence Statement Reference Number (DDS) or EUDR TARIC Document Code (TARIC).
If you need to declare both, they should be separated with a semi-colon. e.g. 26GBABCDE12345;Y129
EUCR
If you would like to enter a Product ID (Merchant Product ID, Non-Standardised Manufacturer Product ID and / or Standardised Manufacturer Product ID), the following fields need to be added to your existing mapping and file.
Field Name: Business (BU) or Non-Business (PR) Contact Ship From
If you are shipping as a Business, this should be BU
If you are shipping as a Private Individual, this should be PR
Field Name: Additional Party Role (Ship TO)
If you are shipping to a Business, this should be BU
If you are shipping to a Private Individual, this should be PR
Field Name: Reference Type
ABW = Merchant Product ID
MF = Non-Standardised Manufacturer Product ID
SRV = Standardised Manufacturer Product ID
To declare 2 or more, they should be in the same field but separated with a semi-colon. e.g. ABW;MF
Leave the field empty if you do not need to declare any reference types.
Field Name: Reference Number
Enter the relevant Product ID(s) in this field.
If you need to declare 2 or more, they should be separated with a semi-colon. e.g. MerchantProdID;NonStdMfgProdID
Leave the field empty if the reference type field is empty because you do not need to declare any references.
How to Update Your Existing Mapping
To add the new fields, you need to update your existing mapping option.
Browse to Ship > Upload a Shipment File and select Create or Edit Mapping Options
Select your existing mapping option from the Create/Edit Mapping Options list.
The existing field names and order will be displayed.
Scroll to the bottom and click Add Field
Type the field name you are looking for and select it. Repeat until you have added the required fields.
Click Save
MyDHL+ Upload
EUDR
If you need to declare a Due Diligence Statement Reference Number (DDS) or EUDR TARIC Document Code (TARIC) for your shipment, you can add the following fields to your existing mapping and file. This may be applicable when shipping a Package shipment from the UK to an EU27 Country.
Section: INV_ITEM
Field Number: 12
Field Name: Reference Type
Use DDS if you need to enter a Due Diligence Statement Reference Number.
Use TAR if you need to enter an EUDR TARIC Document Code.
If you wish to declare both, enter both in the field separated by a semi-colon e.g. |DDS;TAR|
Field Number: 13
Field Name: Reference Number
For DDS, the Due Diligence Statement Reference Number should be entered.
For TAR, the EUDR TARIC Document Code should be entered.
If you wish to declare both, enter both in the field separated by a semi-colon e.g. |26GBGNWDC16349;Y129|
EUCR
If you would like to enter a Product ID (Merchant Product ID, Non-Standardised Manufacturer Product ID and / or Standardised Manufacturer Product ID), the following fields need to be added to your existing mapping and file.
Section: SHIP_FROM
Field Number: 28
Field Name: Role Business Party Type (Ship from)
Use BU if shipping for a Business
Use PR if shipping as a Private Individual
Section: SHIP_TO
Field Number: 30
Field Name: Role Business Party Type (Ship to)
Use BU if shipping to a Business
Use PR if shipping to a Private Individual (Consumer)
Section: INV_ITEM
Field Number: 12
Field Name: Reference Type
ABW = Merchant Product ID
MF = Non-Standardised Manufacturer Product ID
SRV = Standardised Manufacturer Product ID
When the customer wishes to declare 2 or more, they should enter both in the field separated by a semi-colon e.g. |ABW;MF|
Field Number: 13
Field Name: Reference Number
For ABW, the Merchant Product ID should be entered.
For MF, the Non-Standardised Manufacturer Product ID should be entered.
For SRV, the Standardised Manufacturer Product ID should be entered
If you wish to declare 2 or more, they should entererd in the same field separated by a semi-colon e.g. e.g. |Merchant Product ID;Non-Standardised Manufacturer Product ID|


 Share
Share
Similar Stories