When shipping internationally with DHL Express, you have multiple options to transfer your shipment to us
If you prefer to drop off your shipment at a DHL Express service point after booking it online, follow this guide.
It covers everything from creating the shipment to preparing the required drop-off documents in a simple but detailed way.
- Origin and Destination Information Entry
- Shipment Details Input
- Customs Invoice Creation
- Packaging Details Entry
- Delivery Date/Time and Services Selection
- GoGreen+ and Signature Service Add On
- Customs Document Submission
- Shipment Drop-off Arrangement
- Shipment Cost Review and Payment
- Shipment Confirmation and Drop-Off Details
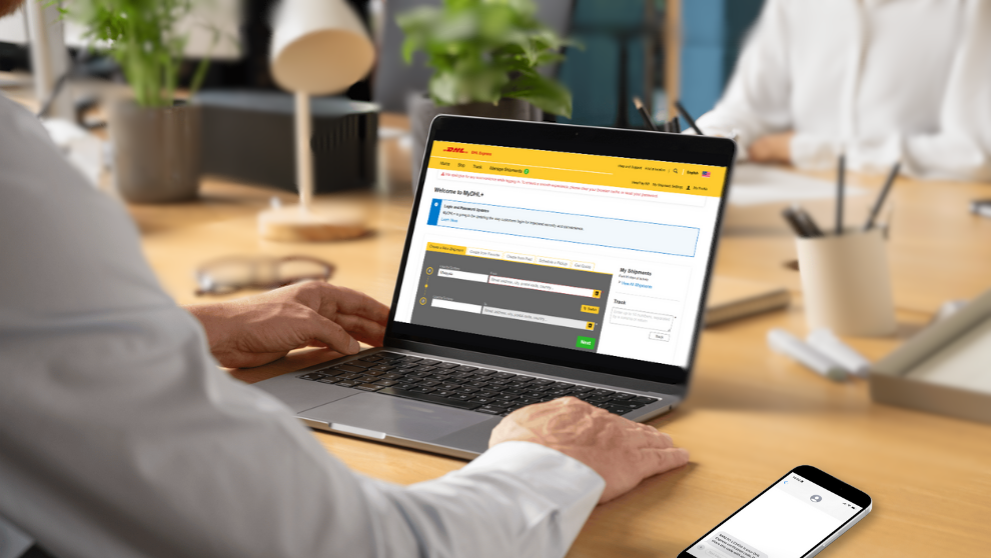
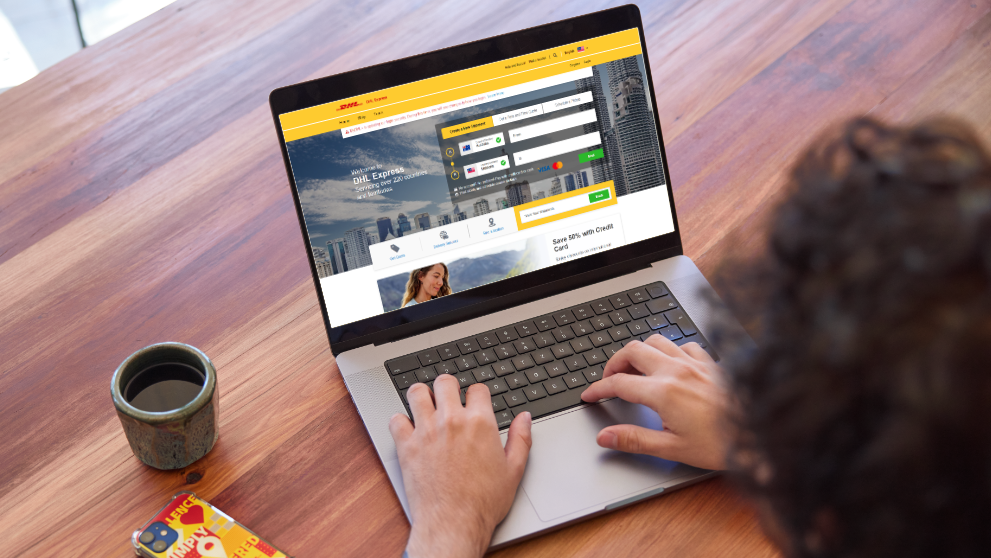
First, visit MyDHL+ and select the country of residence.
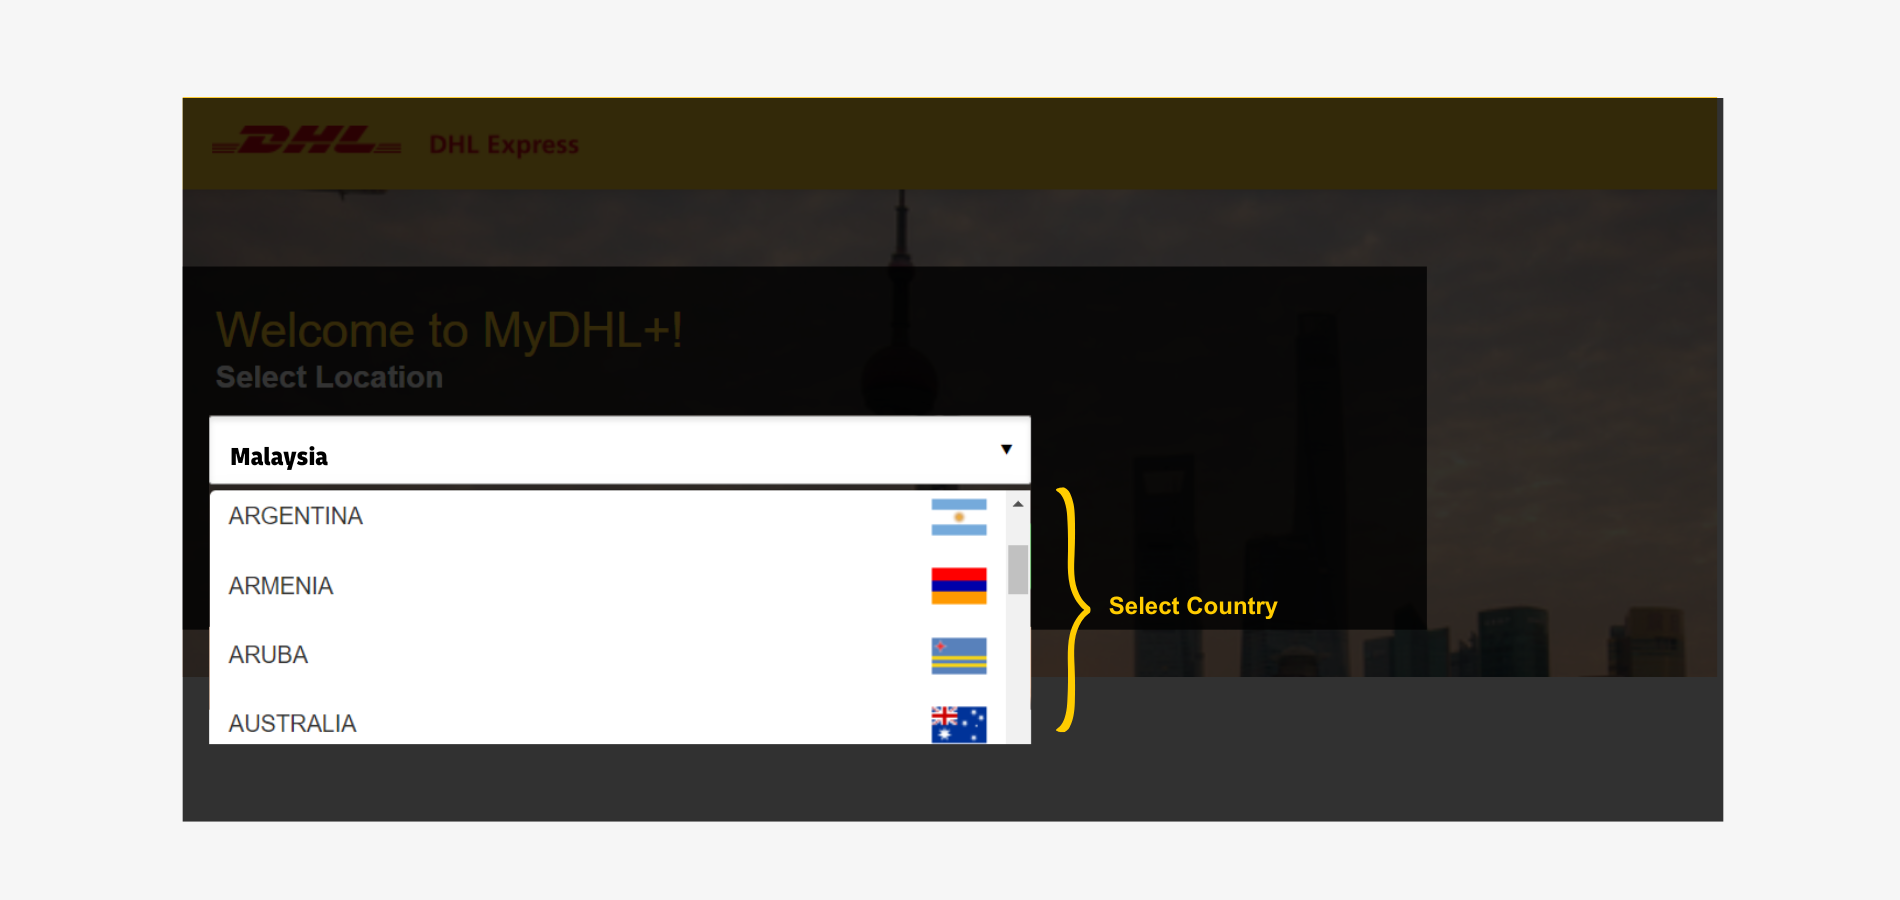
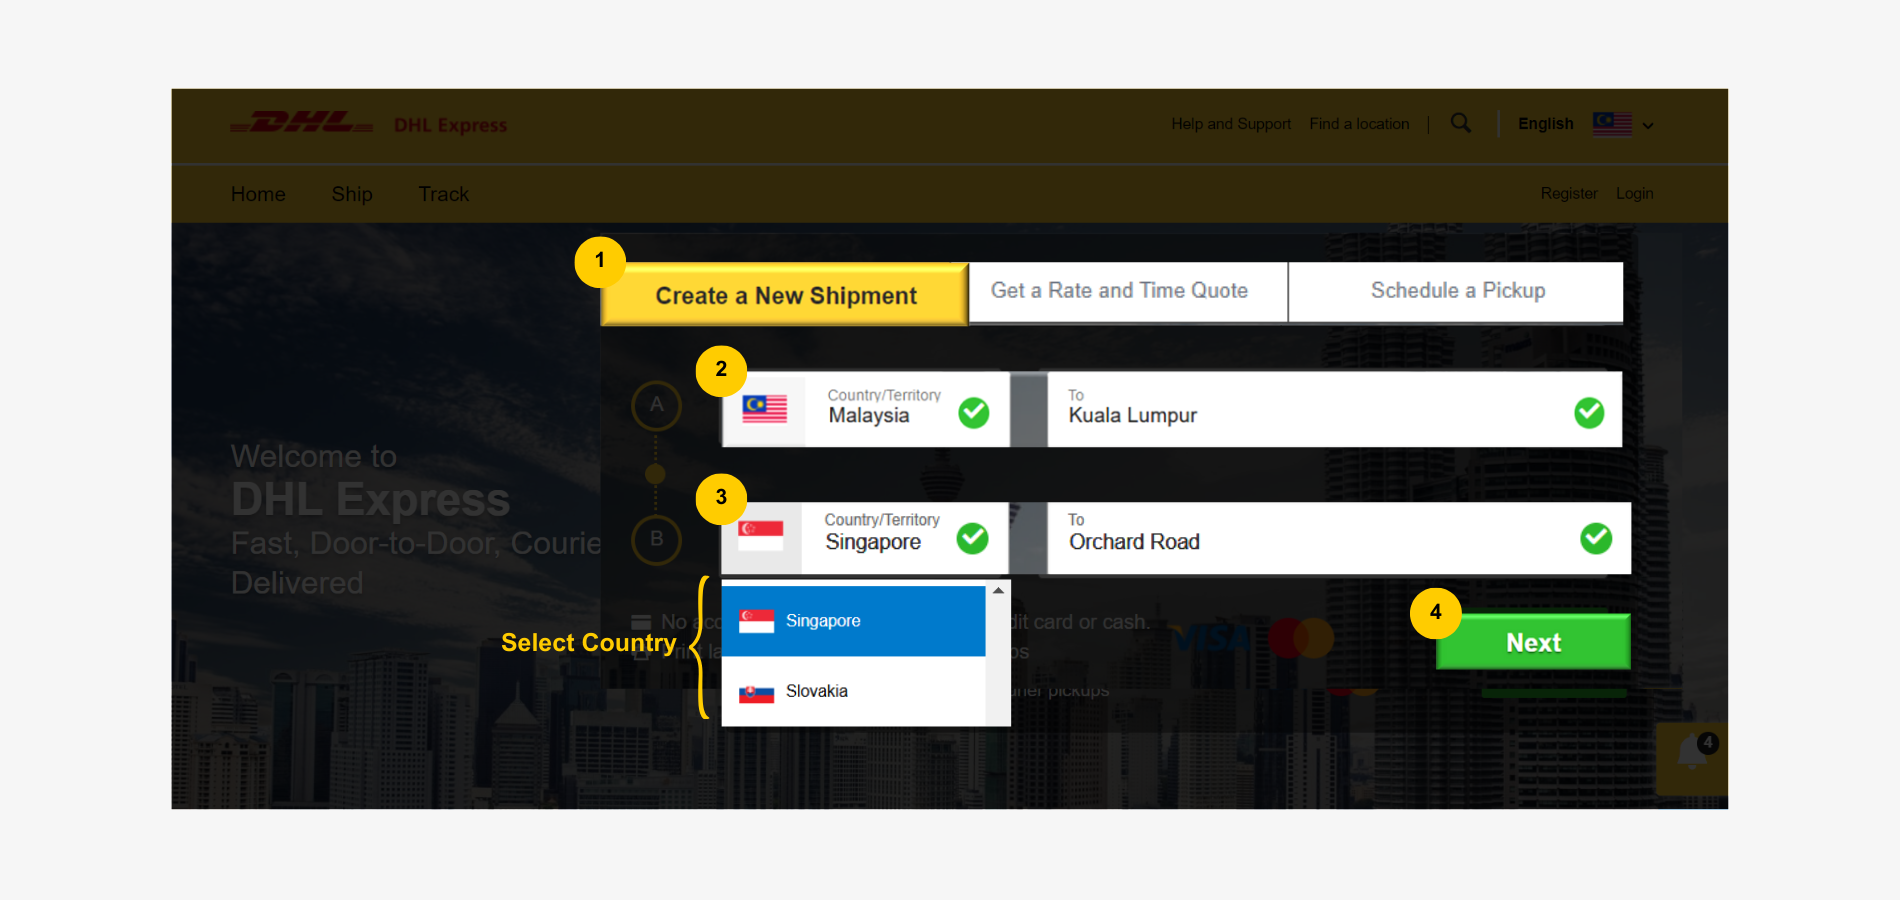
Step 1: Origin and Destination Country Entry
- Click 'Create a New Shipment'.
- Select the 'Country of Export' (e.g Malaysia) and enter the 'State'.
- Select the destination country (e.g Singapore) and enter the 'State', 'Street', or 'Postcode'.
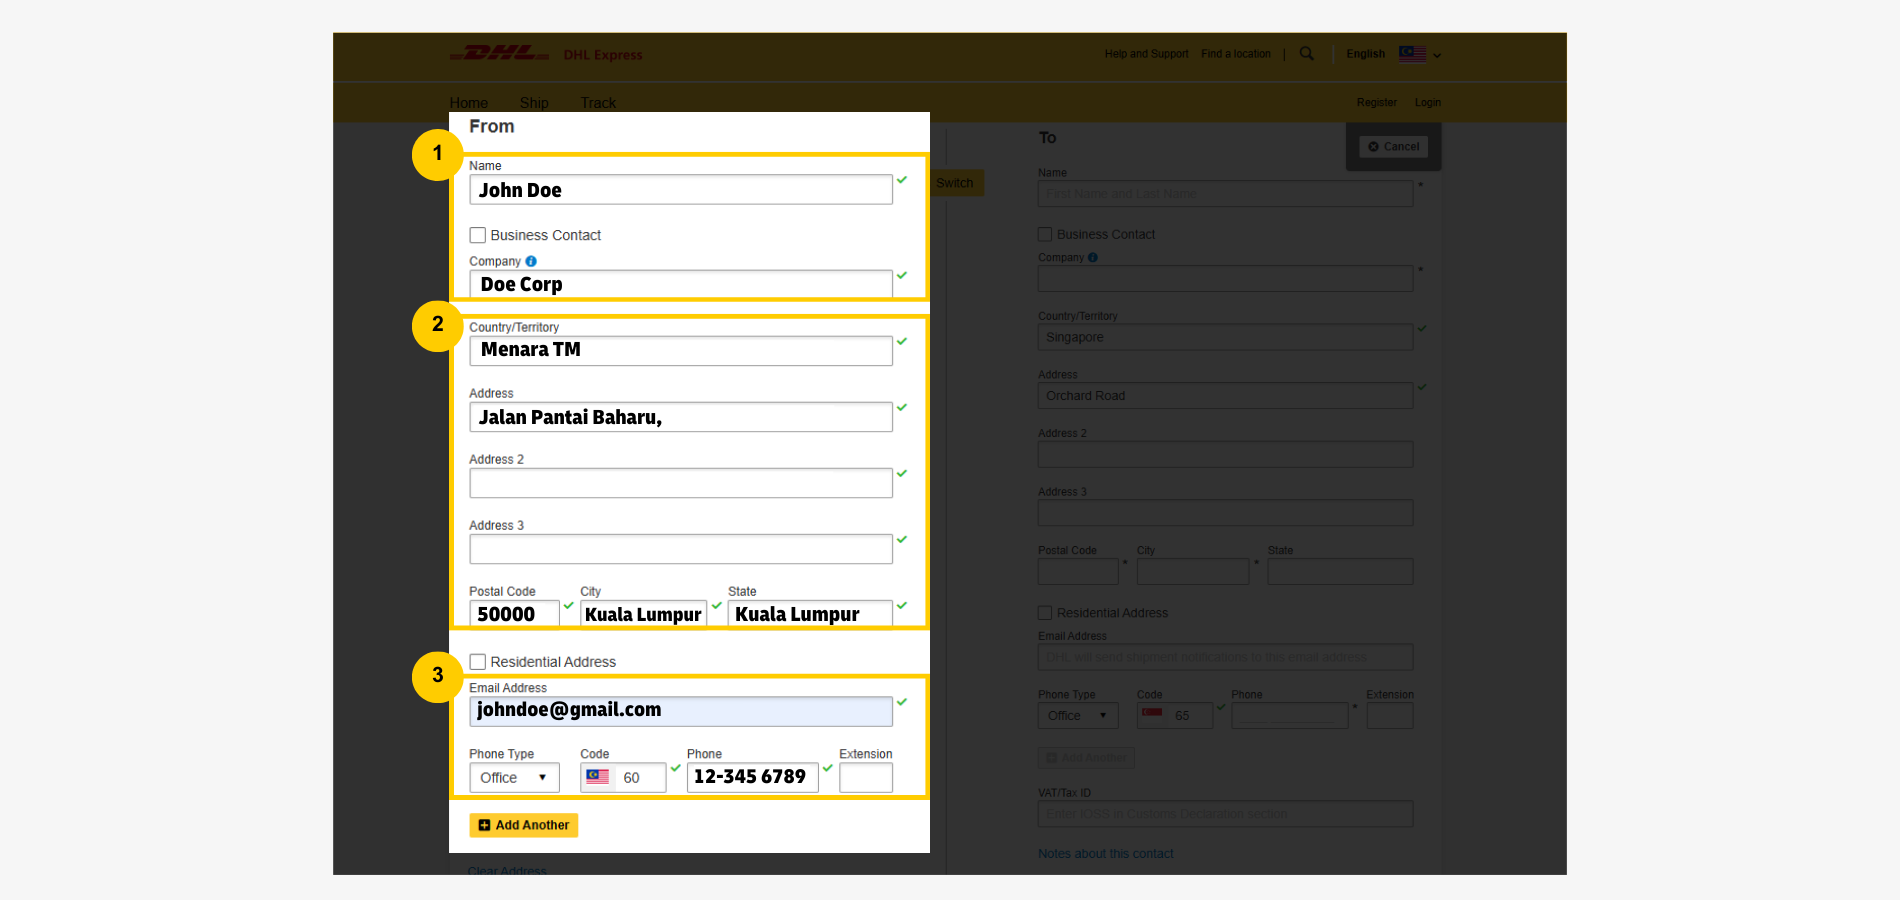
Enter Sender's Address and Contact Information
- Fill in sender's 'Name' and 'Company'.
- Enter sender's 'Address'.
- Enter sender's 'Email Address' and 'Phone Number'.
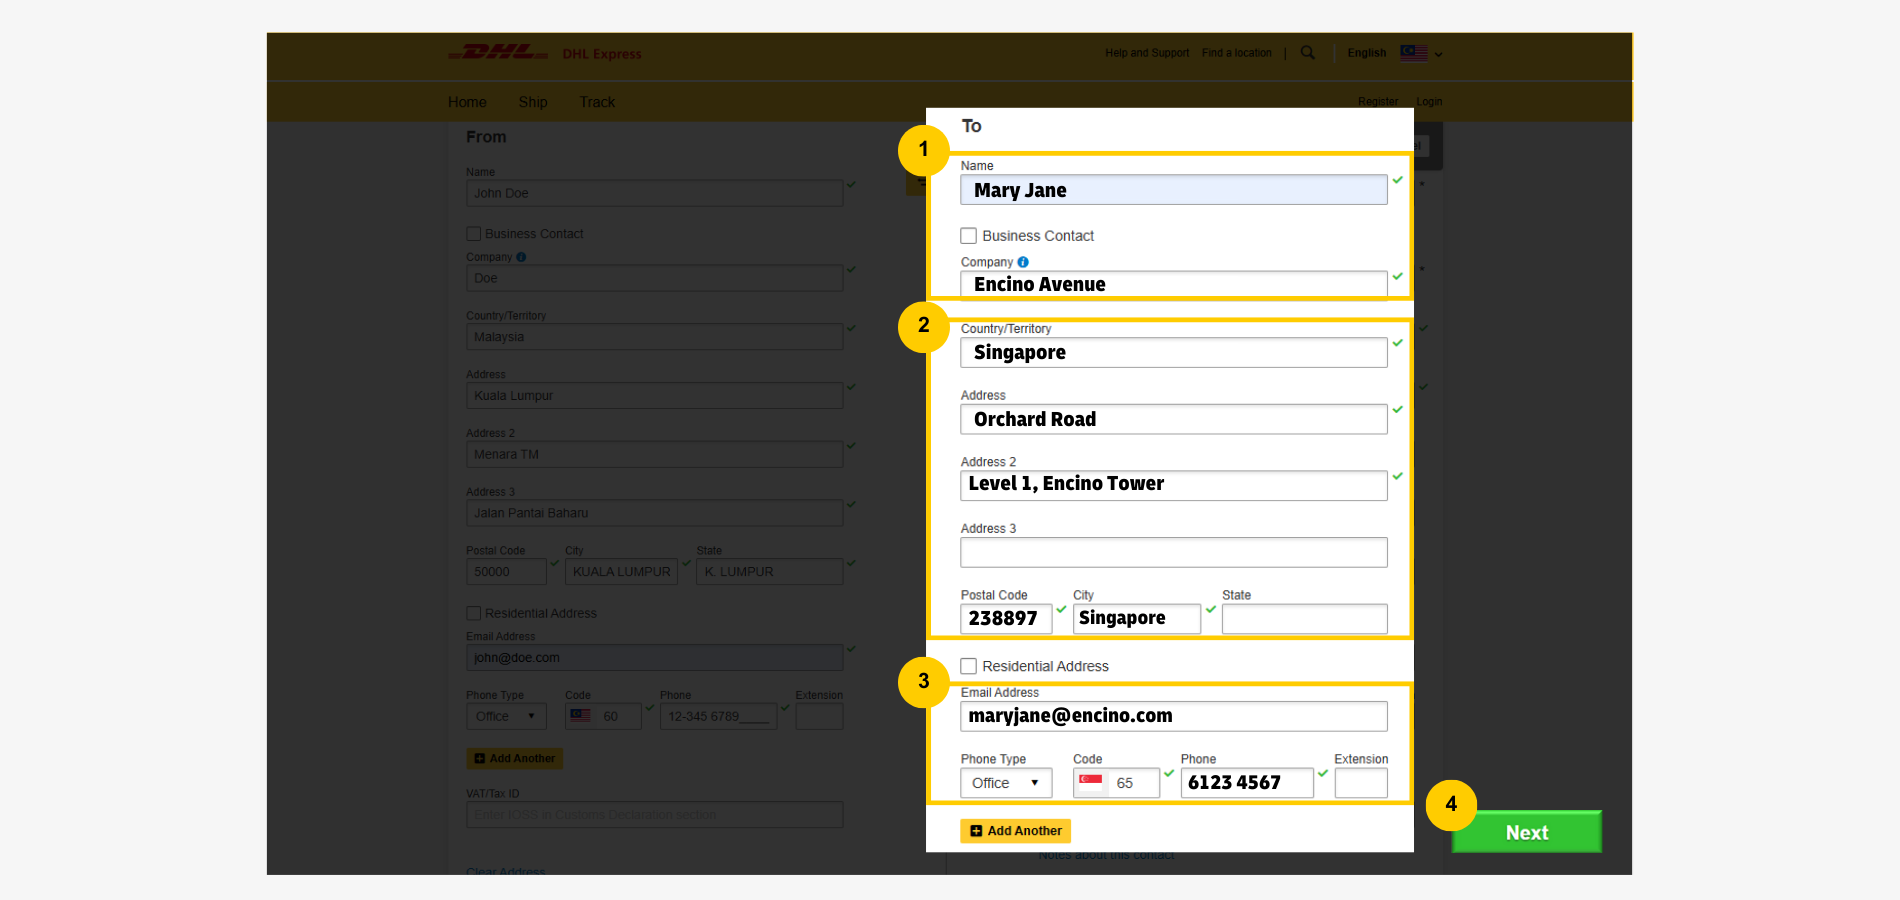
Enter Receiver's Address and Contact Information
- Fill in receiver's 'Name' and 'Company'.
- Enter receiver's 'Address'.
- Enter receiver's 'Email Address' and 'Phone Number'.
- Click 'Next' to proceed.
Step 2: Shipment Details Entry
There are 2 shipment types for selection - documents and packages.
Option 1: Documents Shipment
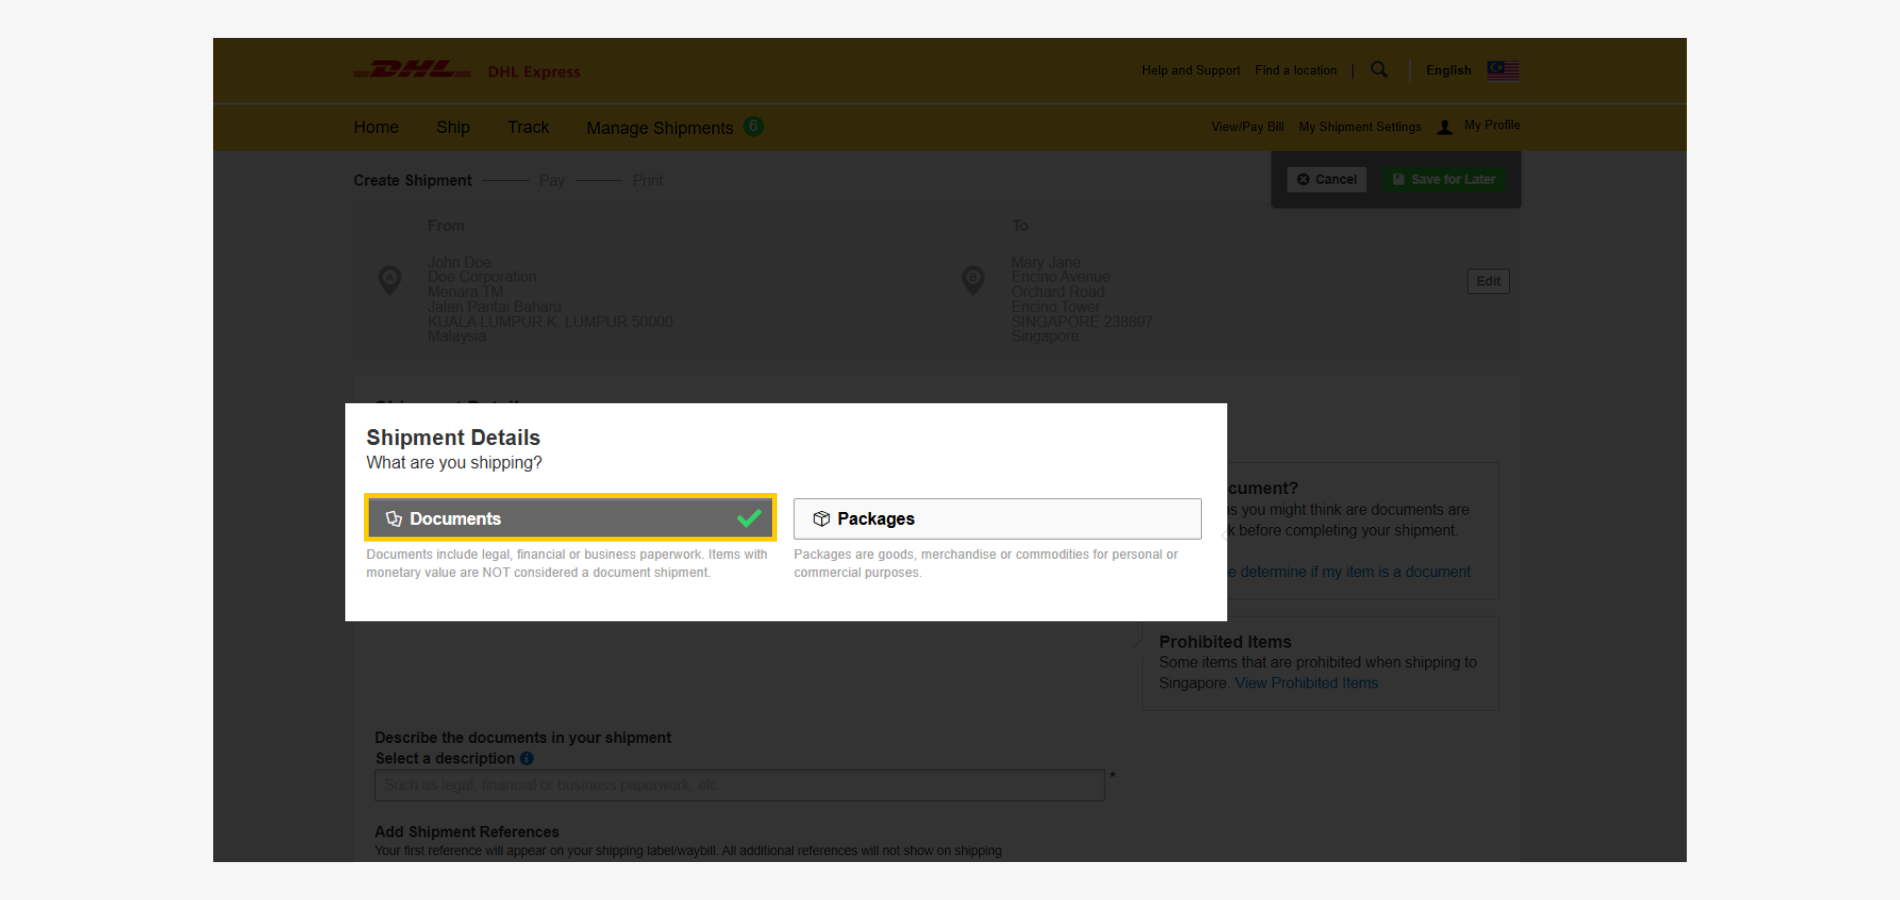
Select 'Documents' if the shipment contains only paperwork.
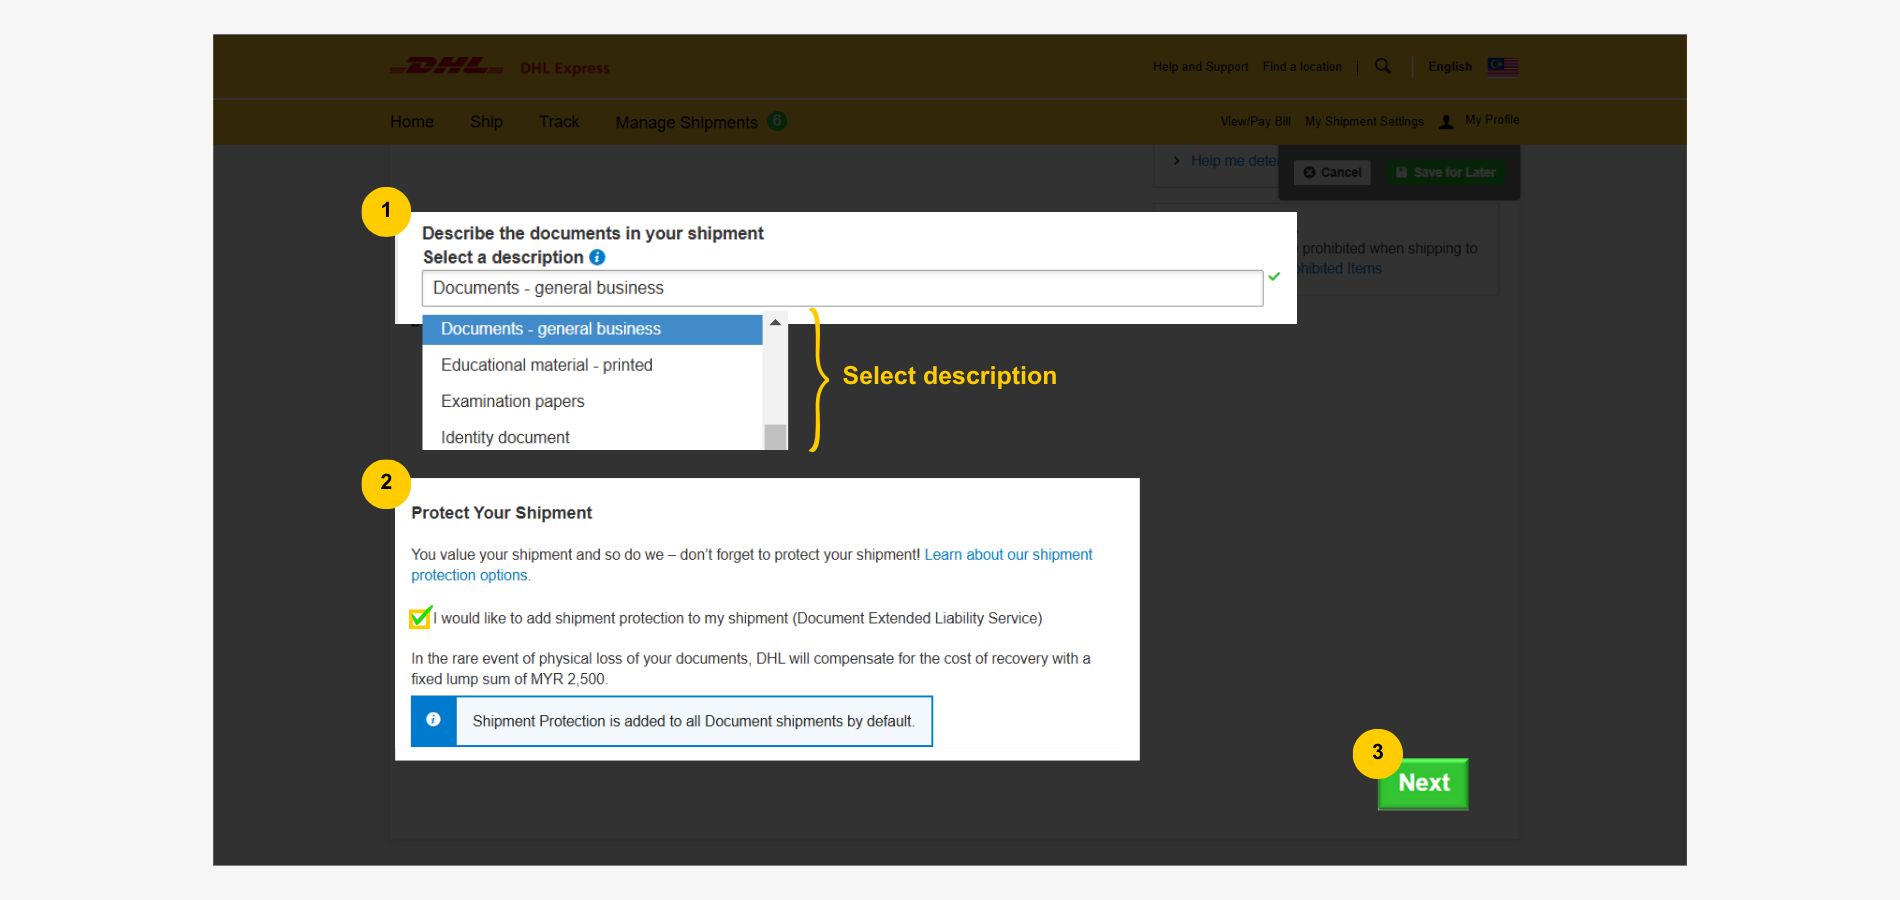
- Select a description that matches the document type.
- To insure the shipment, tick the 'Shipment Protection' box. (Optional)
- Click 'Next' to proceed.
Shipment details entry for document shipment is done. Advance to step 4 - packaging details entry.
Option 2: Packages Shipment
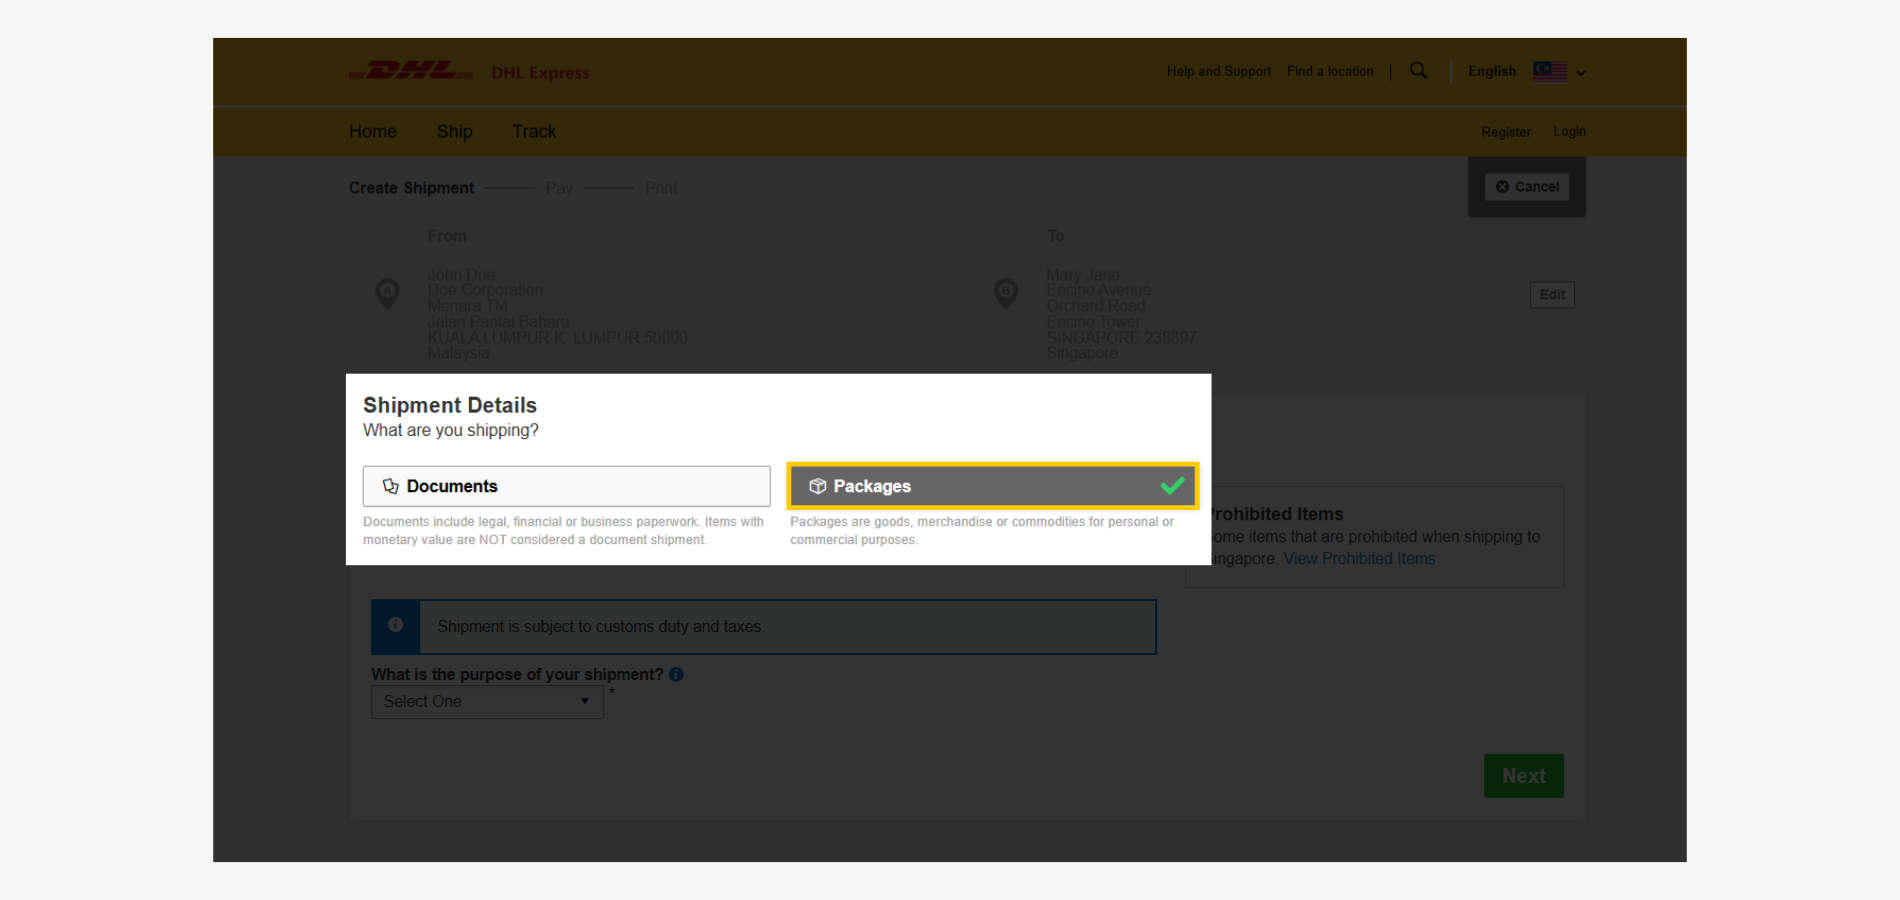
For shipment that is a product or goods, select 'Packages'.
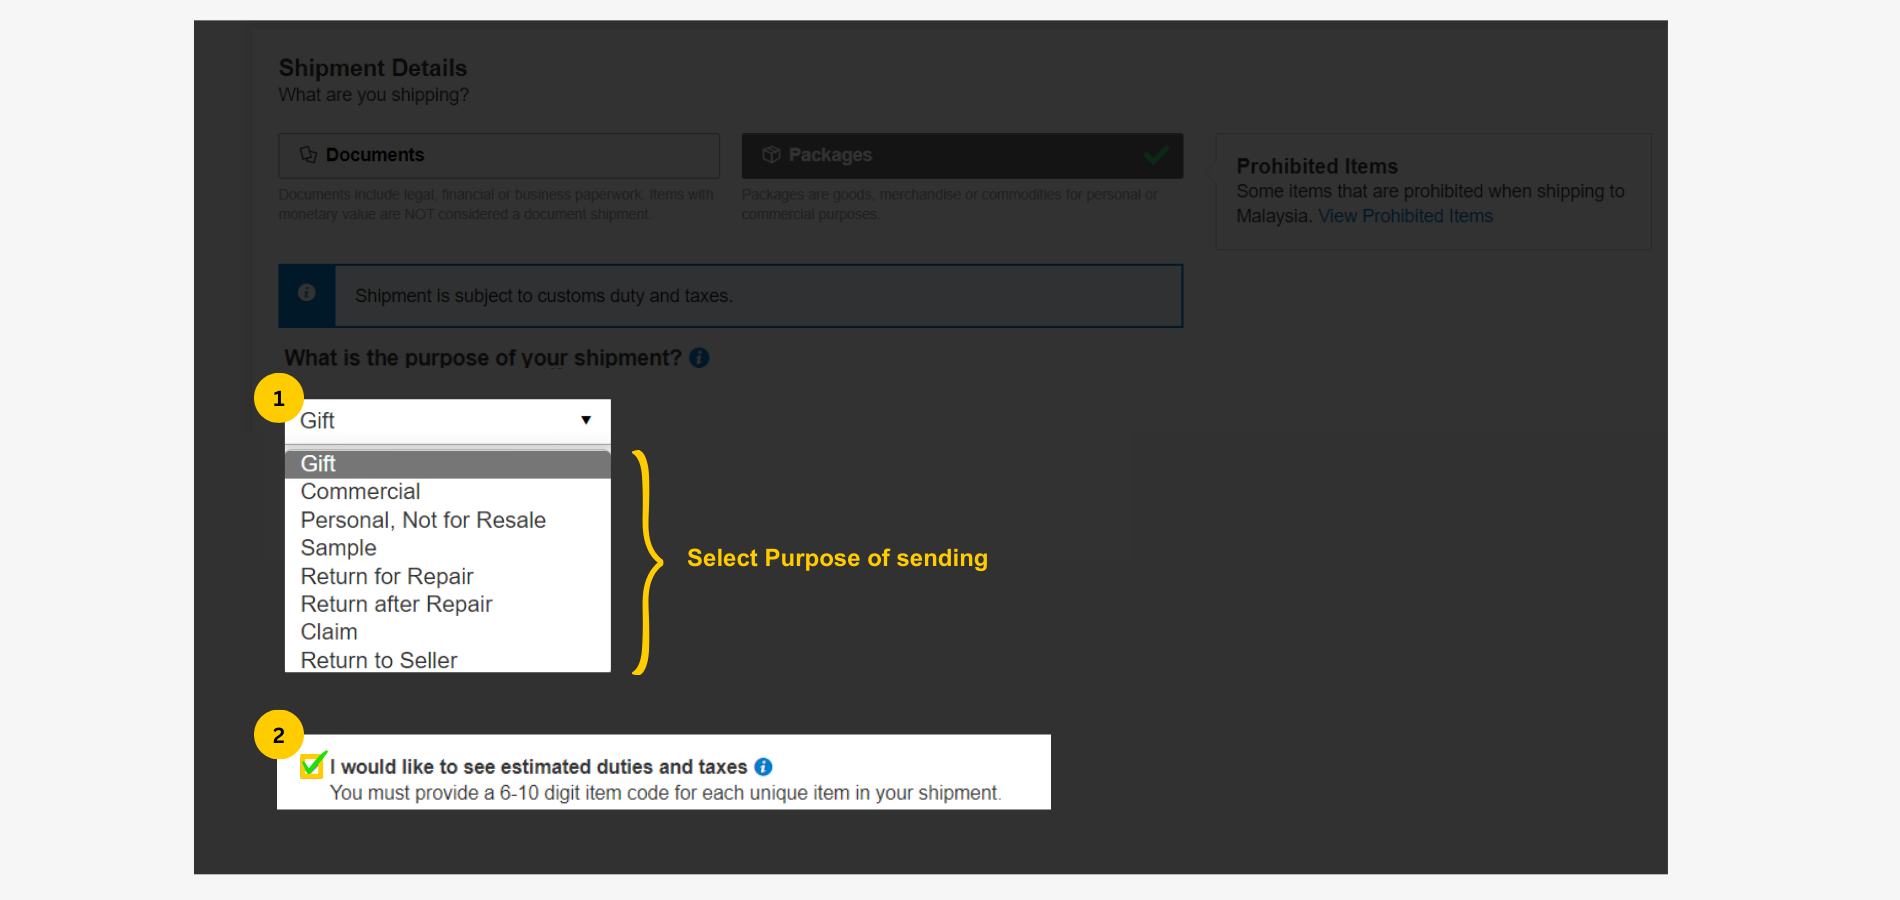
- Select a purpose that matches the shipment's intention.
- To get an estimation of duties and taxes at the end of shipment creation, tick the box of 'I'd like to see estimated duties and taxes'. (Optional)
Describe Shipment Item
There are two options available - use prompts or write a description manually.
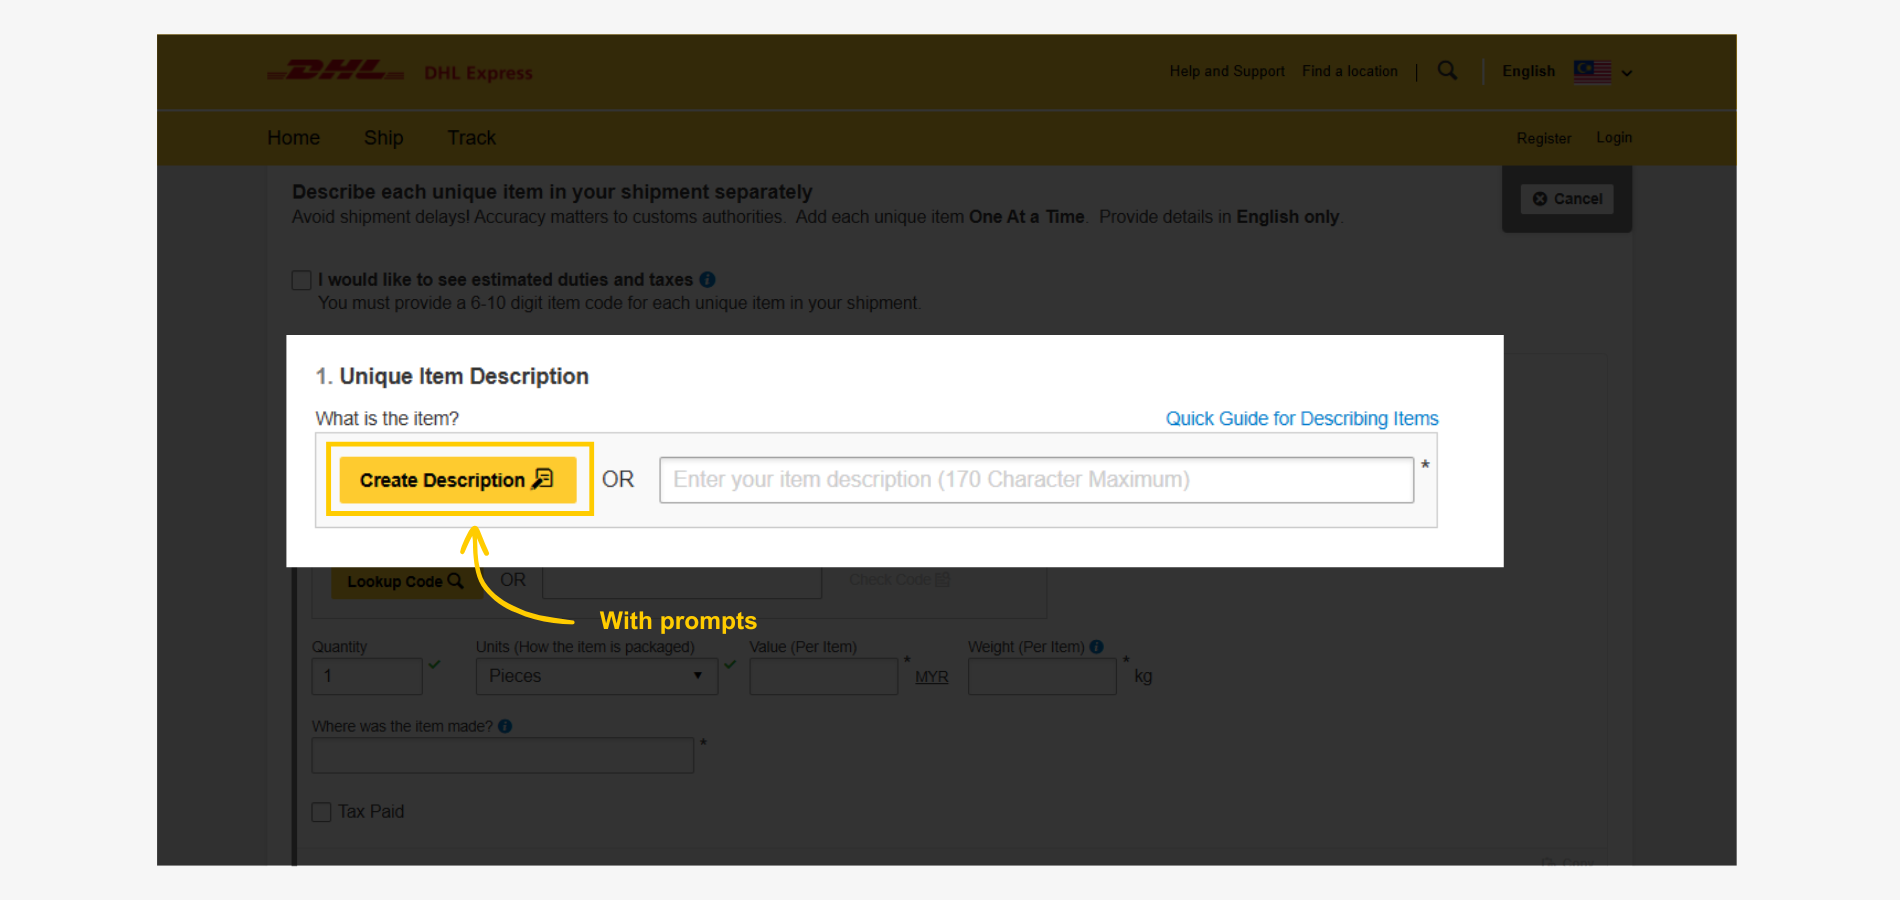
Option 1: Describe Item with Prompts
Click on the yellow button - Create Description.
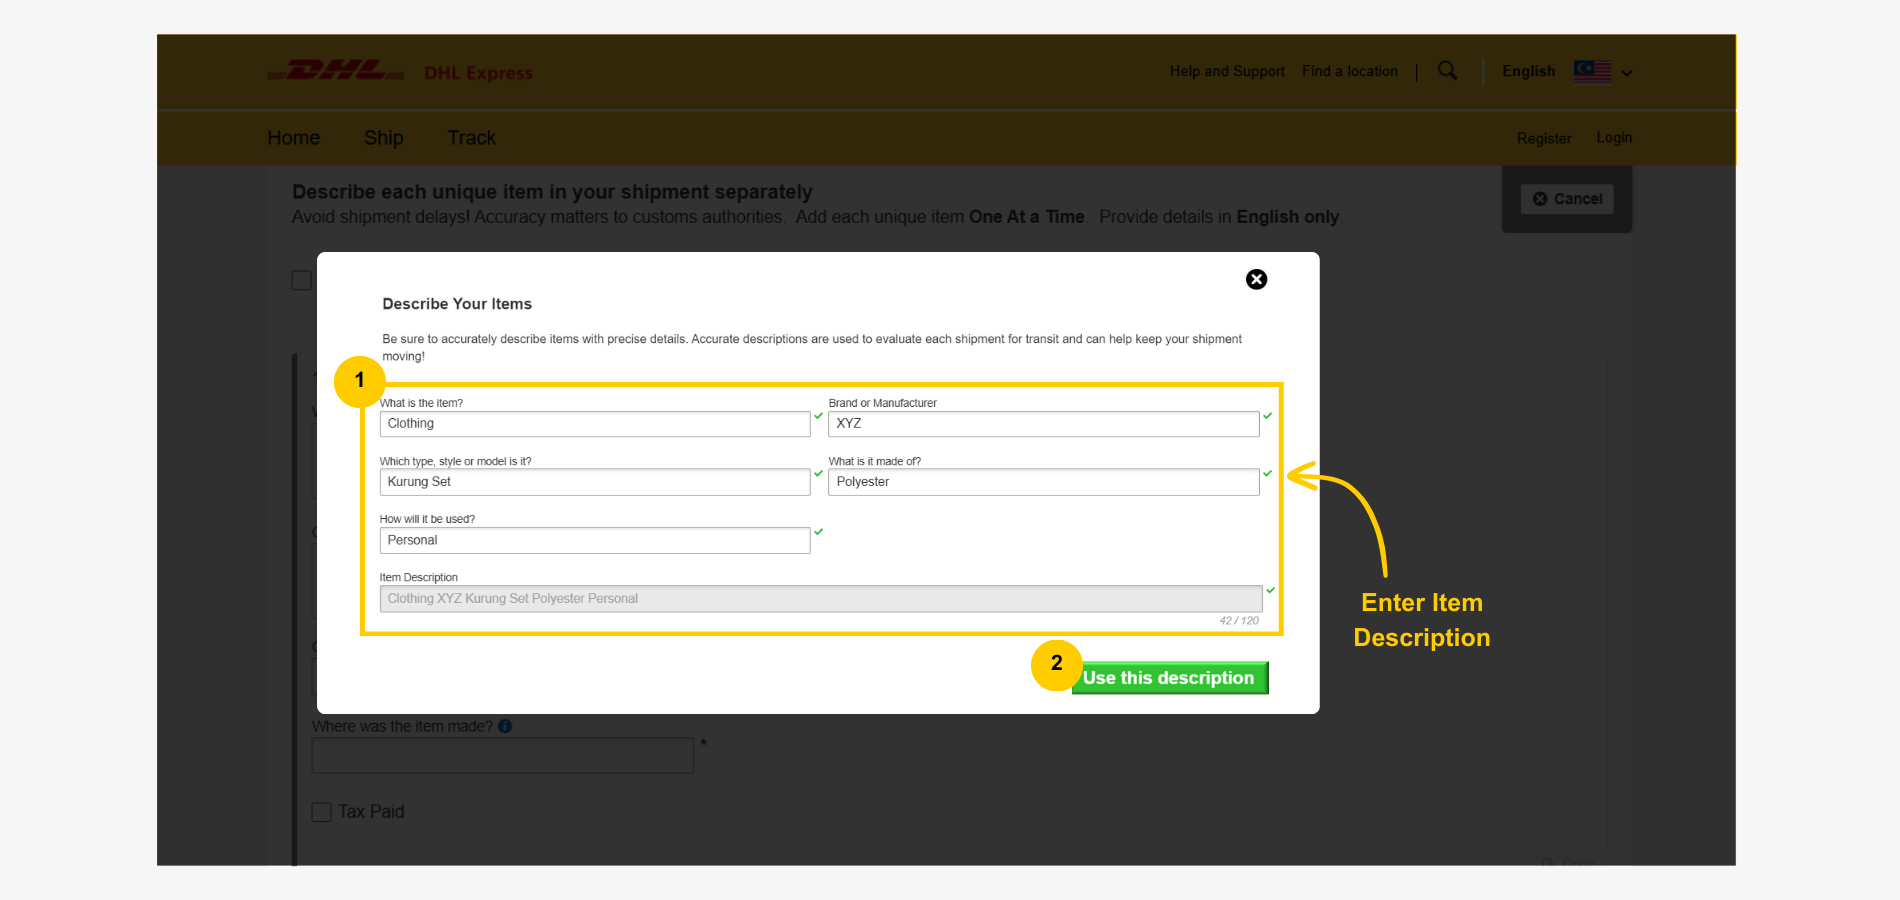
- Enter short and clear answers for all questions.
- Click 'Use this description' to proceed.
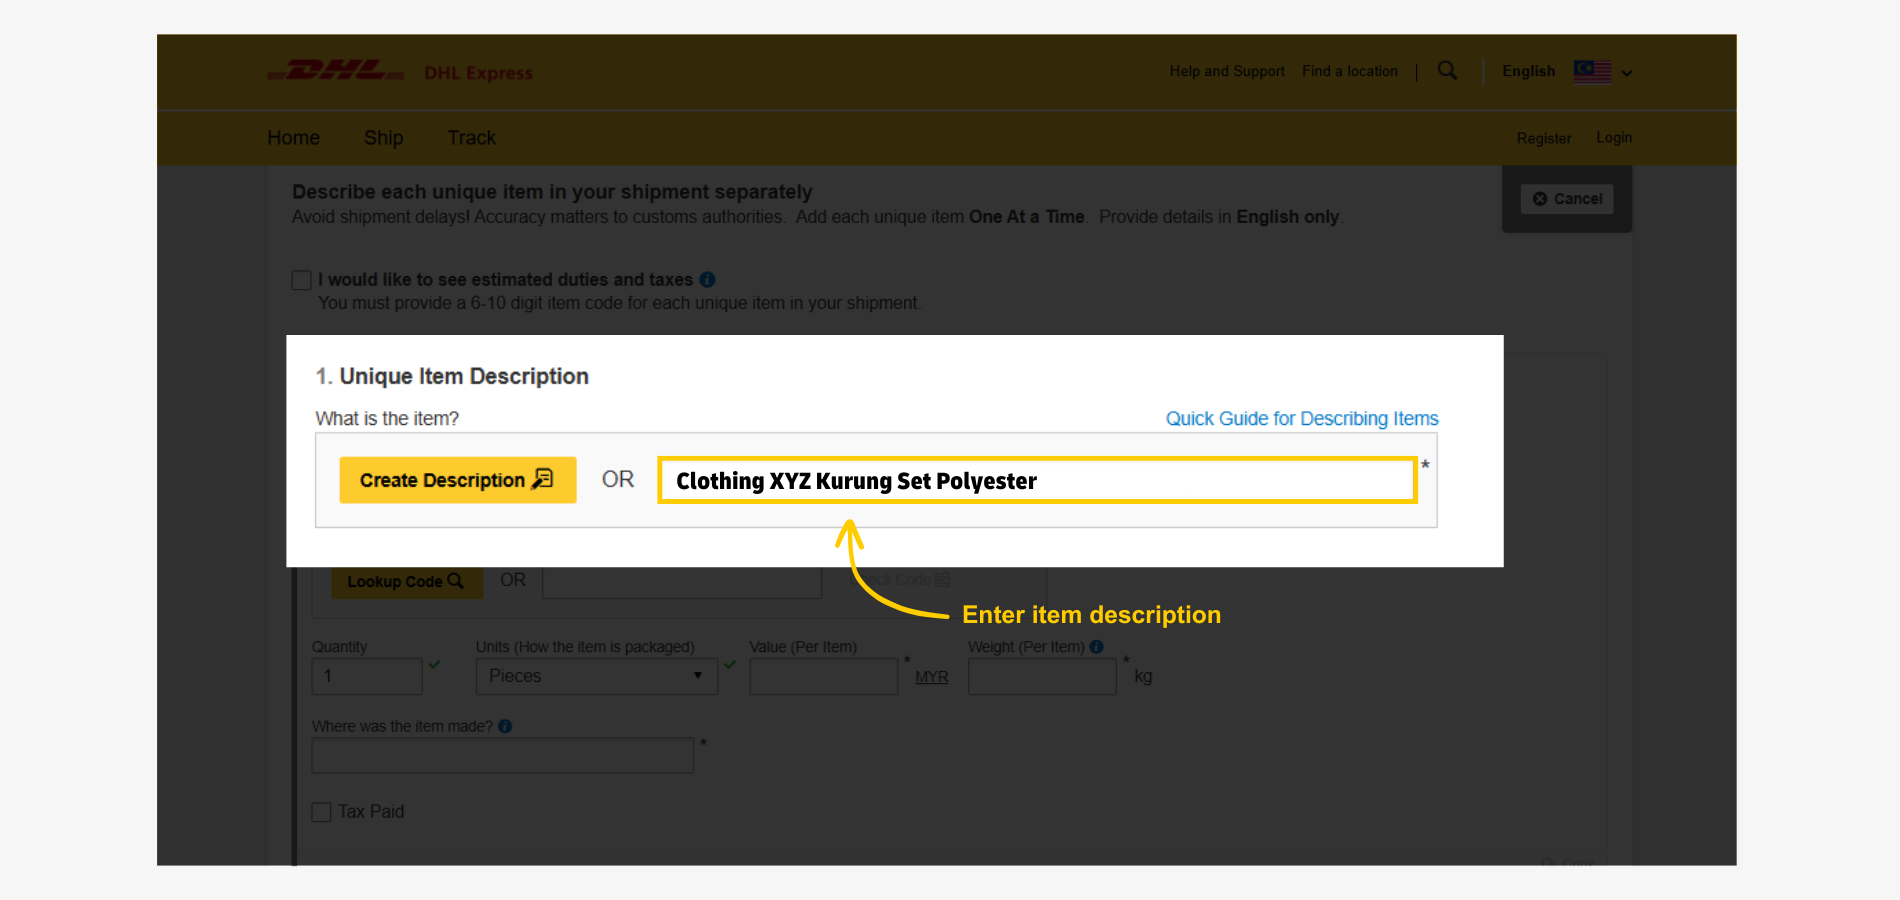
Option 2: Describe Item Manually
Enter a clear and precise description of the shipping item.
Enter Item's Commodity Code
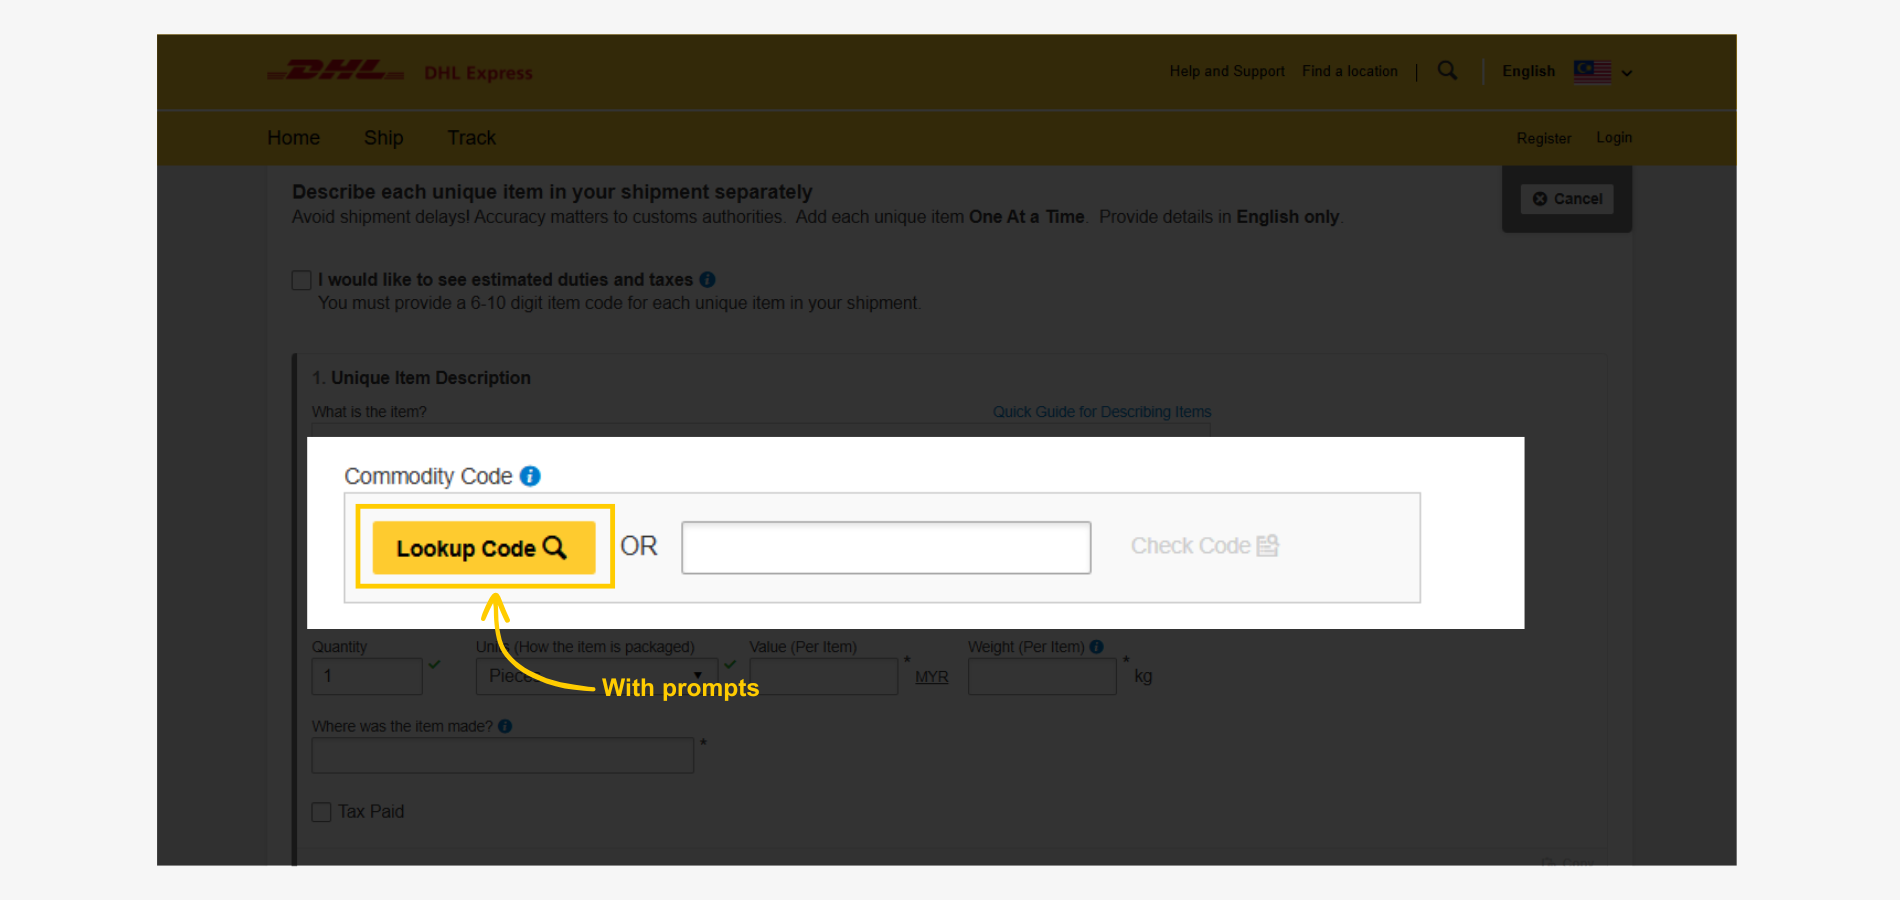
Search via 'Lookup Code' or enter the commodity code manually.
Option 1: Lookup Code
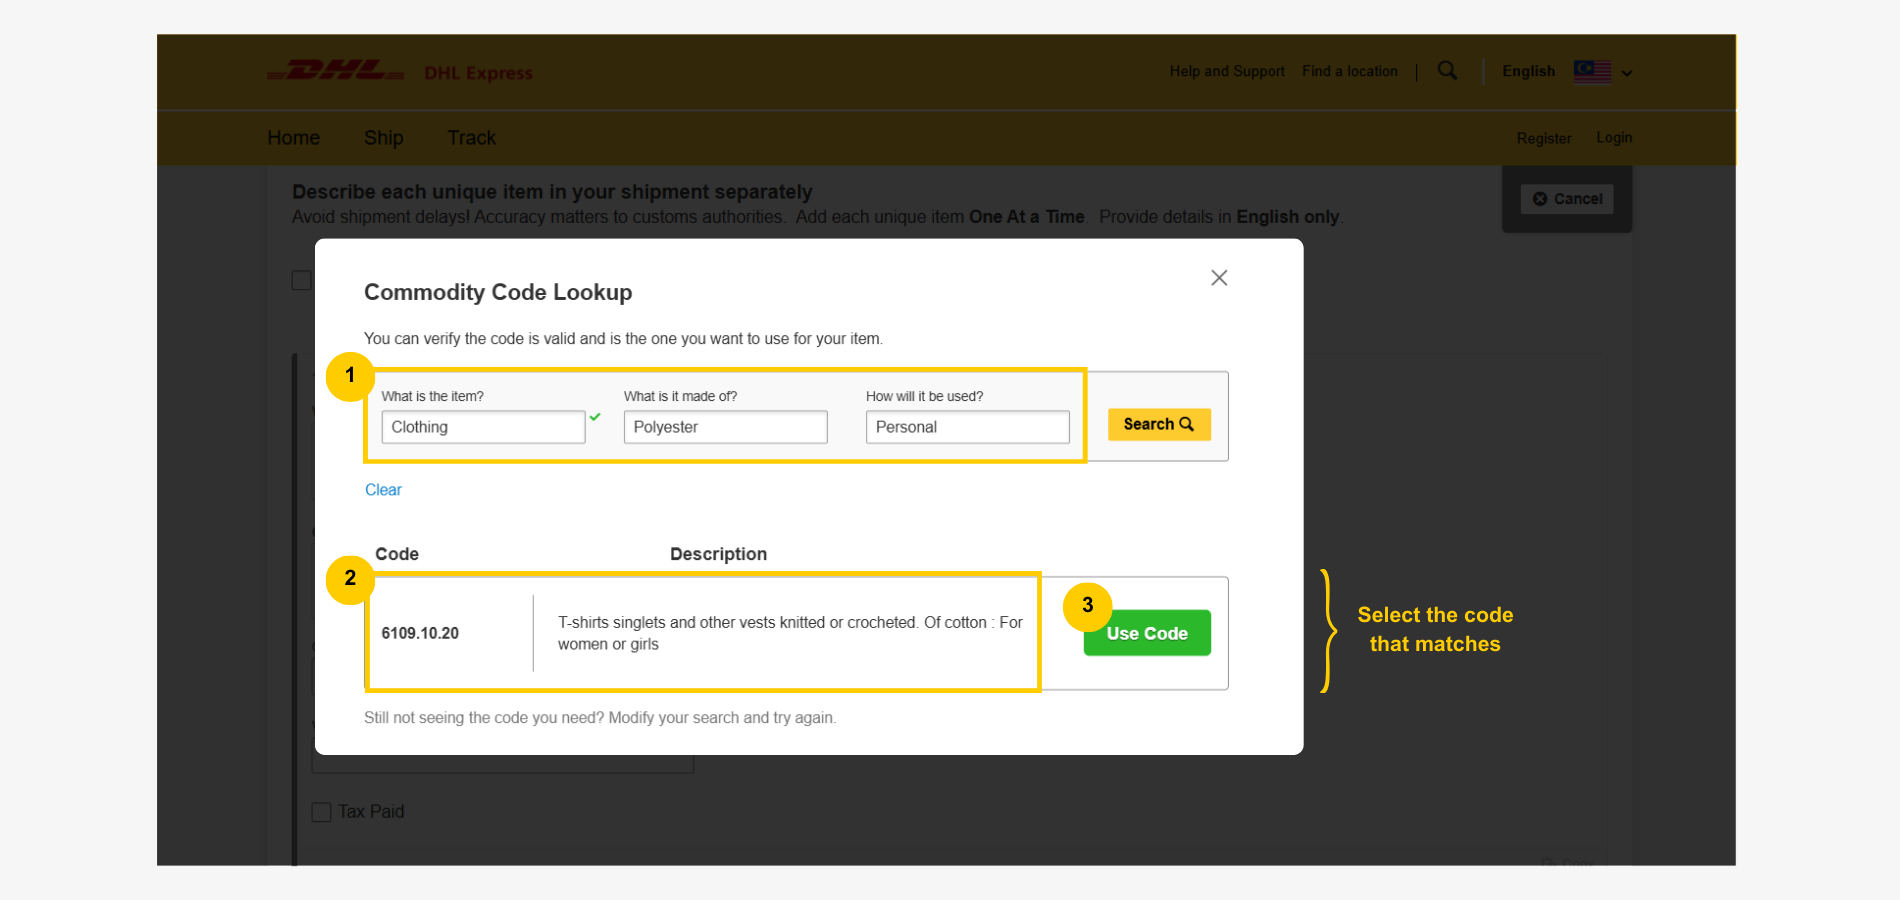
Click the yellow button, 'Lookup Code' to begin the search.
- Fill in the information as per the question prompts then click 'search'.
- Review the displayed results and click 'use code' on the selection that matches the shipment item.
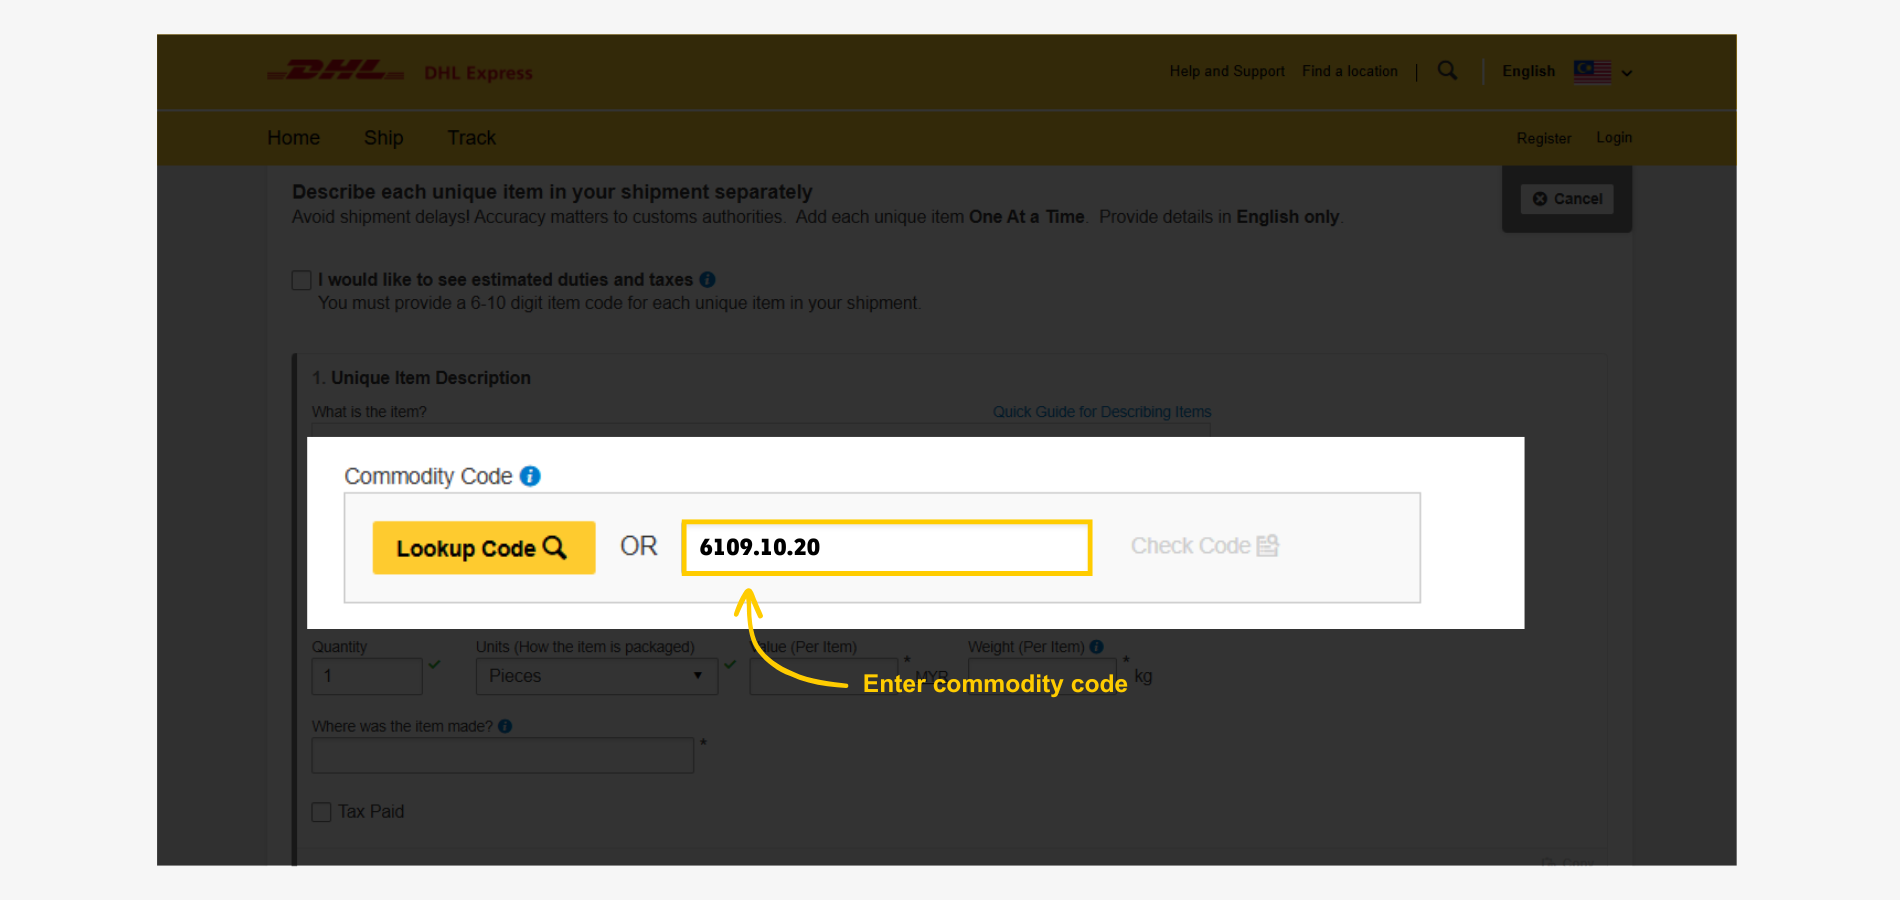
Option 2: Manual Input
Enter an accurate 6 to 10 digits commodity code of the shipping item.
Provide Shipment Content Details
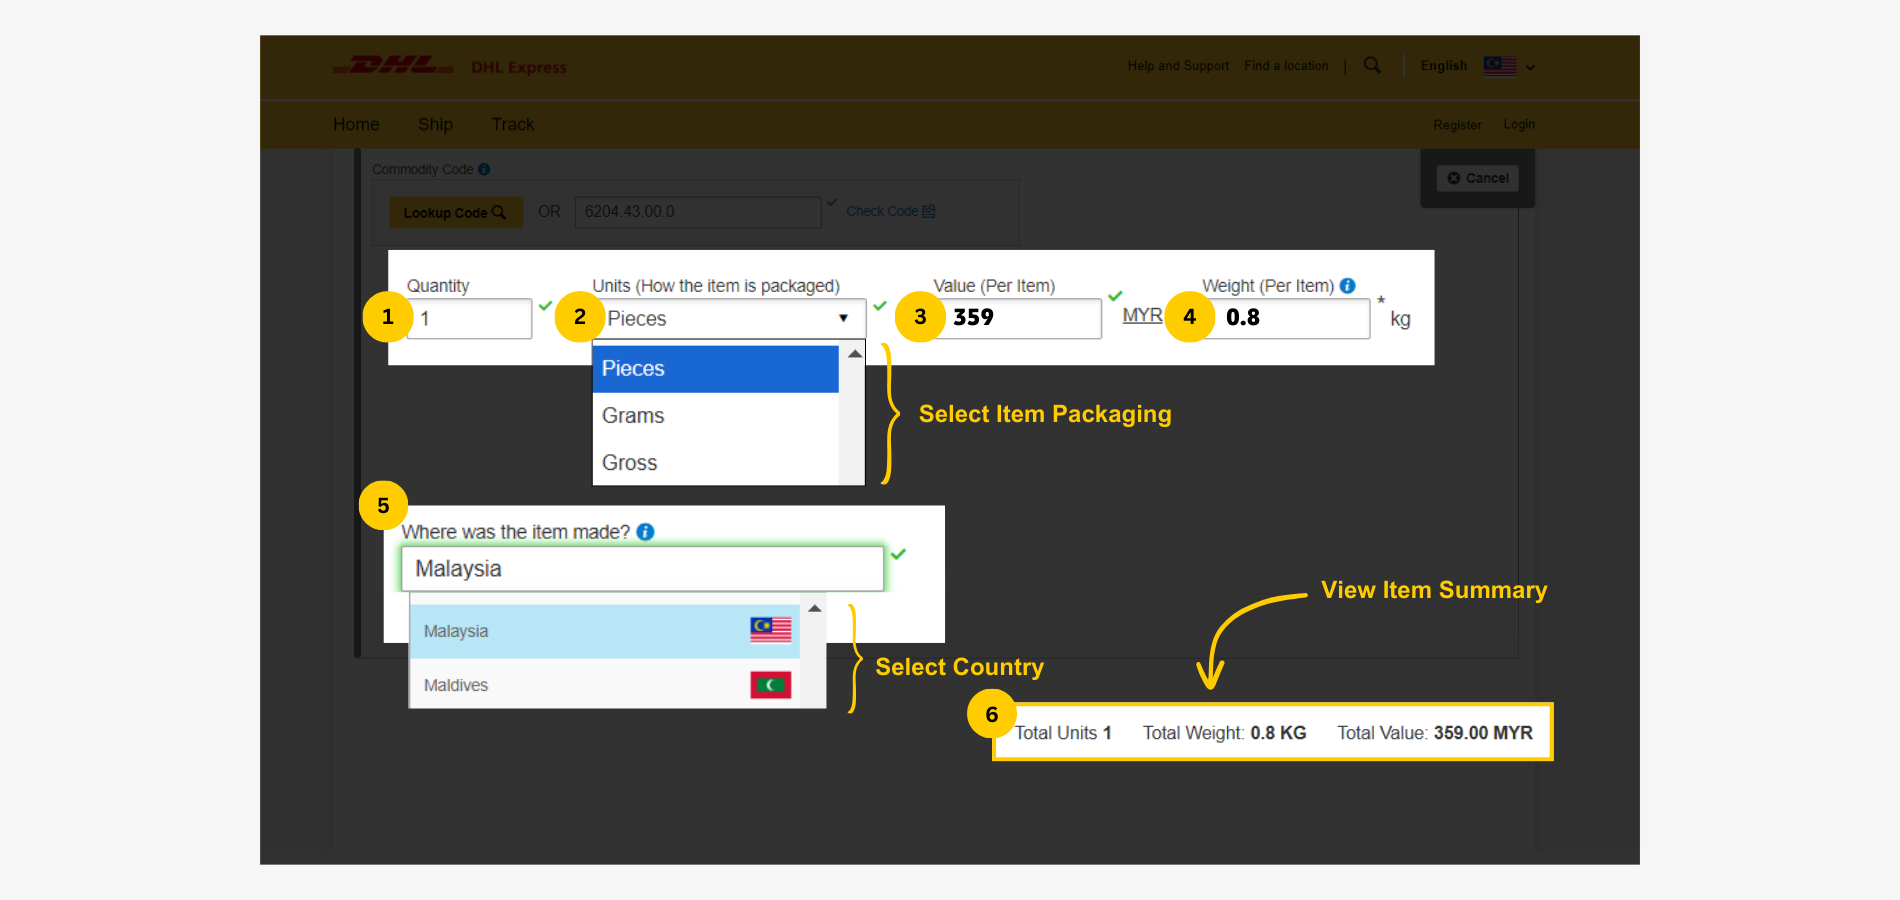
- Enter item quantity
- Select 'unit type' that matches.
- Enter the value of the item.
- Enter the weight of the item in KG.
- Select the country the item was made of.
- Review the entered shipment details summary.
Provide Pre-Calculated Tax (optional)
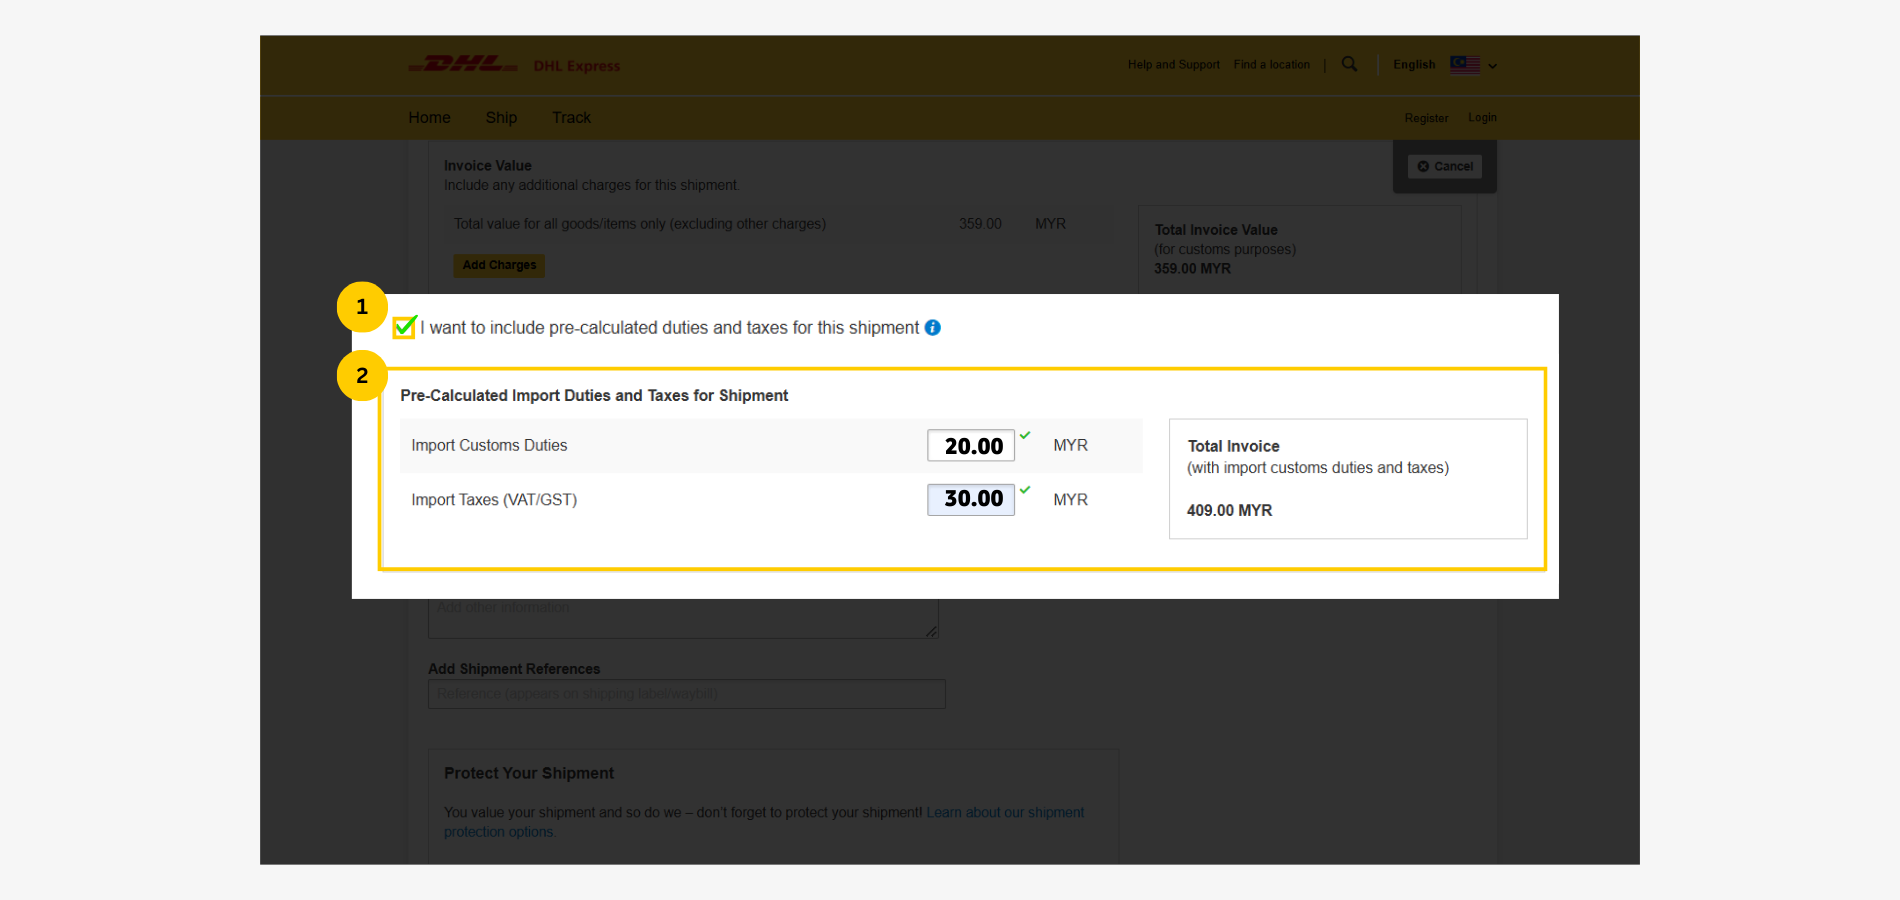
- Tick the box to include pre-calculated duties and taxes.
- Enter pre-calculated import customs details.
- Enter pre-calculated import taxes (VAT or GST).
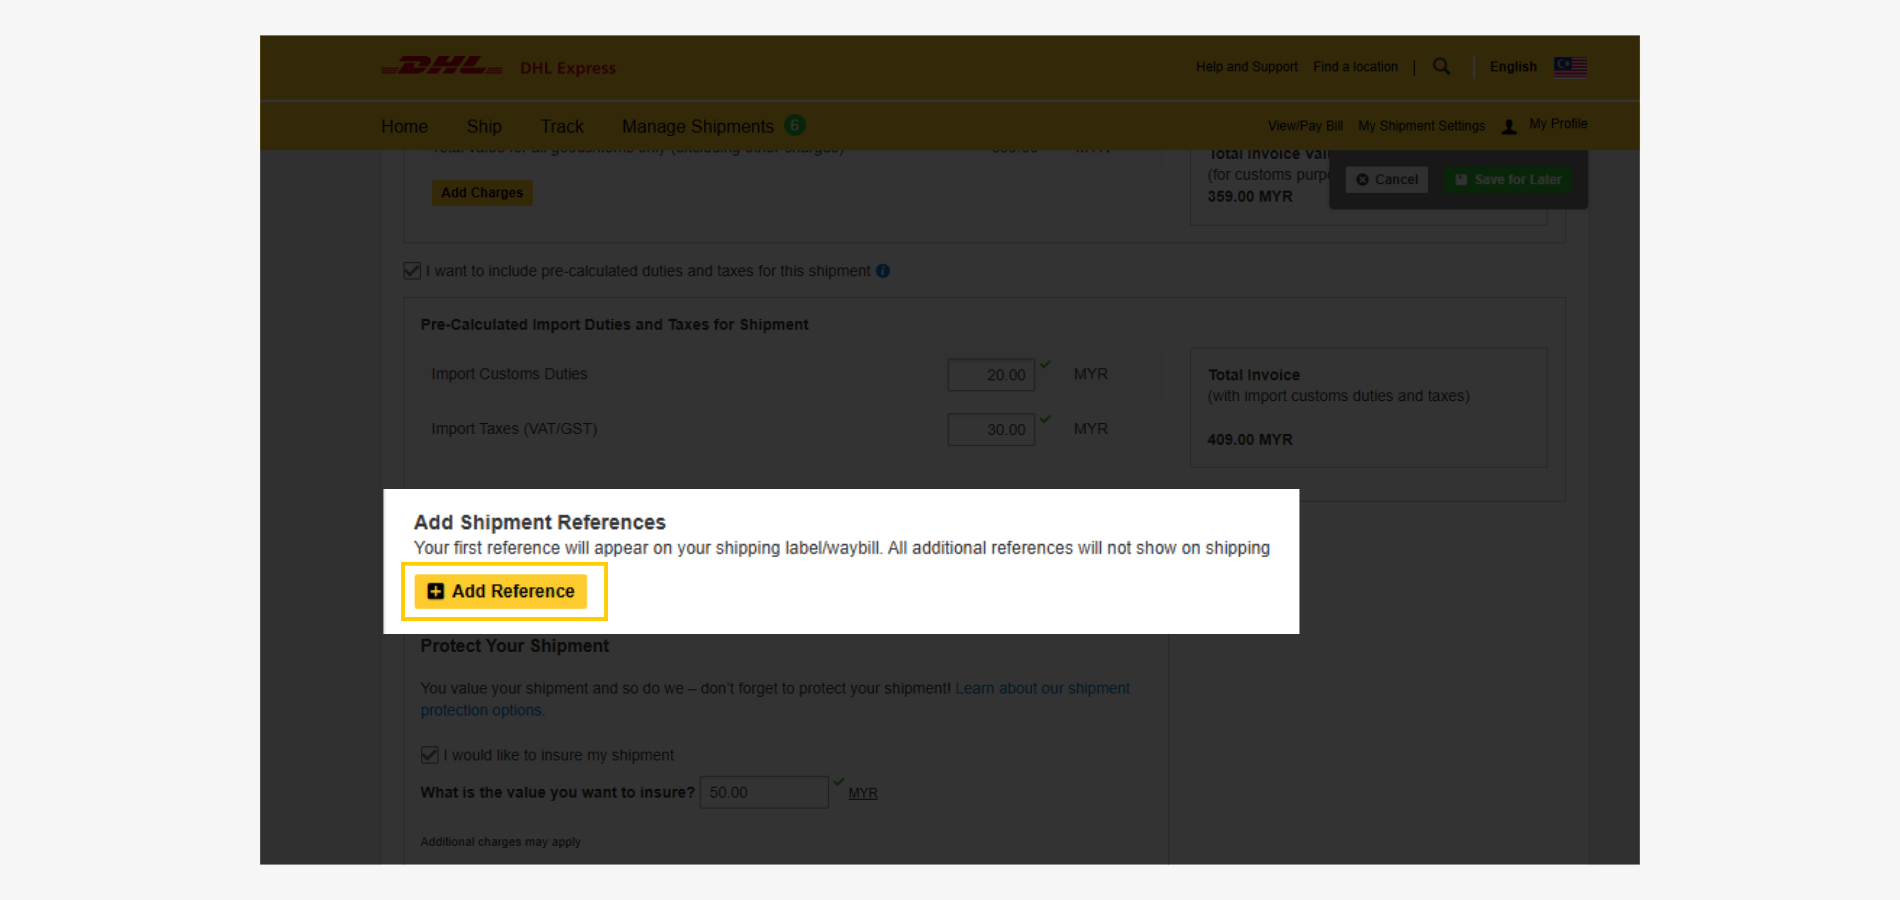
Add Additional Reference (optional)
- Click 'Add Reference'
- Enter shipment reference. (e.g Navy Kurung Set)
Multiple references can be added for the shipment, however, only the first one will be included on the label/waybill.
Insure Package Shipment (optional)
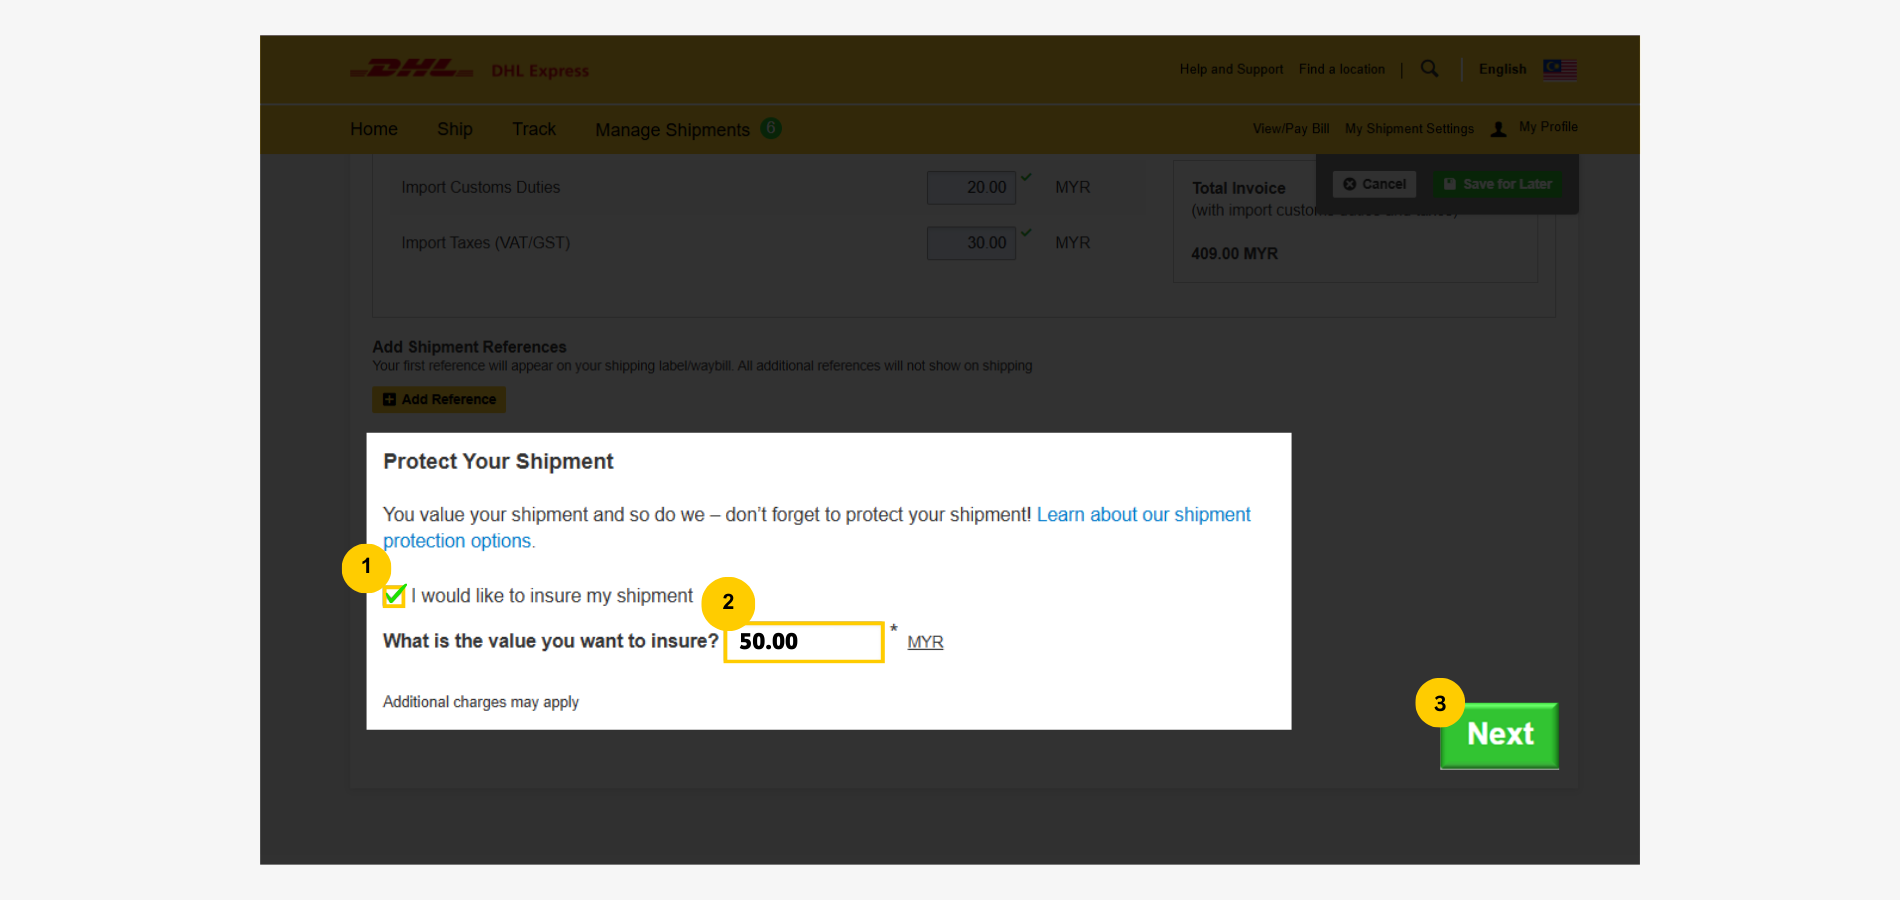
Insurance is optional but recommended to safeguard your shipment with value coverage.
- Tick the 'insure my shipment' box.
- Enter insurance value.
- Click 'next' to proceed.
Step 3: Customs Invoice Creation
Two options are available for selection - create invoice or use your own invoice.
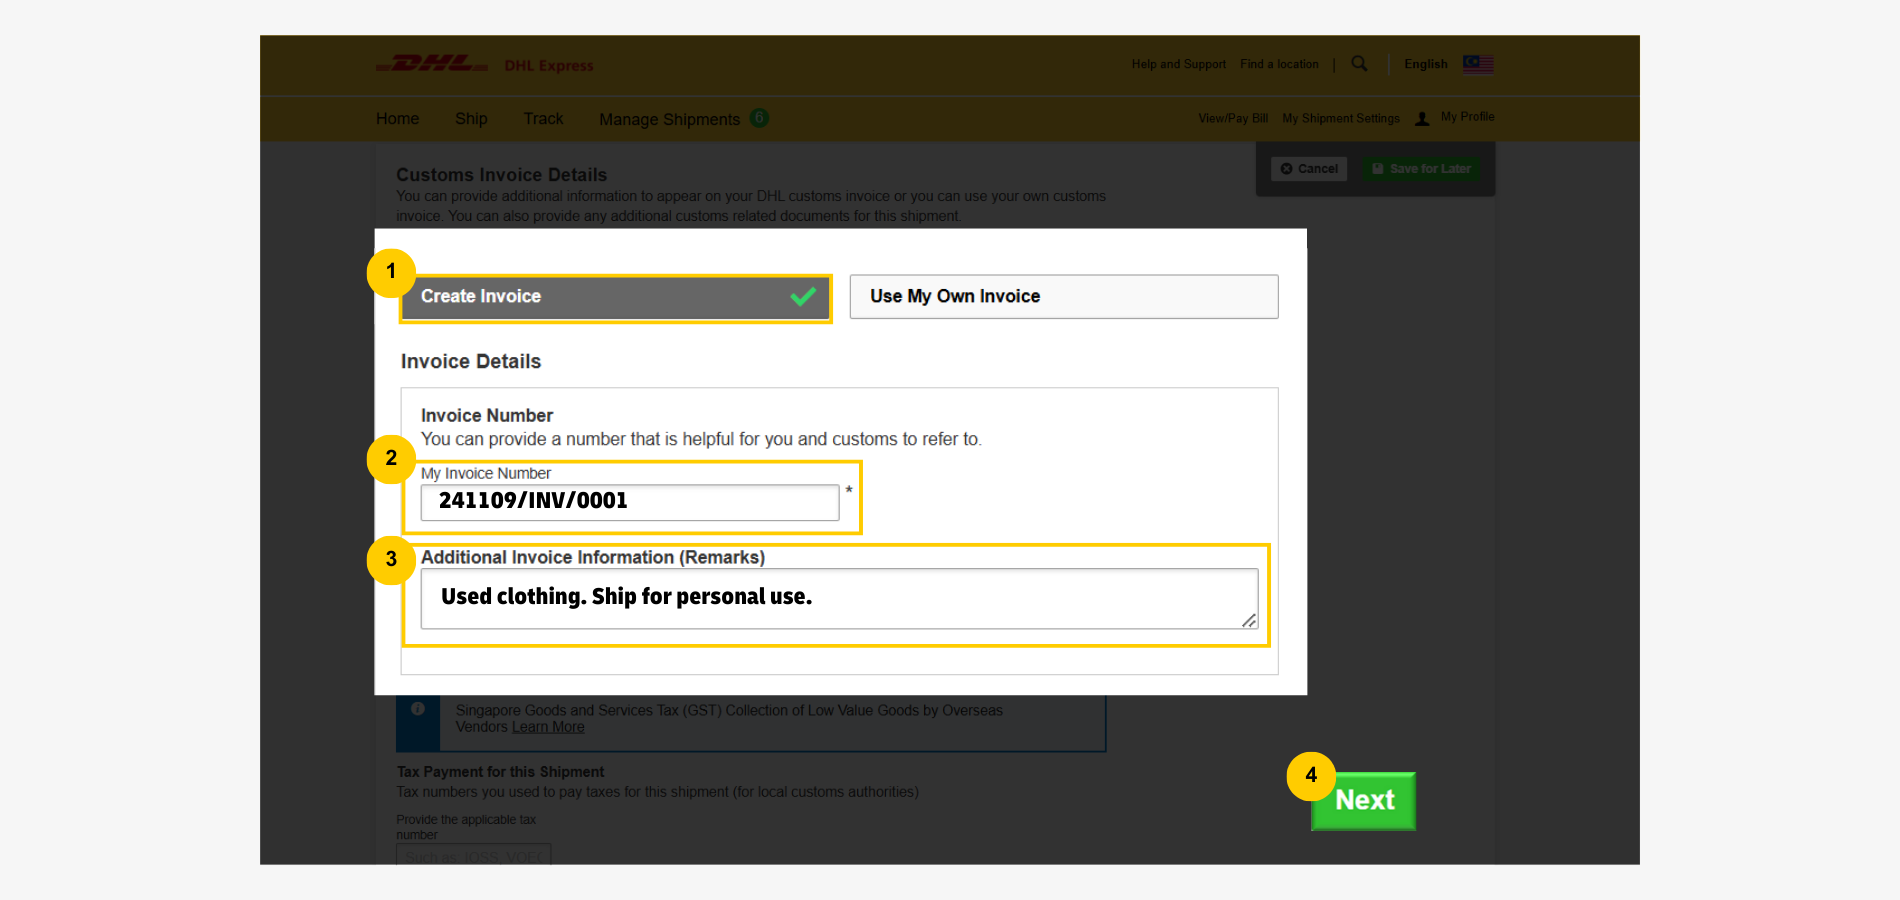
Option 1: Create Invoice
This option generates an invoice with DHL template.
- Click 'Create Invoice'.
- Add an invoice number in any format for easy reference. (e.g YYMMDD/INV/Order Number).
- Enter an 'Additional Invoice Reference' to include in the DHL customs invoice.
- Click 'Next' to proceed.
Option 2: Use Own Invoice
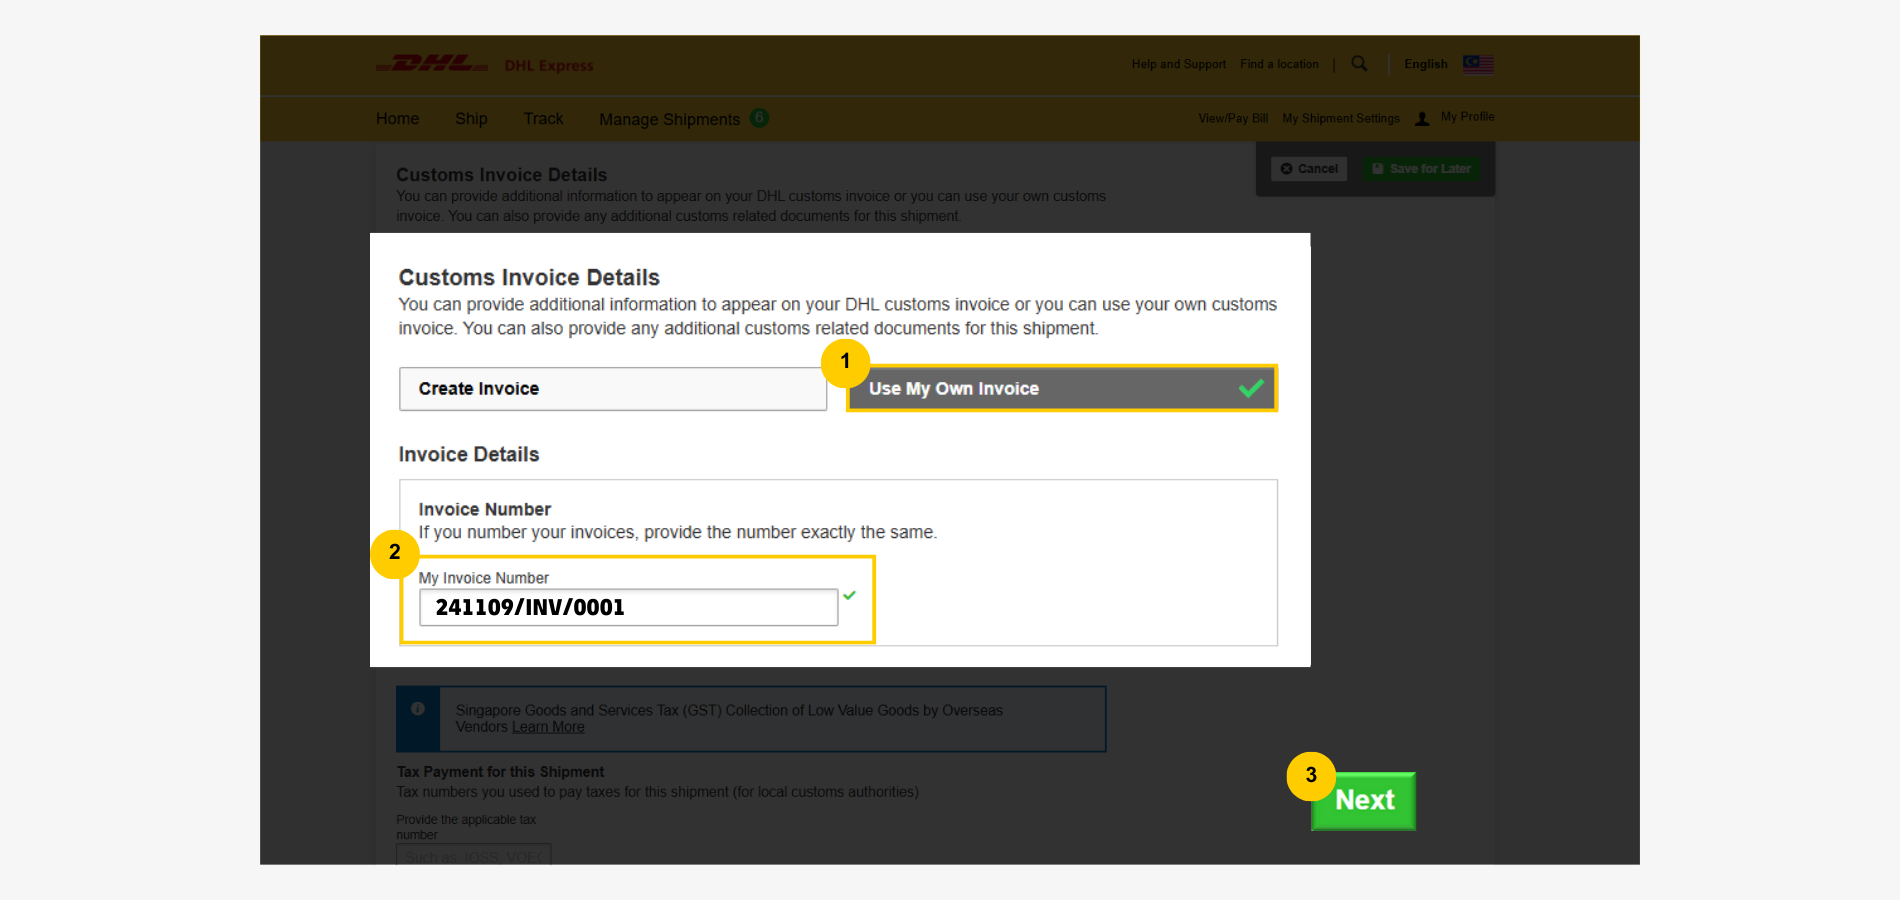
Choose this option to provide your own invoice.
- Select 'Use My Own Invoice'.
- Enter invoice number.
- Click 'Next' to proceed.
Add Additional Information (optional)
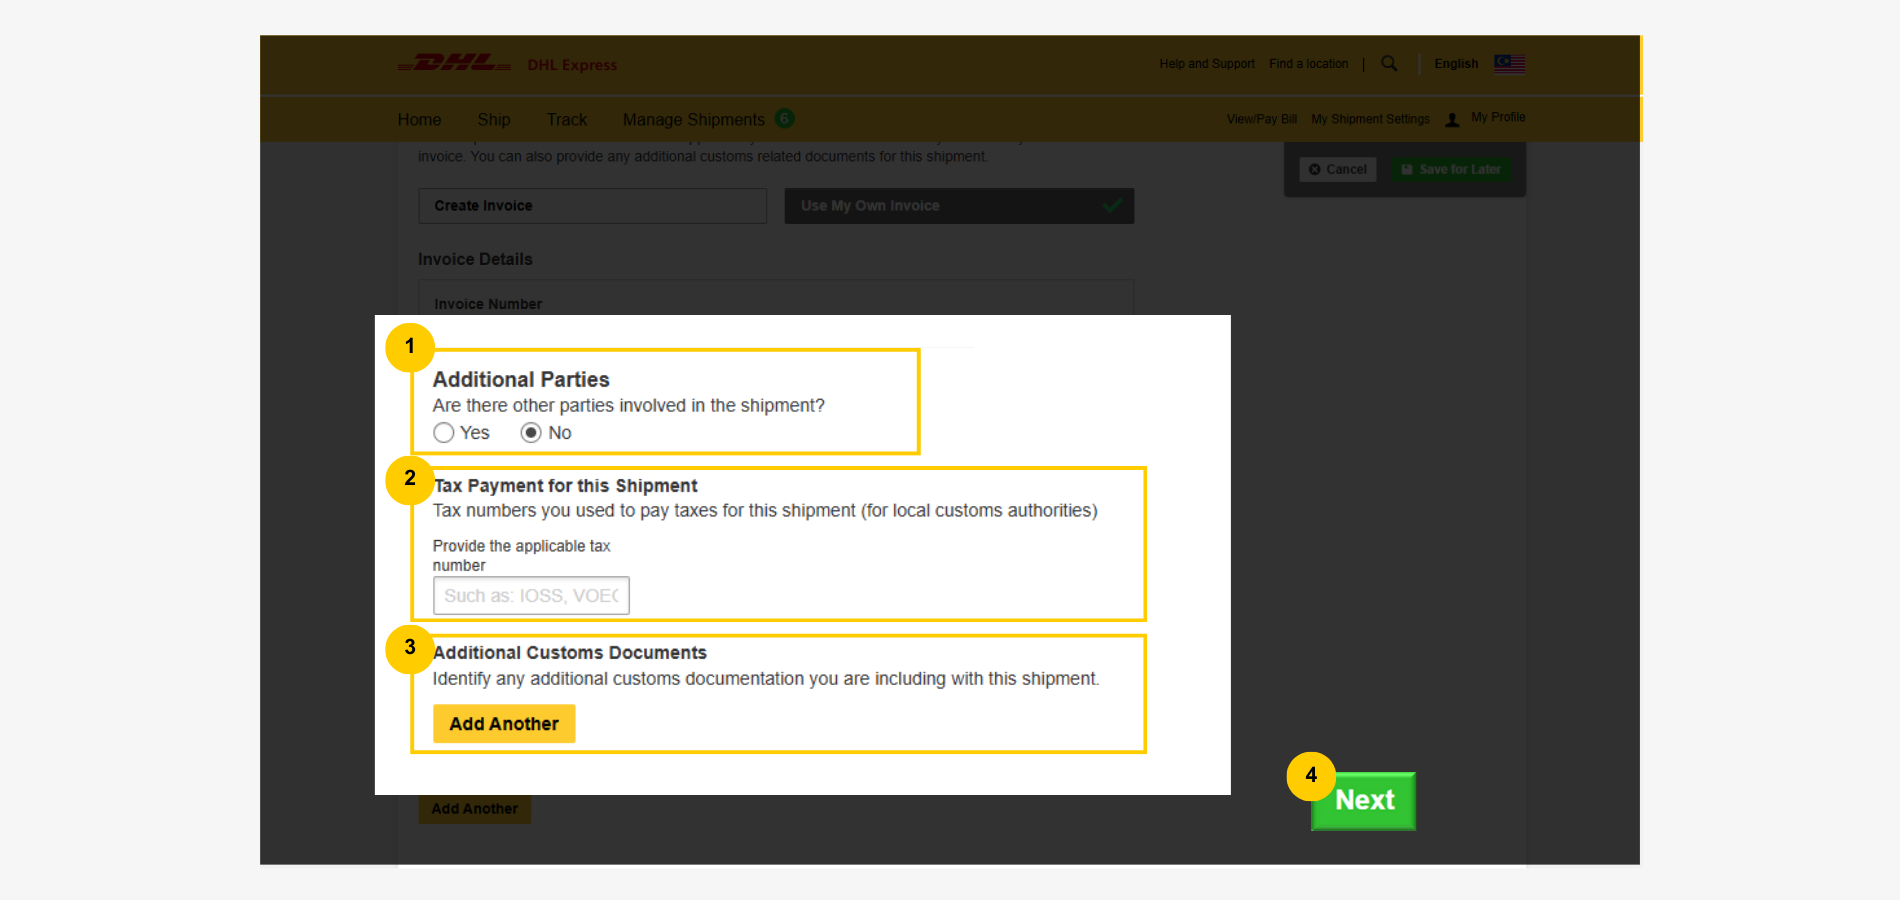
If applicable, provide third-party details, tax payment account, and any additional customs documents of your shipments.
- Third-party involvement: For one-off direct shipping, click 'no' if no third party is involved; otherwise, click 'yes' and provide third-party details.
- Tax payer identification: For personal shipments, Tax Payer ID is usually not needed, so skip it. If relevant, enter the Tax Payer ID (e.g C123456789).
- Customs documents: Some shipments need a permit, license, certificate of origin, or proof of payment for customs clearance. If not applicable, skip this step. Otherwise, click 'Add Another' under Additional Customs Documents and enter the document ID.
- Click 'Next' to proceed.
Step 4: Packaging Details Entry
You can use your own packaging or get a shipment package from DHL Express.
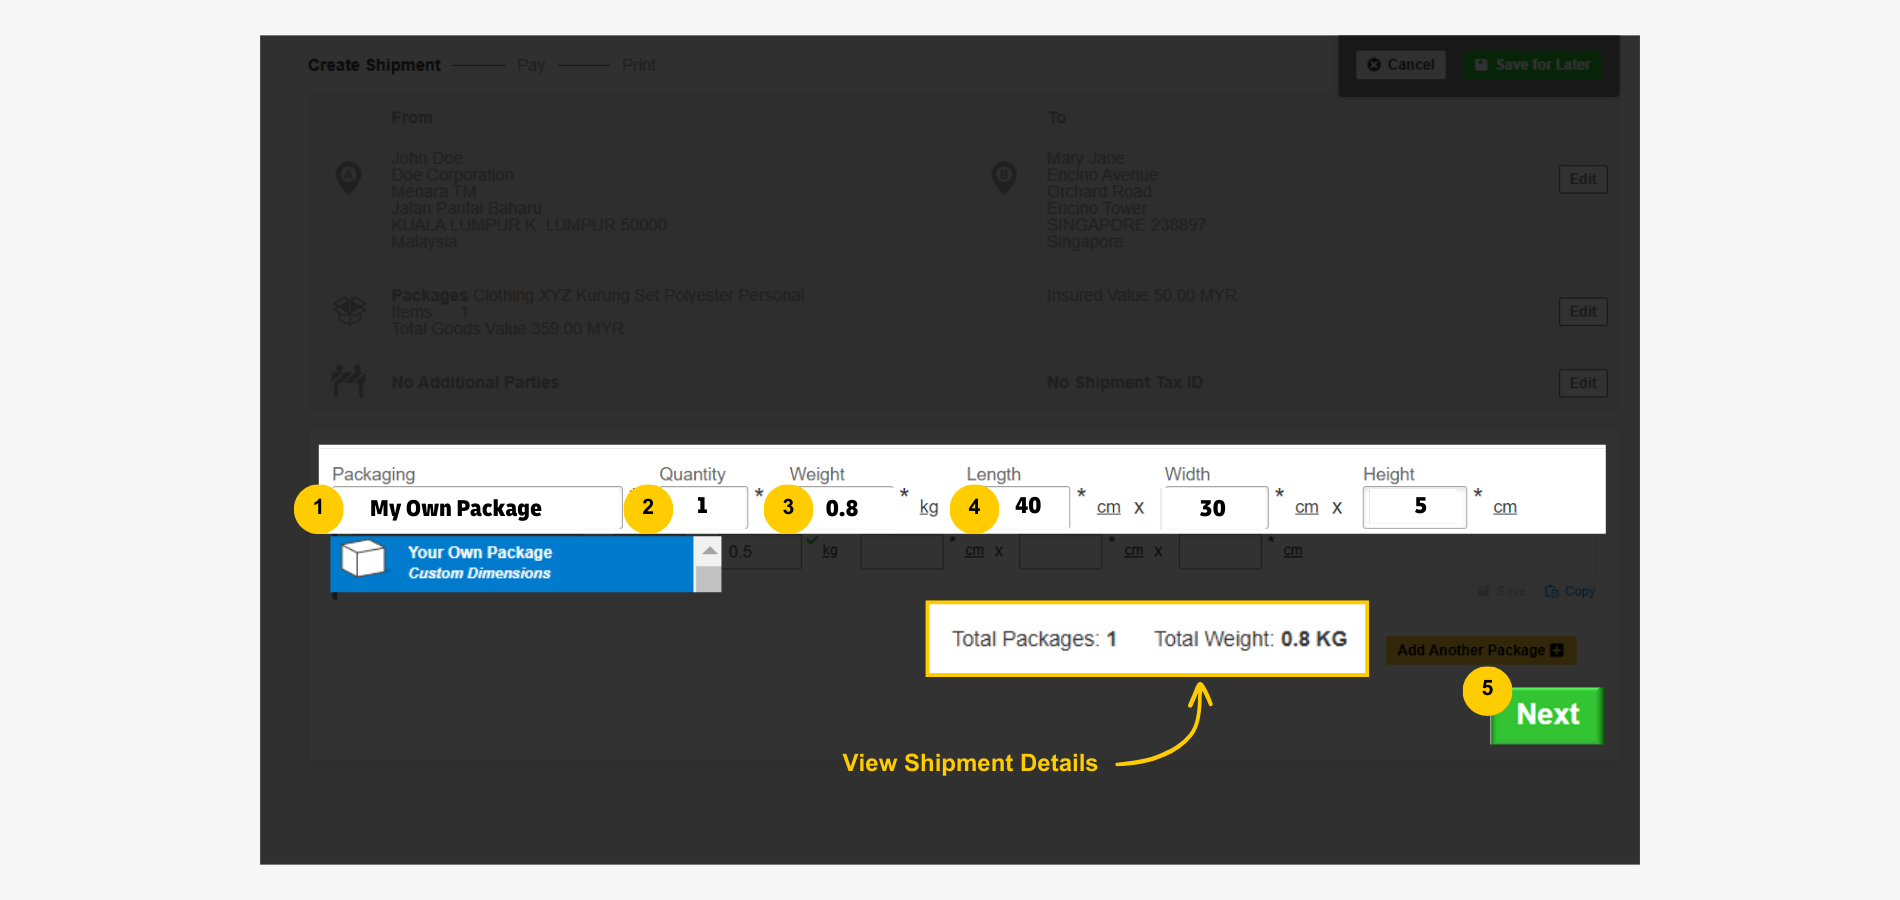
Option 1: Use Own Packaging
- Select 'Your Own Package'.
- Enter shipment quantity.
- Enter shipment weight in KG.
- Enter shipment dimensions in cm - length, width, and height.
- Review shipment detatils and click 'Next' to proceed.
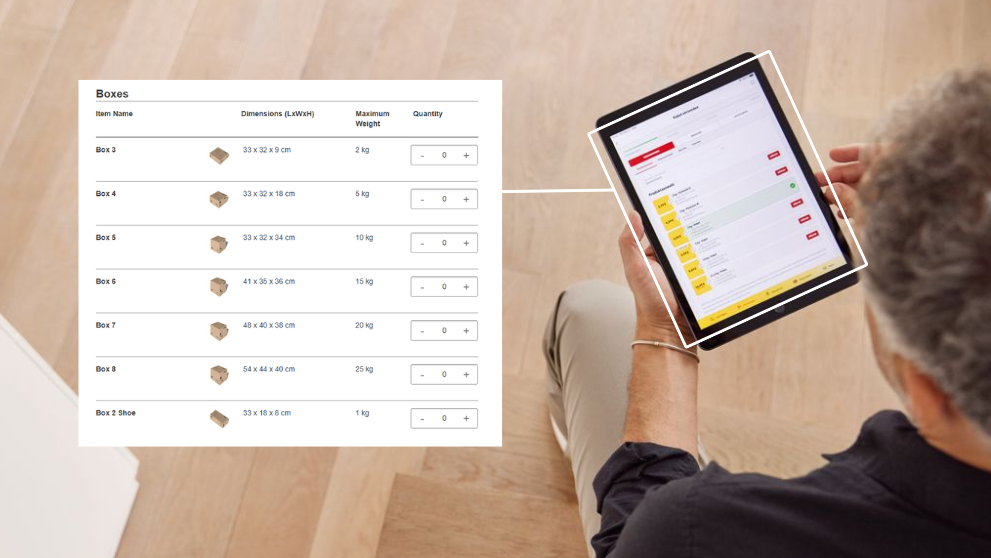
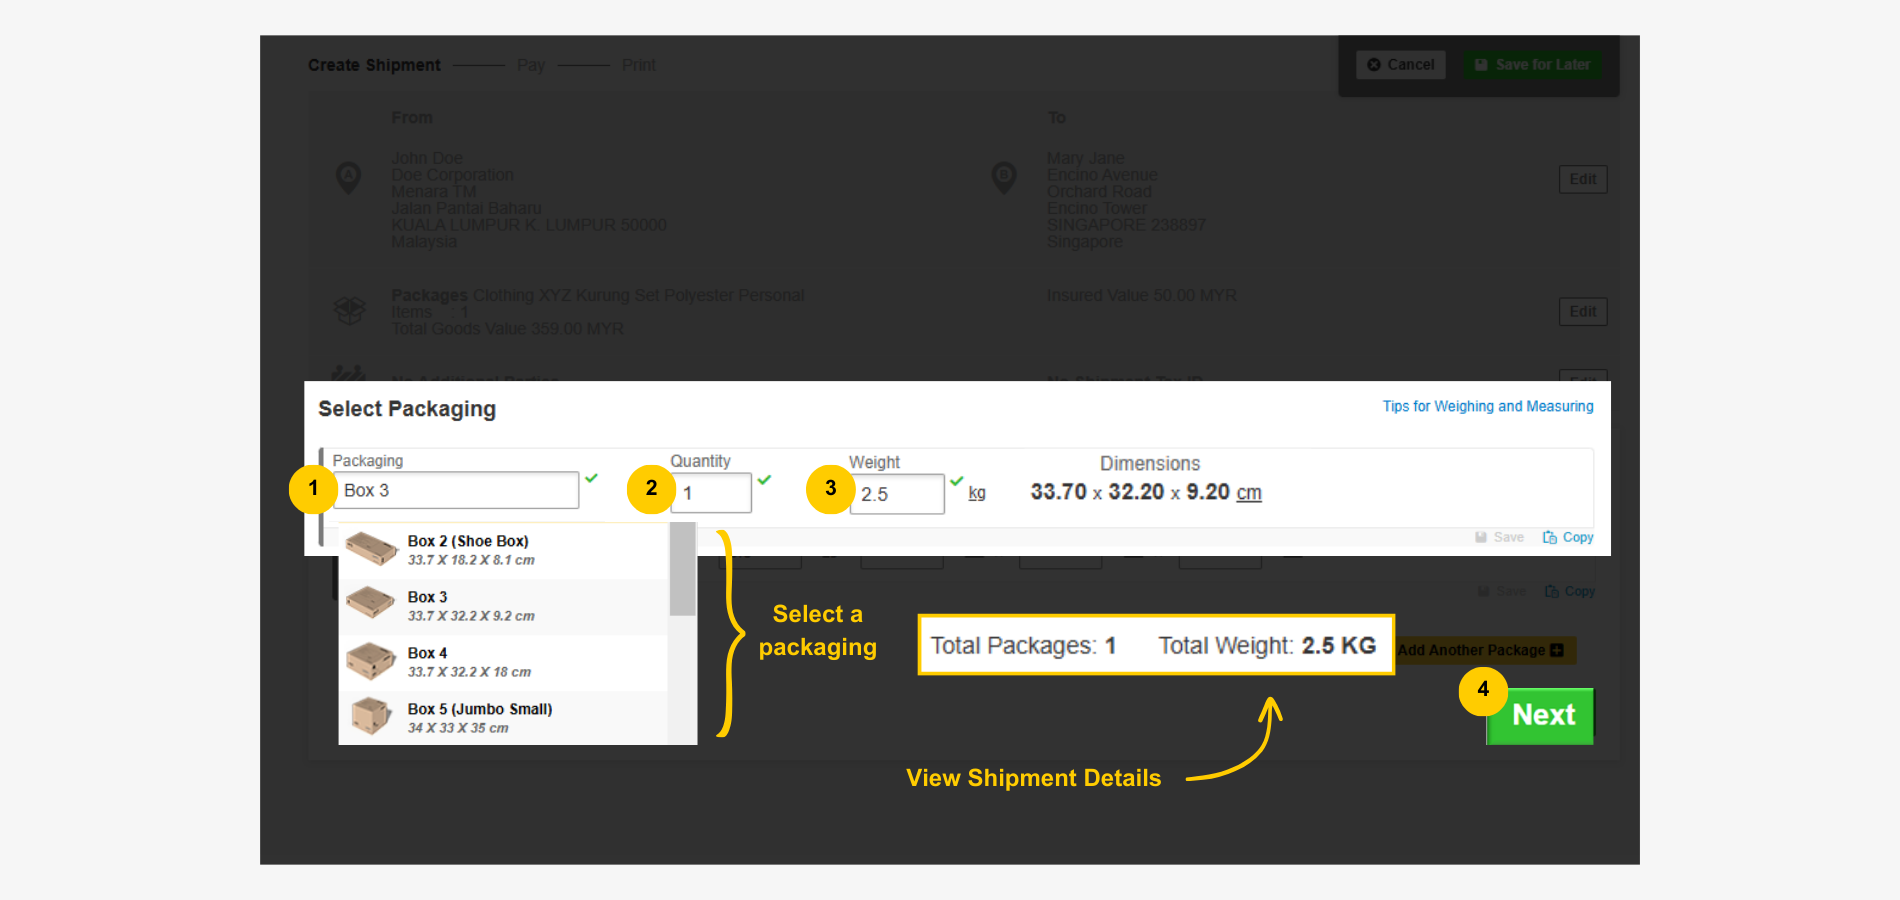
Option 2: Use DHL Express Package
- Select a package that fits.
- Enter shipment quantity.
- Enter shipment weight. (Note: Each package type has its own weight limit.)
- Review shipment detatils and click 'Next' to proceed.
Note: Selecting a DHL box in this section does not place an order for a box. To order a DHL box, add a special note for the courier at the end of your shipment booking.
Step 5: Delivery Time and DHL Express Service
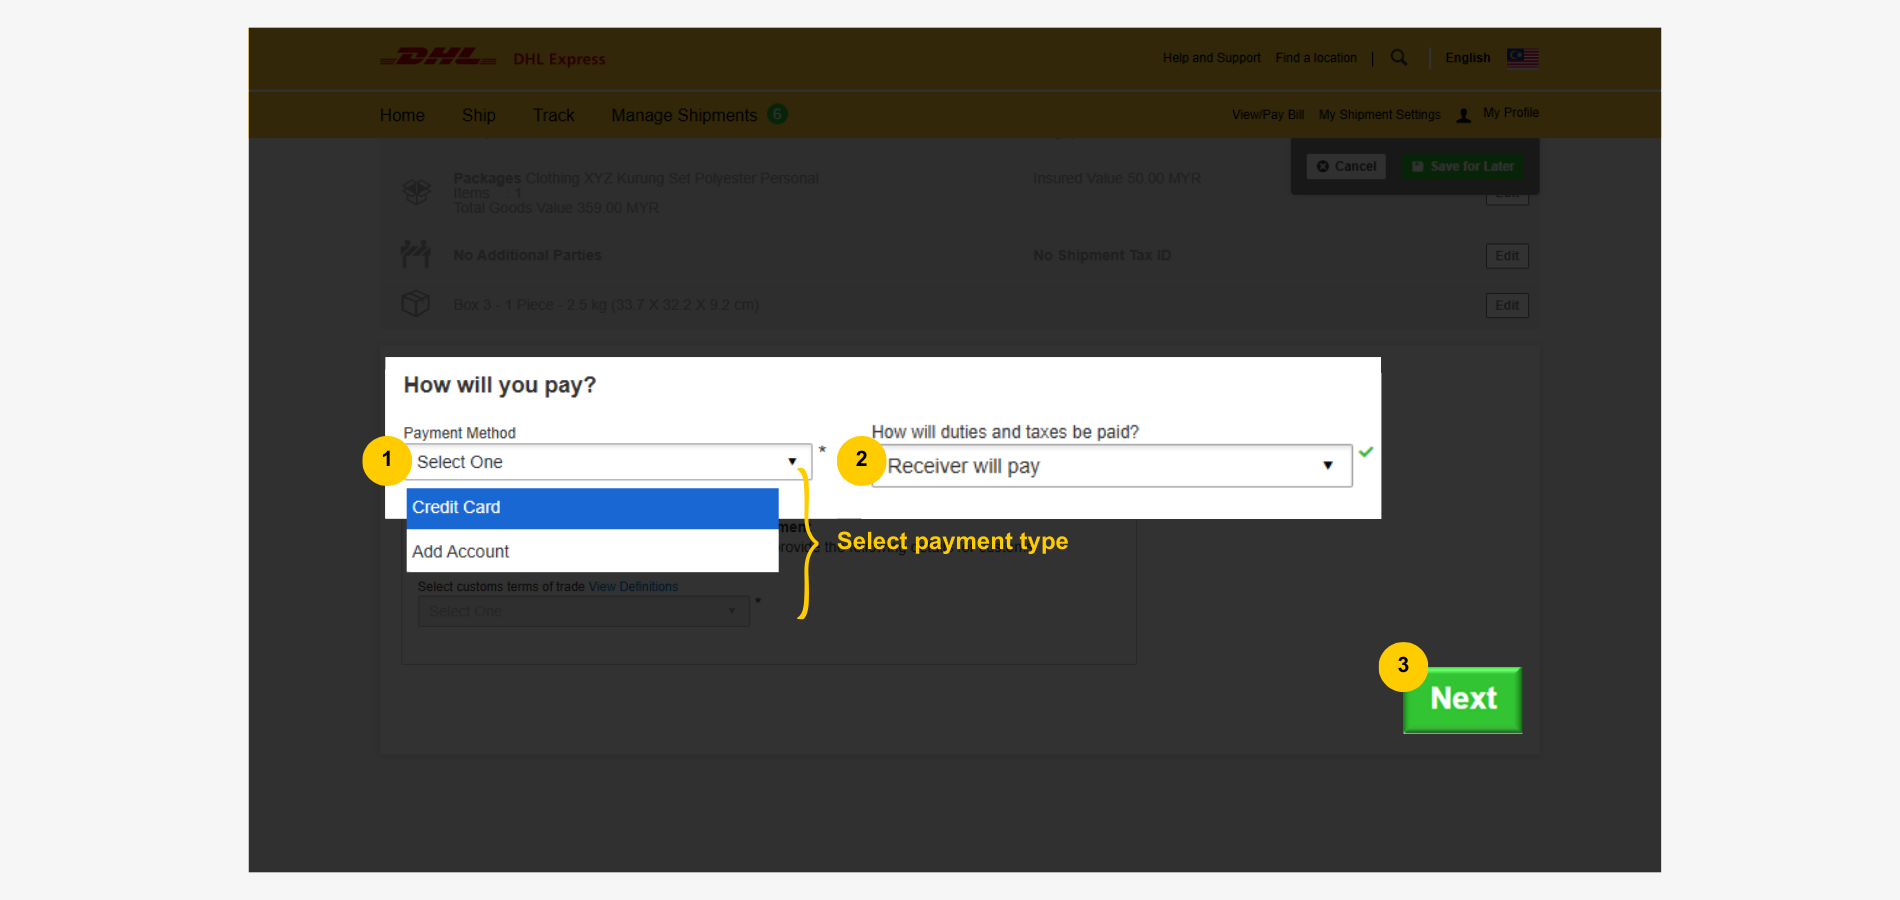
Choose Payment Method
Before setting the delivery time and choosing a service, set a payment method for your shipment. For a non-business account DHL Express shipper, the default is 'credit card'.
- Credit card is the default payment method. (note: Choose 'Add Account' only applies to DHL Business account holder.)
- For duties and taxes payment, 'Receiver will pay' is the default selection.
- Click 'Next' to proceed.
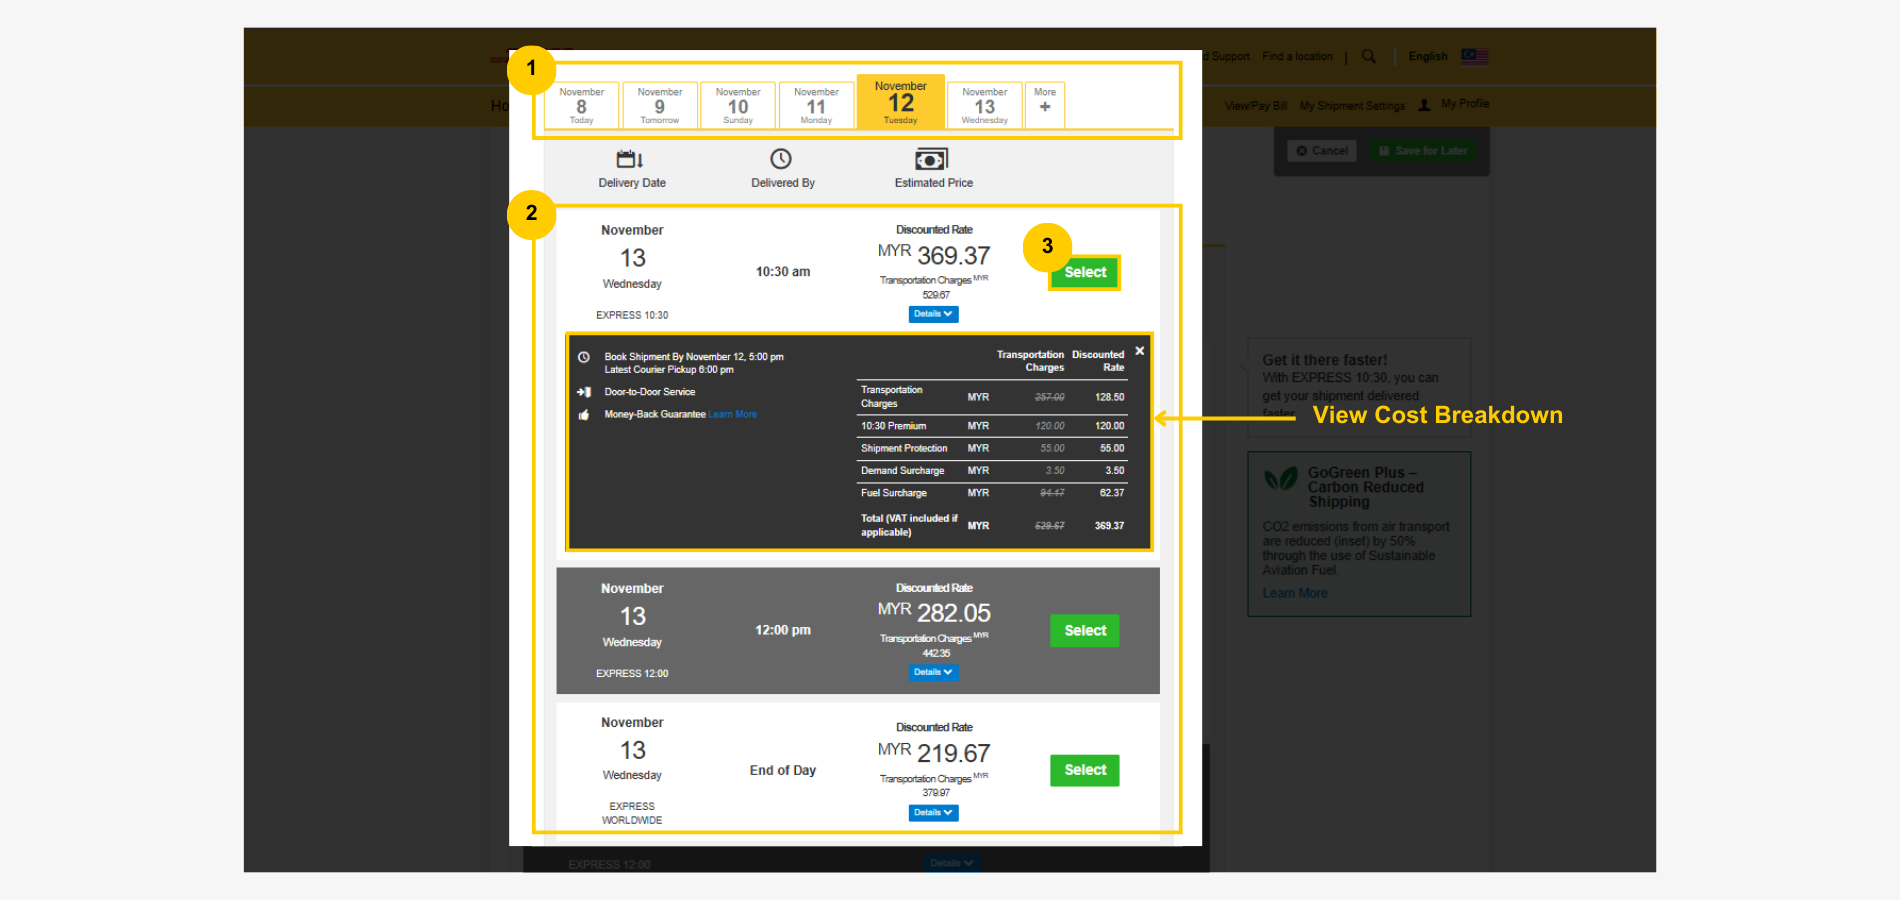
Pick a Delivery Date and DHL Express Service
A list of DHL Express services like Express Time-Definite, Express Worldwide, Express Easy, etc. is available for selection.
- Select a date for shipment drop off or pick up.
- Choose a DHL Express service. To view the cost breakdown, shipment pick up date and time, and other information about the service, click 'details'.
- Click 'select' to proceed.
Step 6: Additional Services Add On
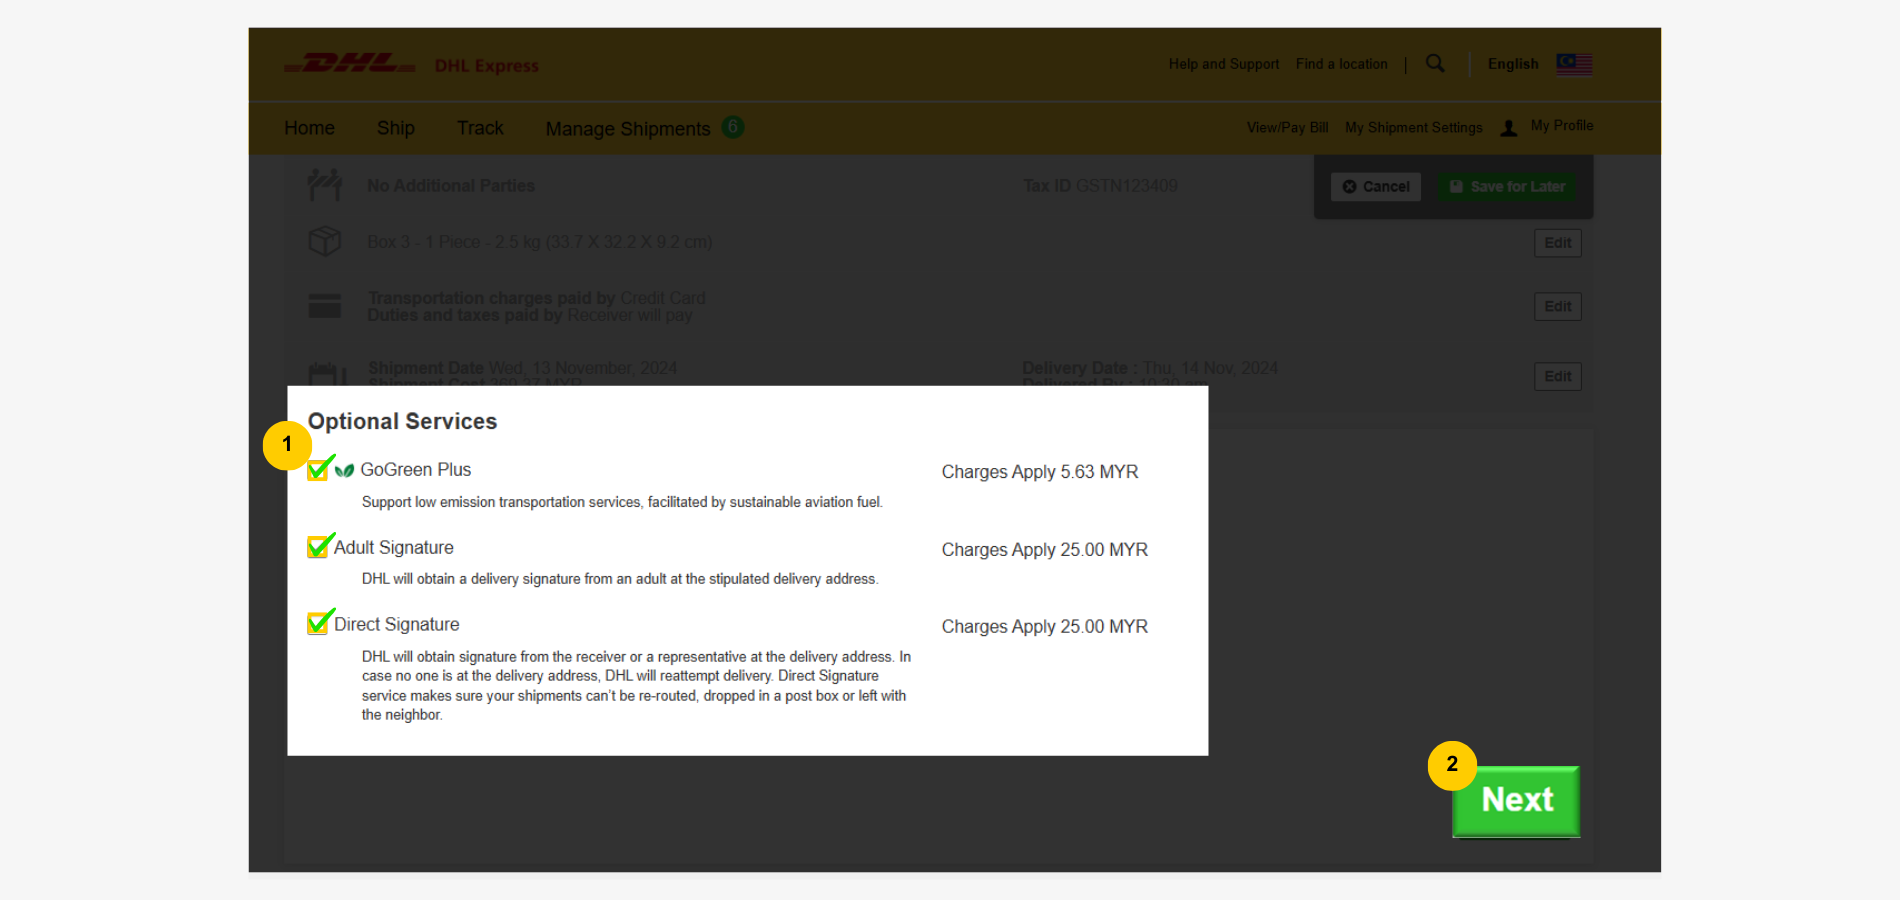
The optional services available are:
GoGreen Plus: Reduce the carbon footprint of your shipment with DHL Express GoGreen service.
Adult Signature: Guarantee an adult signature at the designated delivery address.
Direct Signature: Assure a direct signature at the delivery address. If no one is available, the shipment will not be re-routed, left in a post-box, or with a neighbor.
- Tick the box of 'Optional Service' that fits your need.
- Click 'Next' to proceed.
Step 7: Customs Documents Submission
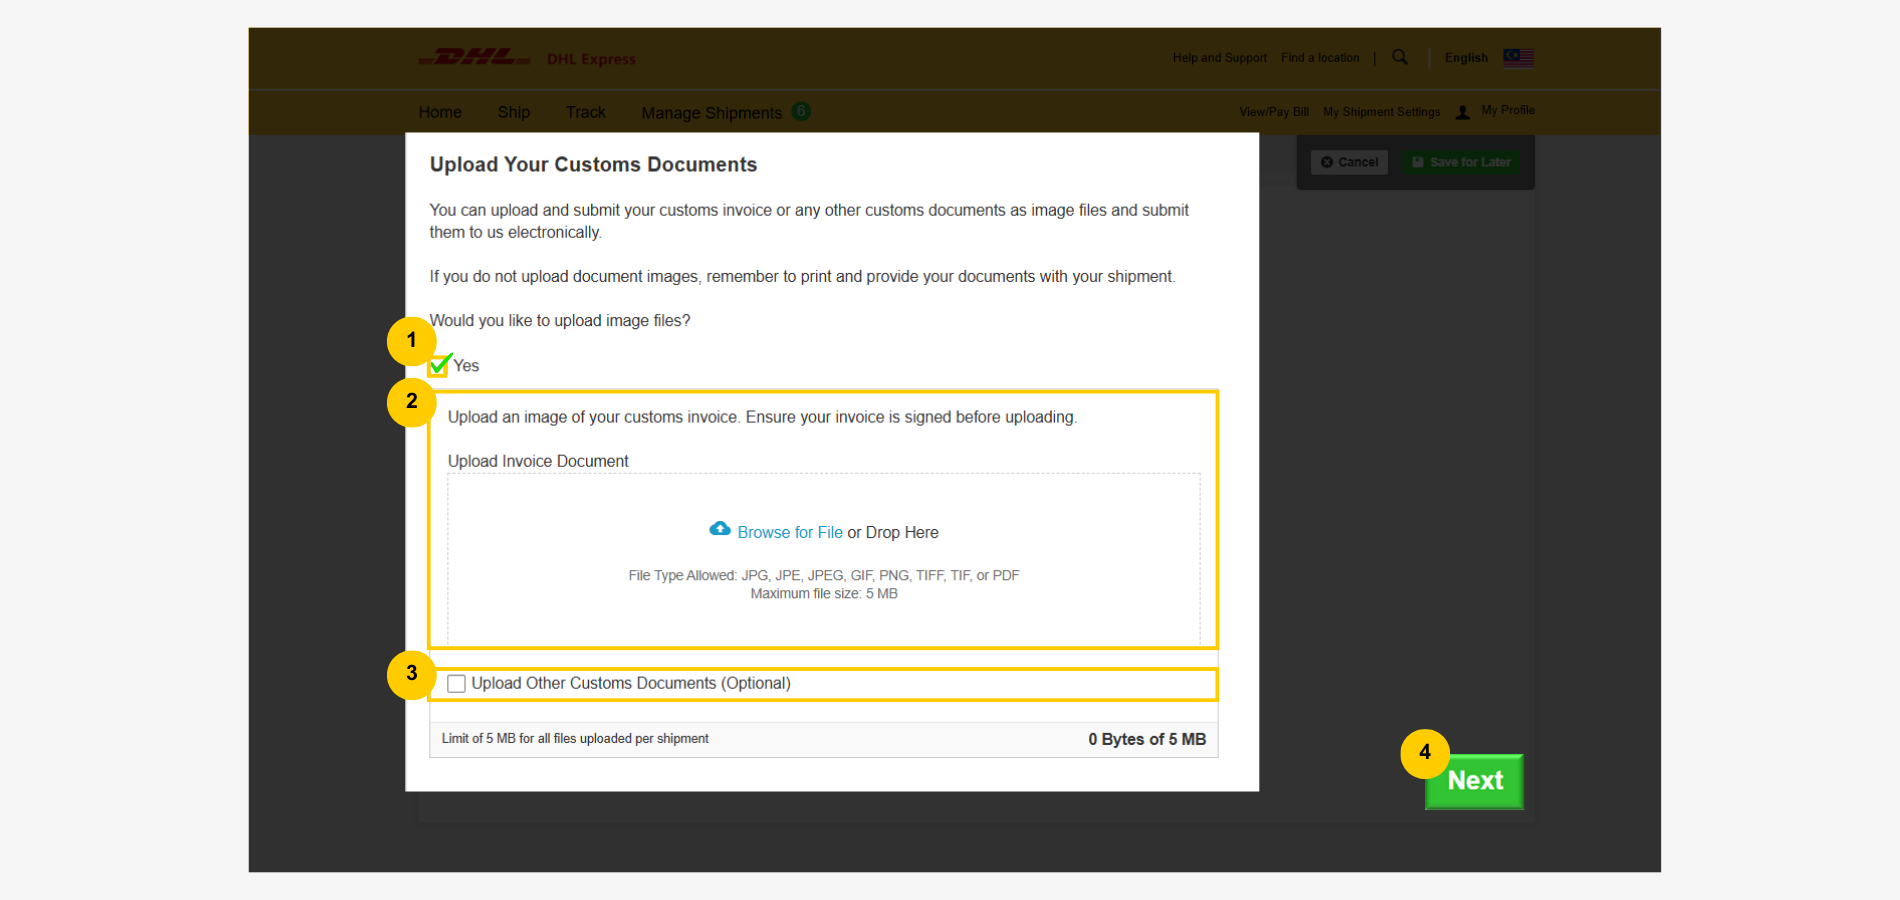
- Tick 'Yes' to submit customs required documents electronically (e.g customs invoice, permit, license, etc.).
- Upload documents in JPEG, GIF, or PNG format.
- Tick 'Upload Other Customs Documents' to upload more required customs documents in suggested format. (optional)
- Click 'Next' to proceed.
Step 8: Shipment Drop-Off Arrangement
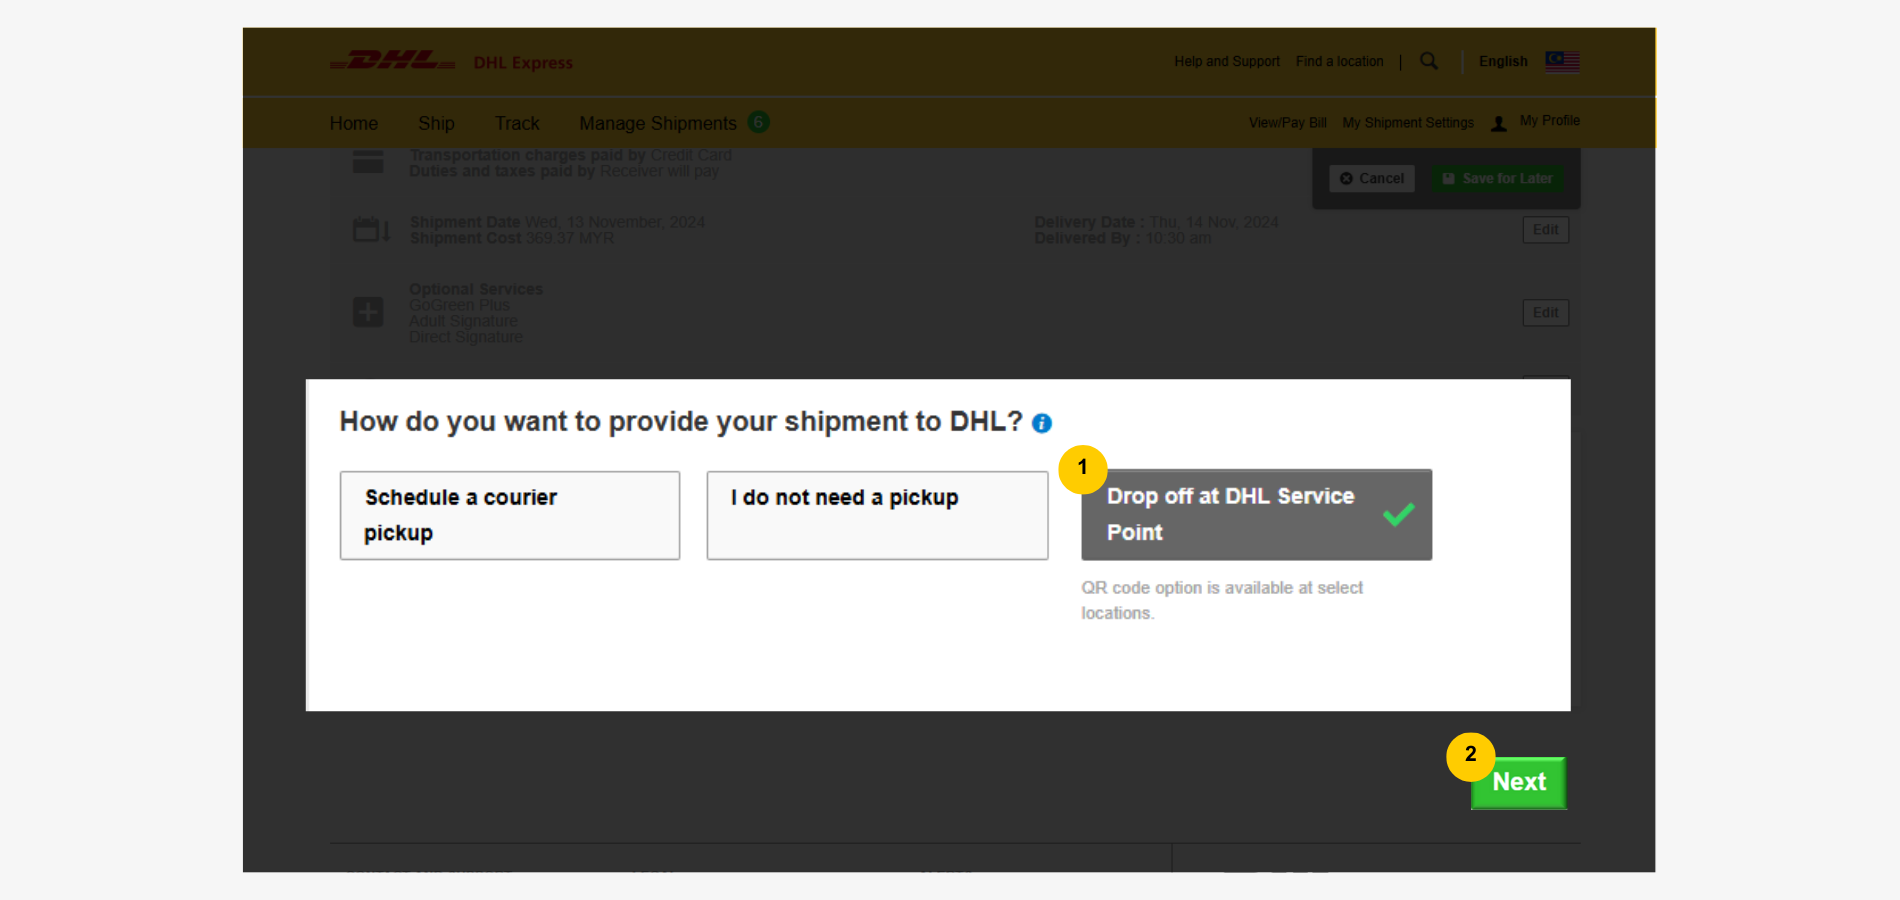
- Select 'Drop off at DHL Service Point'.
- Click 'Next' to proceed.
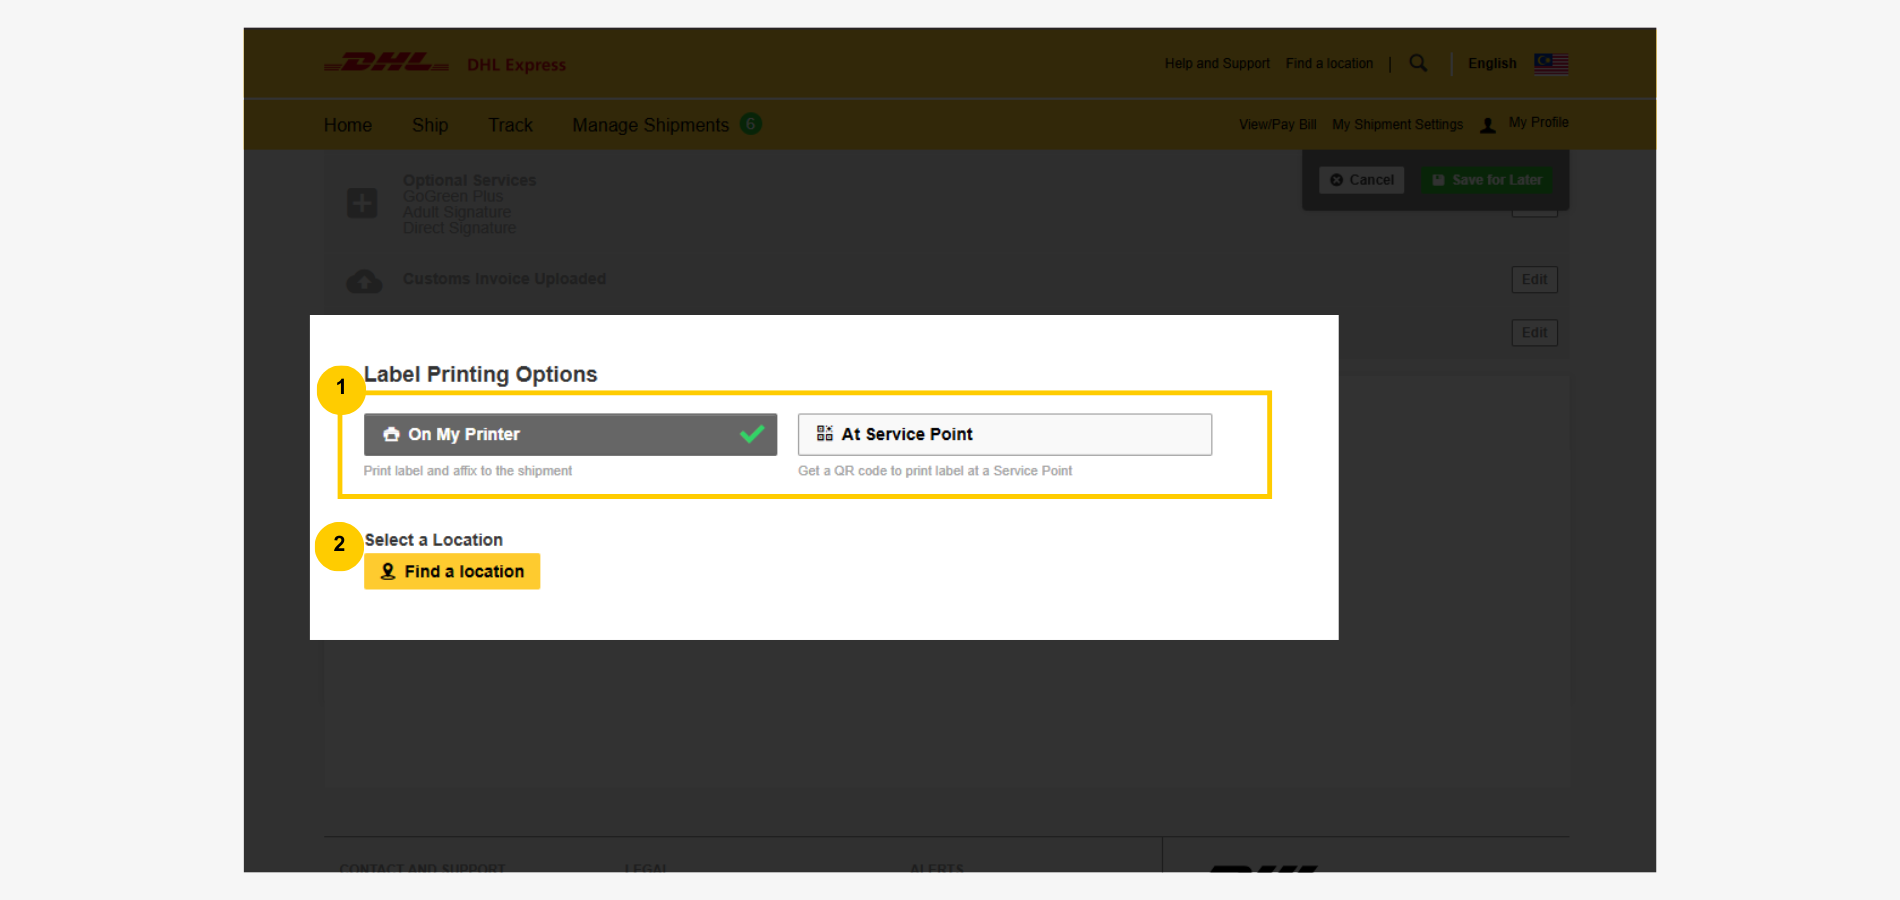
Choose a Label Printing Option
Label refers to the waybill that is to be attached to the shipment.
Two ways to prepare the label - print on your own or at a DHL Express service point during drop-off.
- Select 'On My Printer' to print it yourself or 'At Service Point' for a digital copy to print at a service point.
- Click 'Find a Location' to choose a service point for the shipment drop-off.
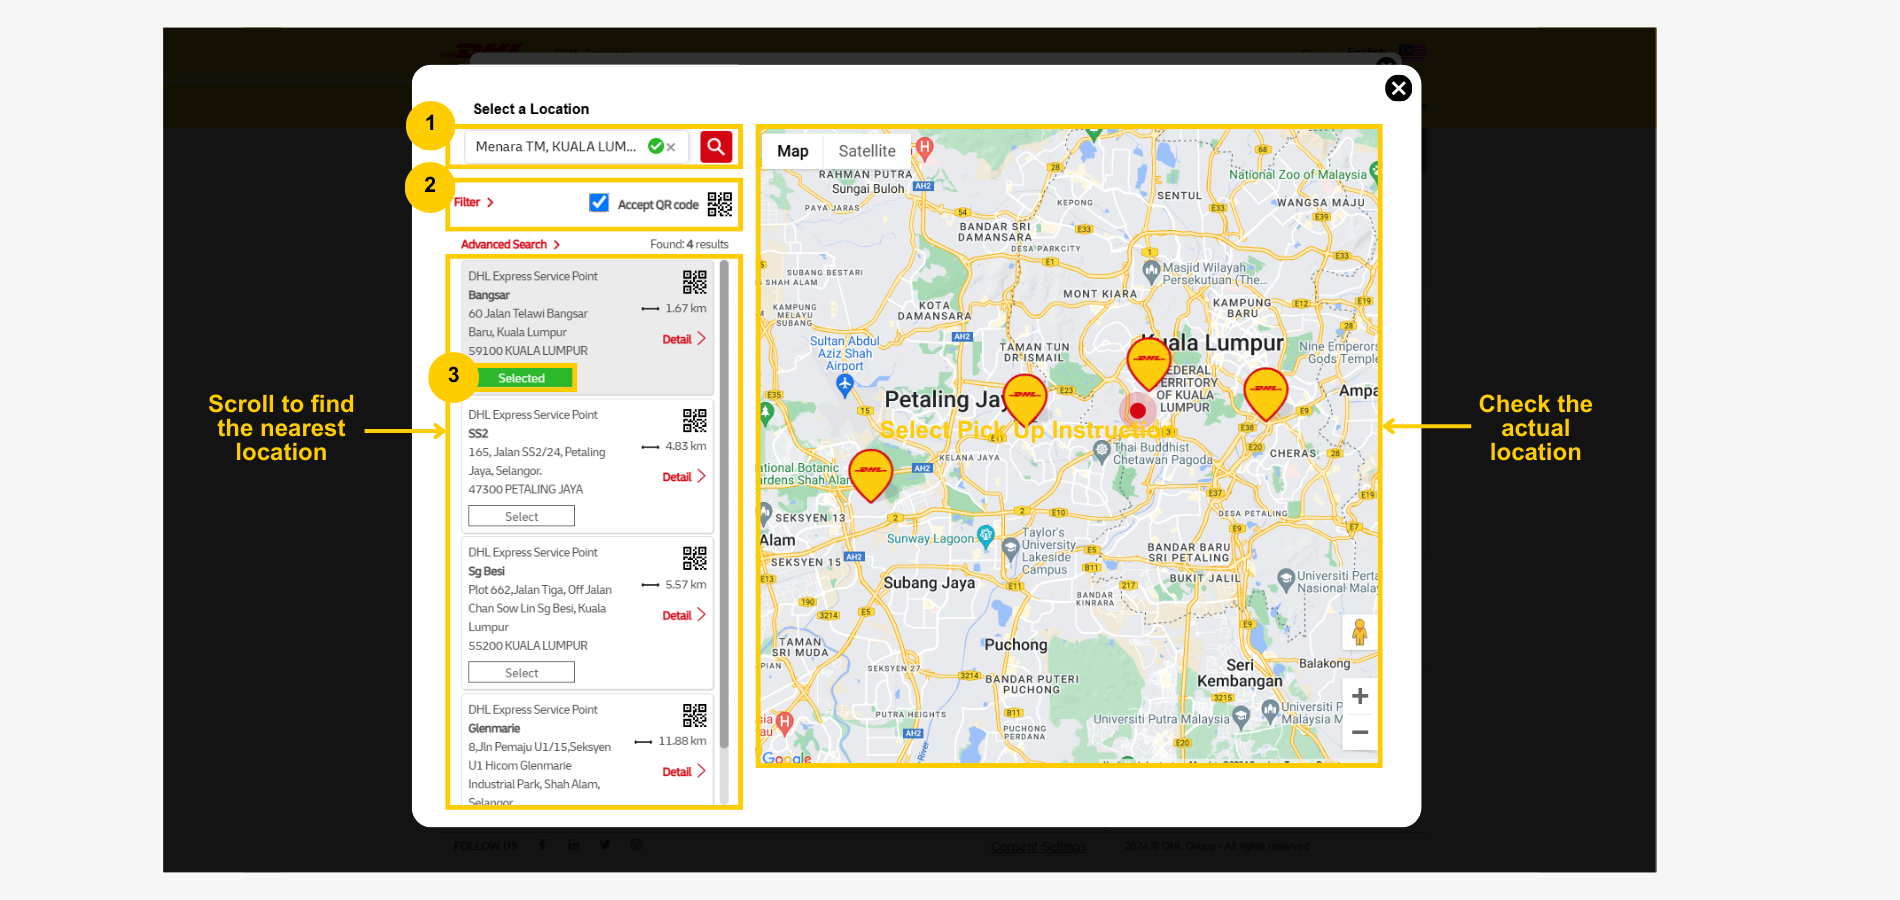
- Enter city name, or location keyword to search for the preferred DHL Express Service point for drop off.
- Ensure 'Accept QR code' is checked if you chose to print the label at the service point.
- Select the preferred DHL Express service point.
Note: To view more information about a service point, click 'detail'.
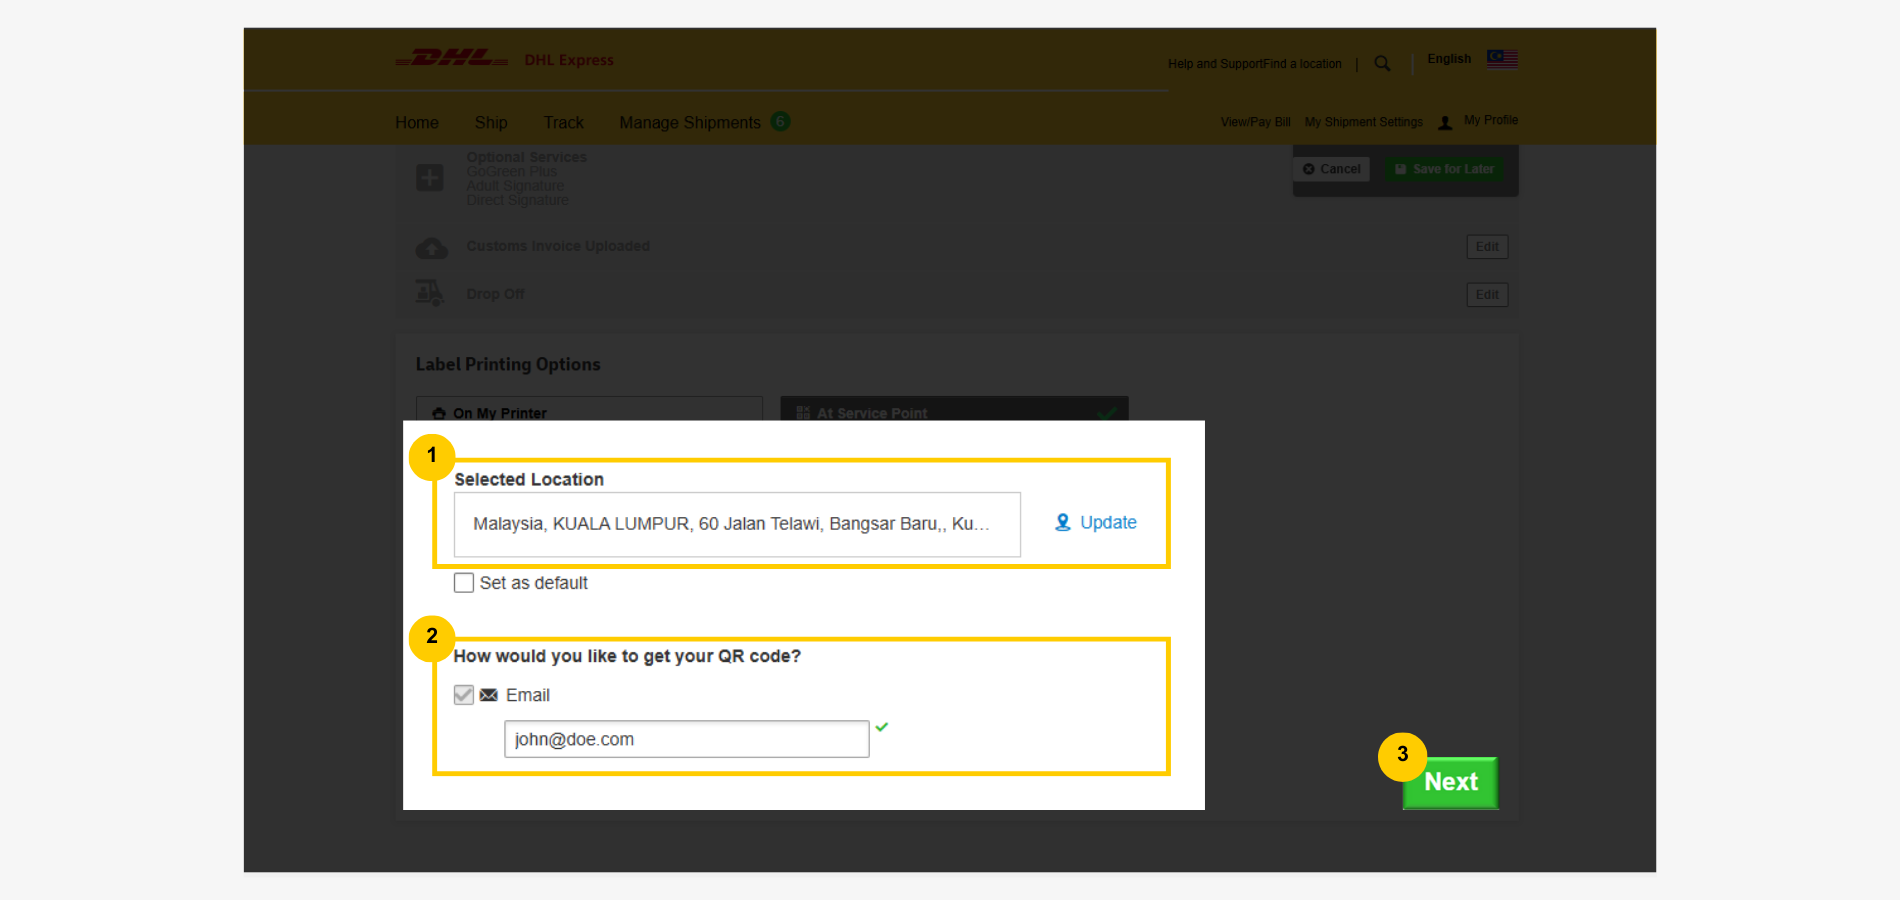
- Confirm the selected service point.
- Confirm or edit the QR code email receiver (applies to 'Print at Service Point' selection only).
- Click 'Next' to proceed.
Step 9: Shipment Cost Review and Payment
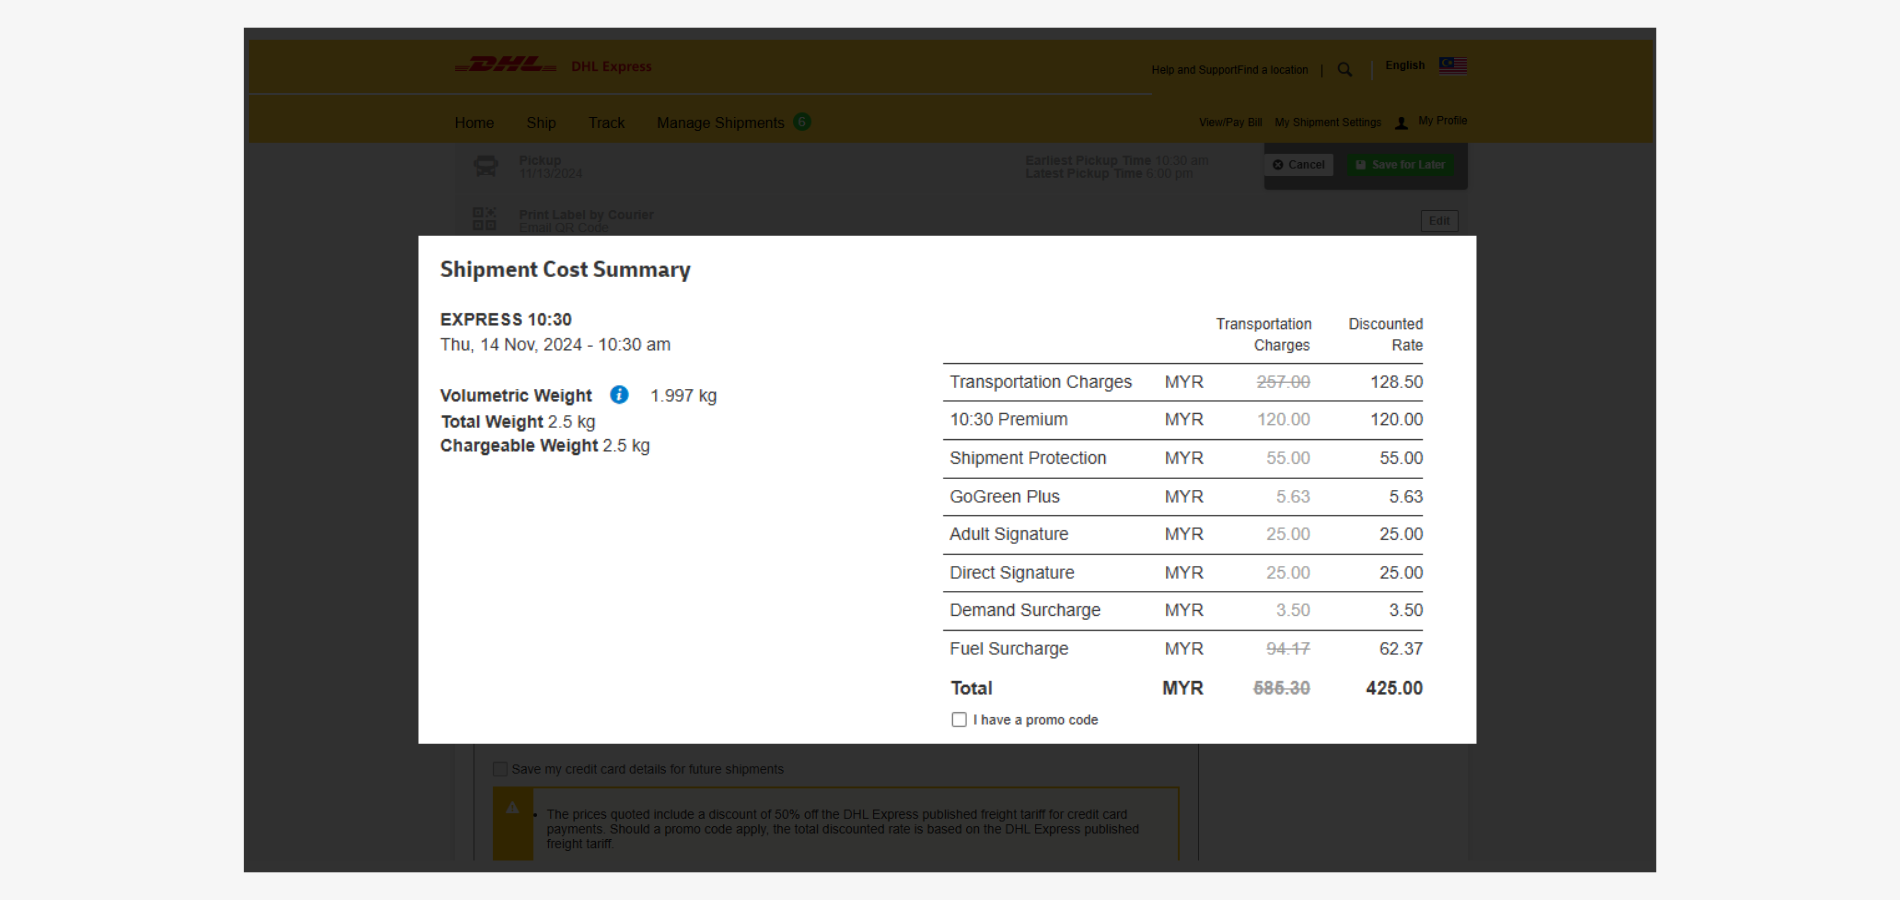
Review Shipment Cost Breakdown and Summary
The shipment details, such as the chosen DHL Express service and volumetric weight, will be presented.
The costs will be itemized, showing transportation charges, DHL Express service fee, insurance, and any additional services opted for.
Choose a Payment Option
Two options available - Visa or Mastercard.
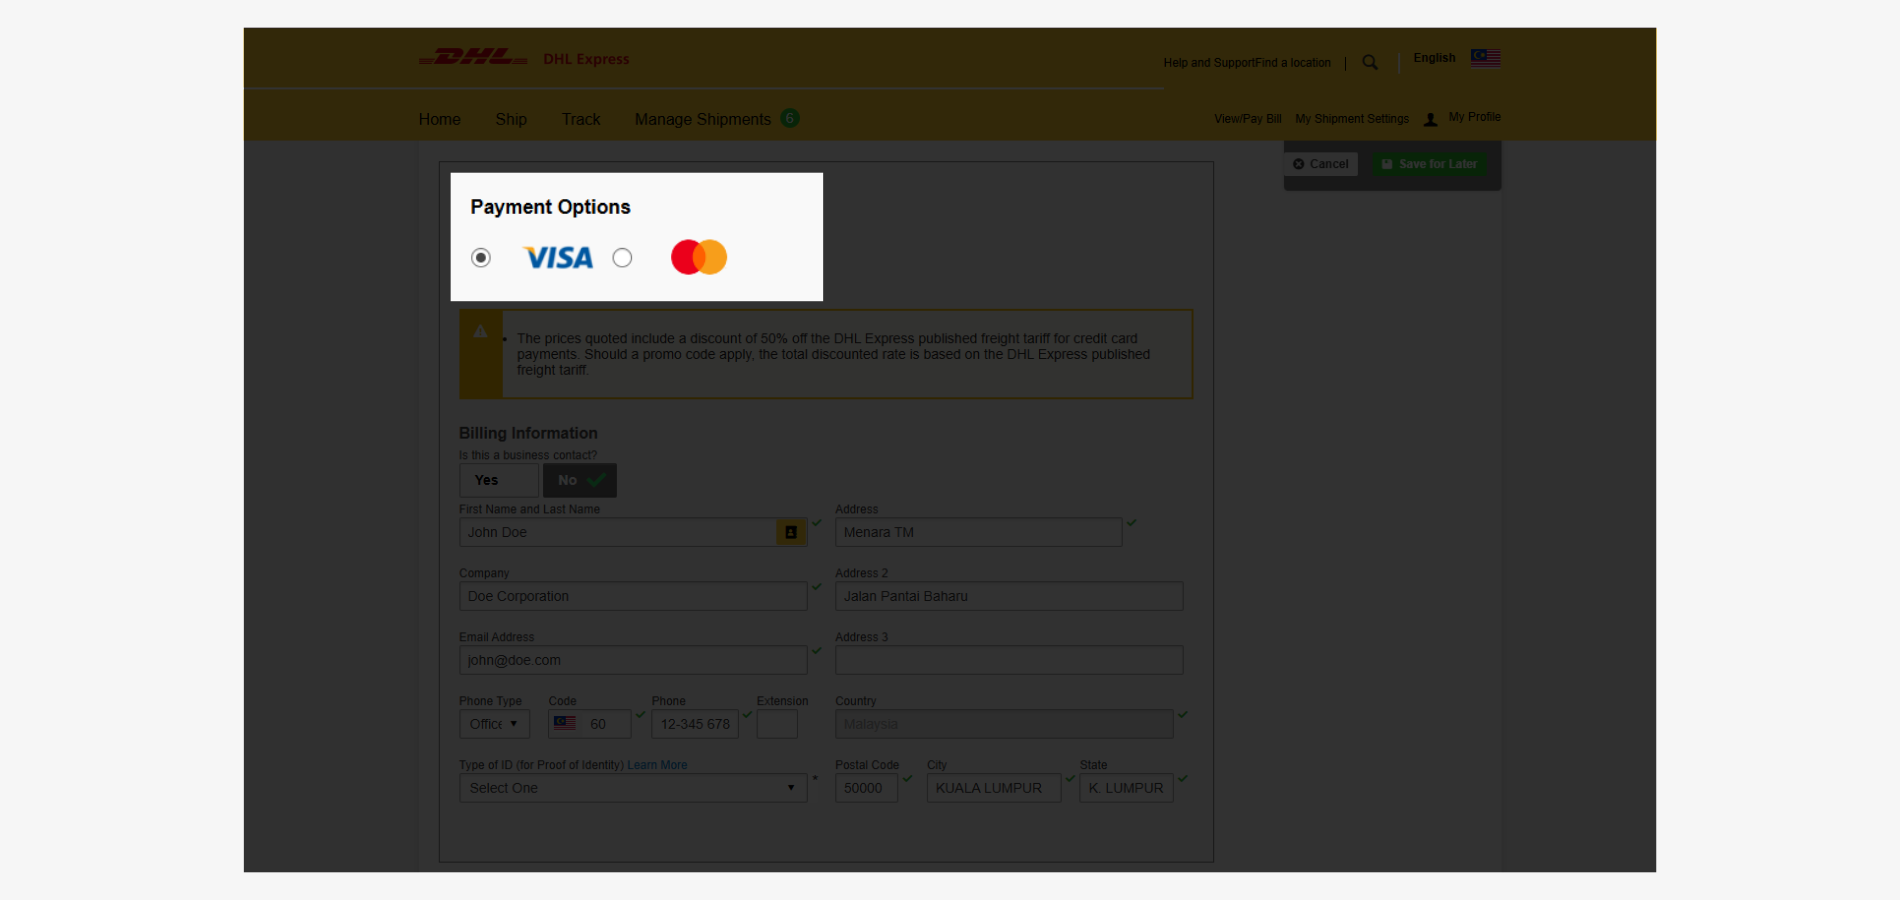
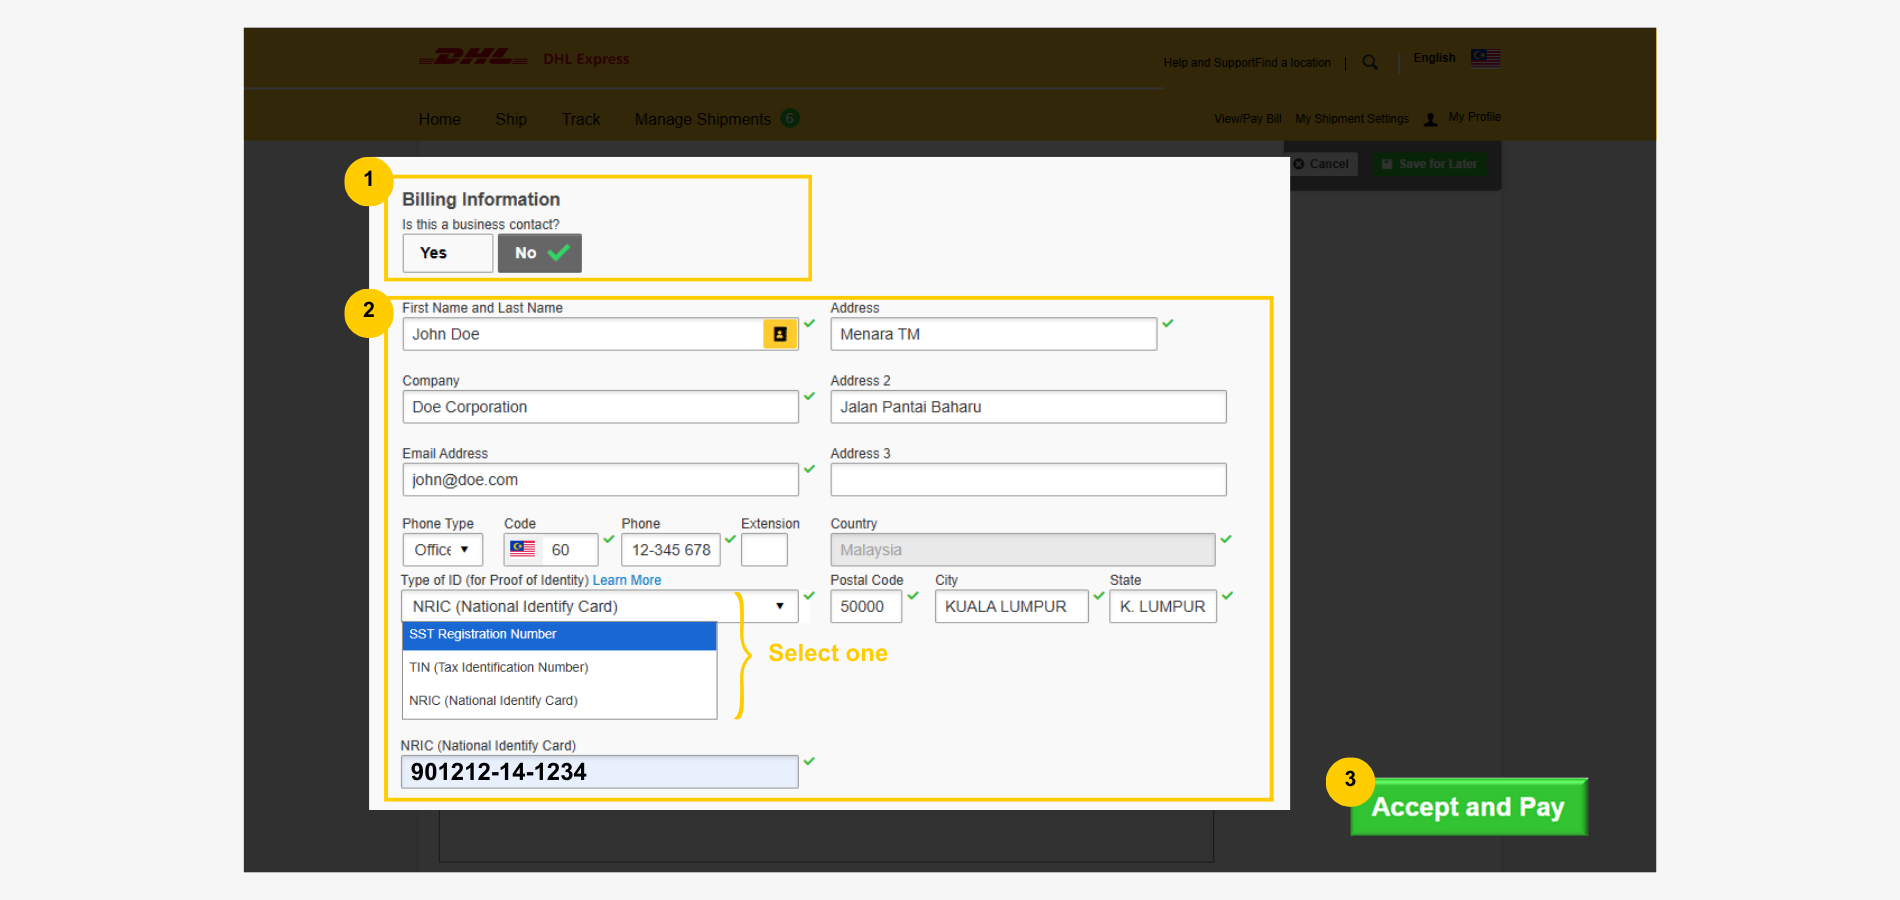
Fill and Confirm Billing Information
- Click 'No' if importer is not a business contact. Otherwise, select 'Yes' and provide additional required for business contact, such as SST number, business registration number, and tax identification number.
- Check and input billing contact information, including name, company, email, phone number, and billing address.
- Click 'Accept and Pay' to proceed.
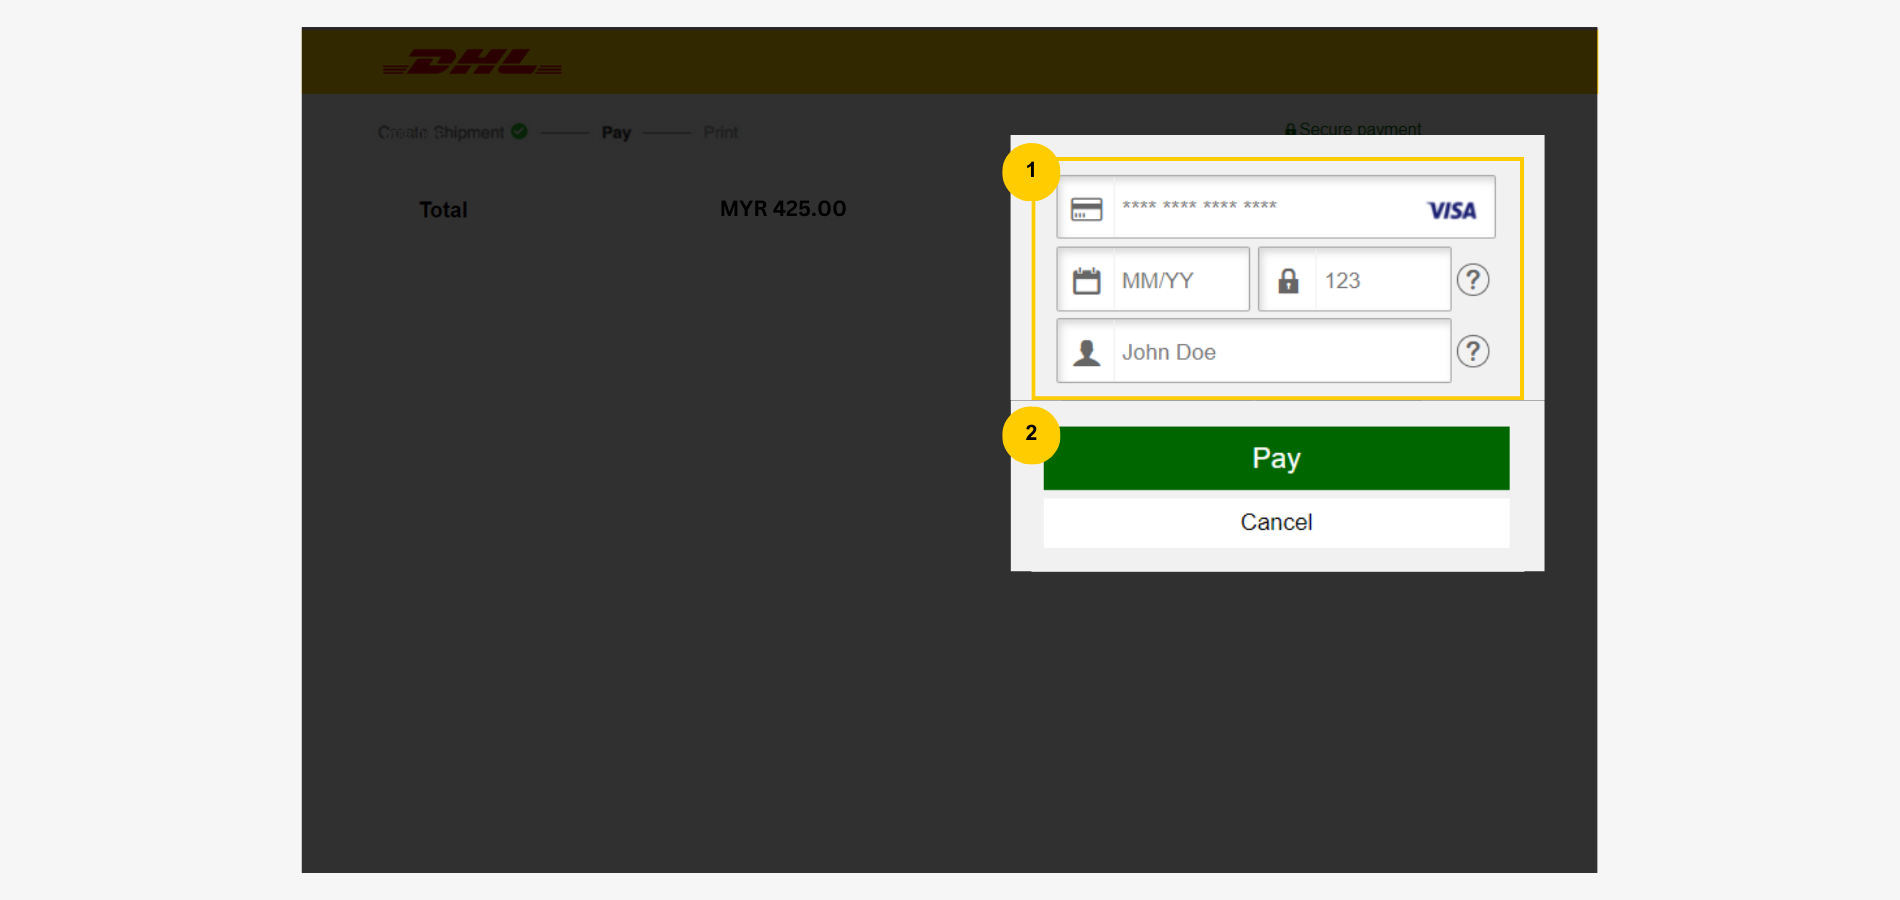
Pay with Credit Card
You will be taken to a secure payment site to complete your transaction.
- Enter credit card details.
- Click 'Pay' to proceed.
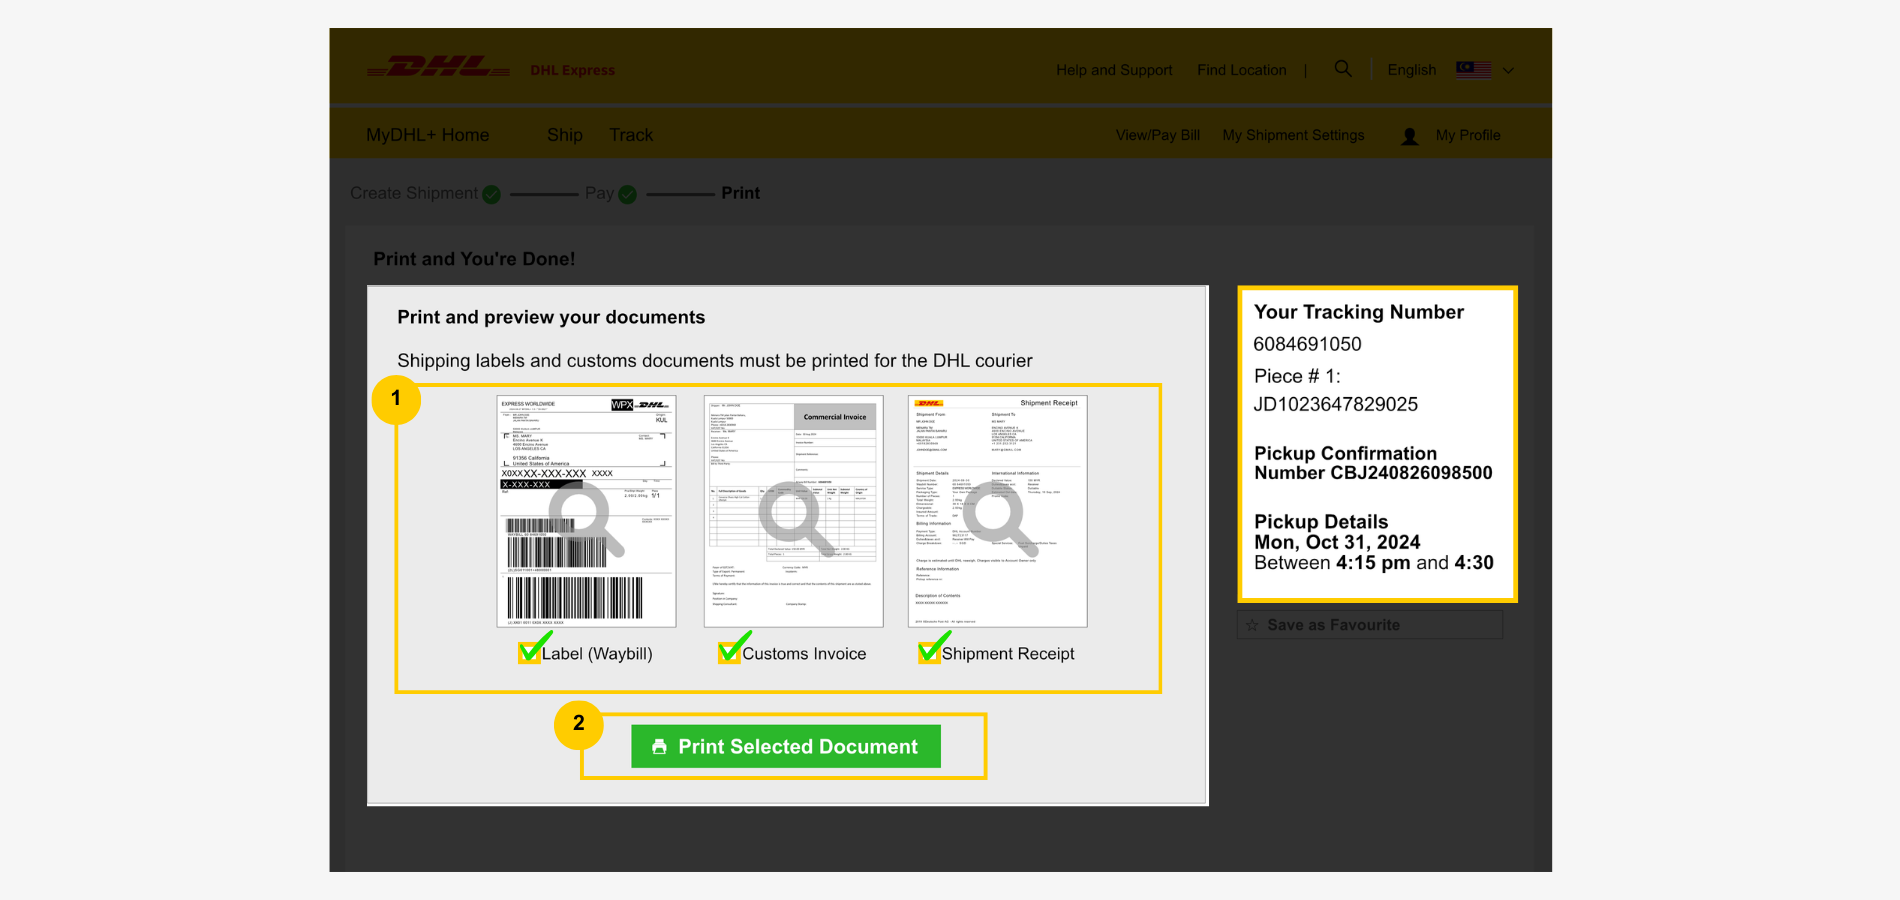
Step 10: Shipment Confirmation Details and Documents
The shipment tracking number is now available. Shipment details like the 10-digit waybill number, item quantity, and pickup schedule are displayed on the right.
Have one waybill and two customs invoices ready for the courier upon shipment pickup.
- Check the boxes of waybill, customs Invoices (mandatory), and shipment receipt (optional).
- Click 'Print' to proceed.
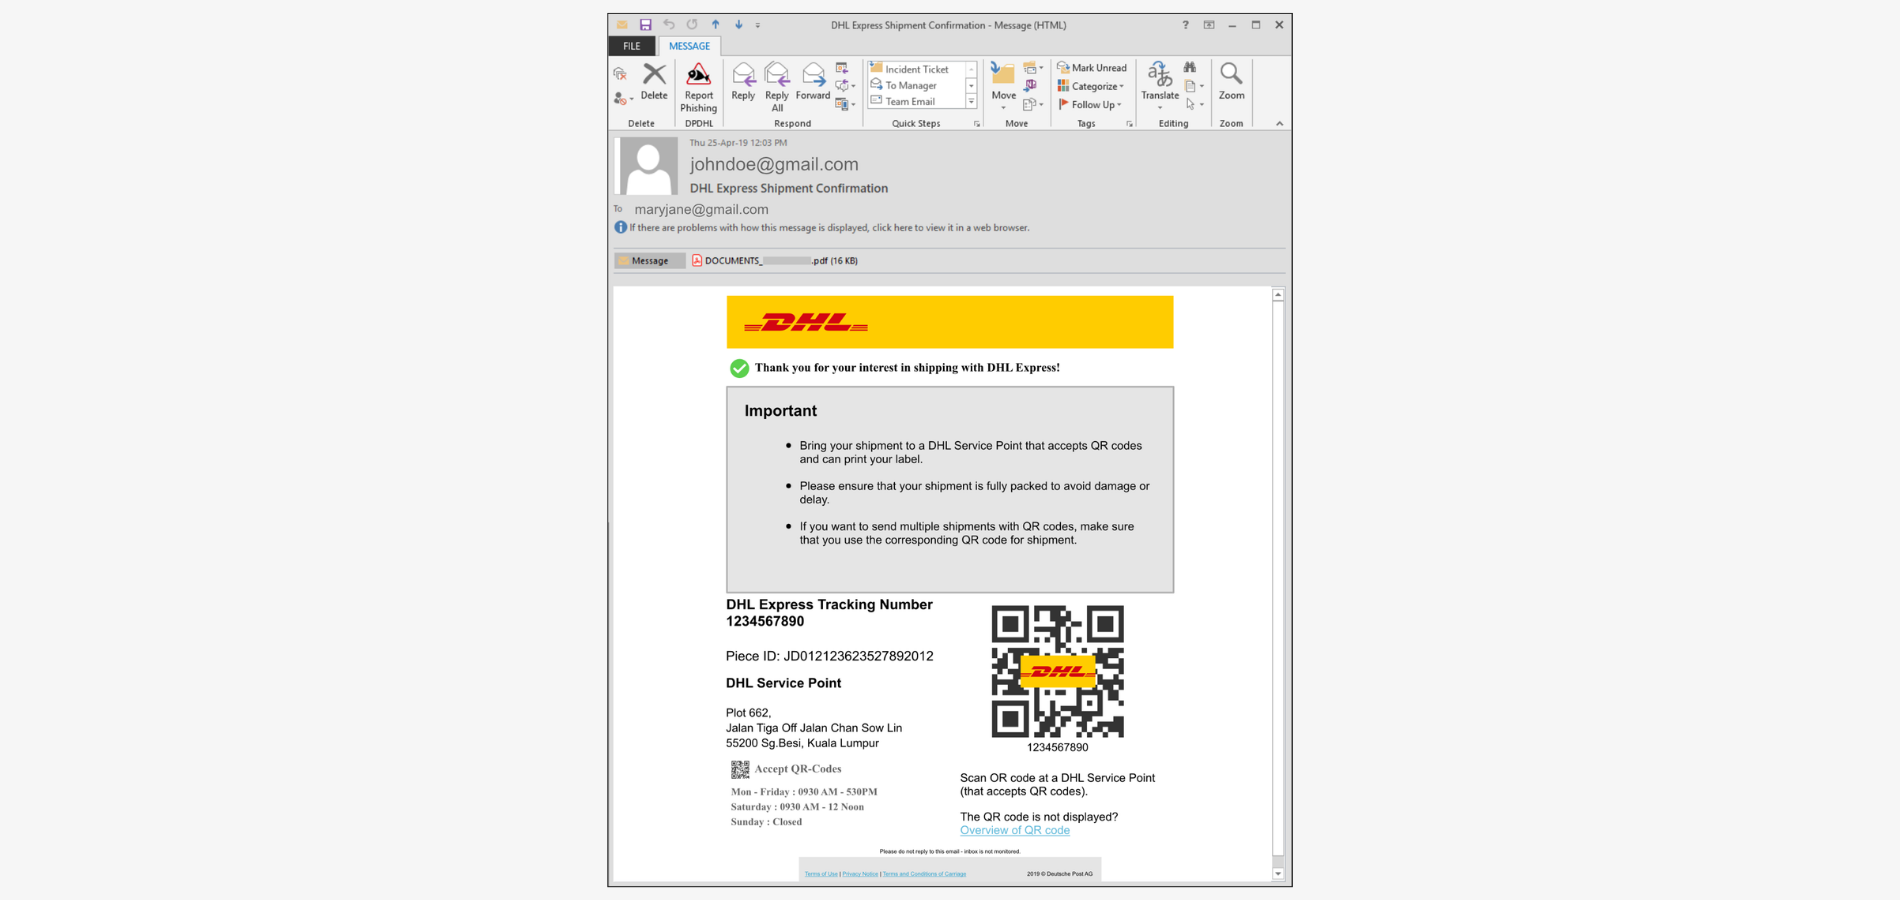
A shipment confirmation will be sent to the designated email, containing essential shipment information such as the waybill number, drop-off service point, QR code (for those who chose 'service point label printing' only), etc.
