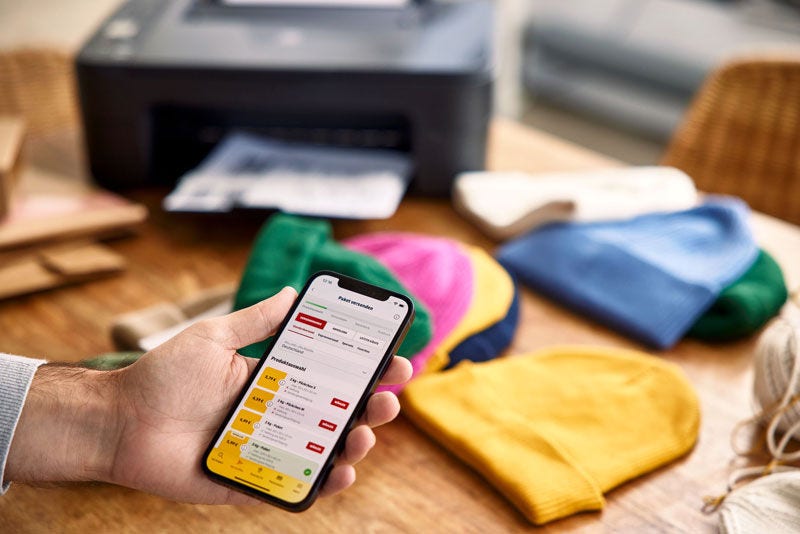
Designed and created with customers in mind, MyDHL+ is an intuitive tool built to help ensure shipping is a simple and convenient process for all involved. By integrating the most essential shipping services into a single, immensely powerful platform with one password, MyDHL+ provides greater functionality and ease of use. With an account, the complexities of international shipping are made simple because MyDHL+ allows you to ship at your convenience, on your time, and always based on your needs. At DHL Express, our goal is to provide excellence to all our clients. Simply delivered.
MyDHL+ - YOUR HUB FOR MANAGING SHIPMENTS IN SINGAPORE
As a sign of our commitment to ensuring shipping is simpler and easier to handle, DHL Express has developed a MyDHL+ guide that is easy to follow. Designed to be heavily customisable for clients for every process and business environment, MyDHL+ covers shipping-related processes and requirements in a single platform:
Finding out pricing quotations, estimates, and rates (including estimates of duties and taxes)
Creating shipping labels & invoices
How to get a DHL Express envelope
Scheduling pickups and collection
Setting up address books for easy access
Managing and tracking shipments
Viewing records of your shipping history
Accessing shipment bills
Customising your shipping preferences, dashboard and address book
Preparing customs invoice data using invoice samples and templates
Just follow these step-by-step guides to the most used processes on MyDHL+.
Adding Addresses To Mydhl+ Address Book
Add addresses manually by keying in correct and complete details about your recipients.
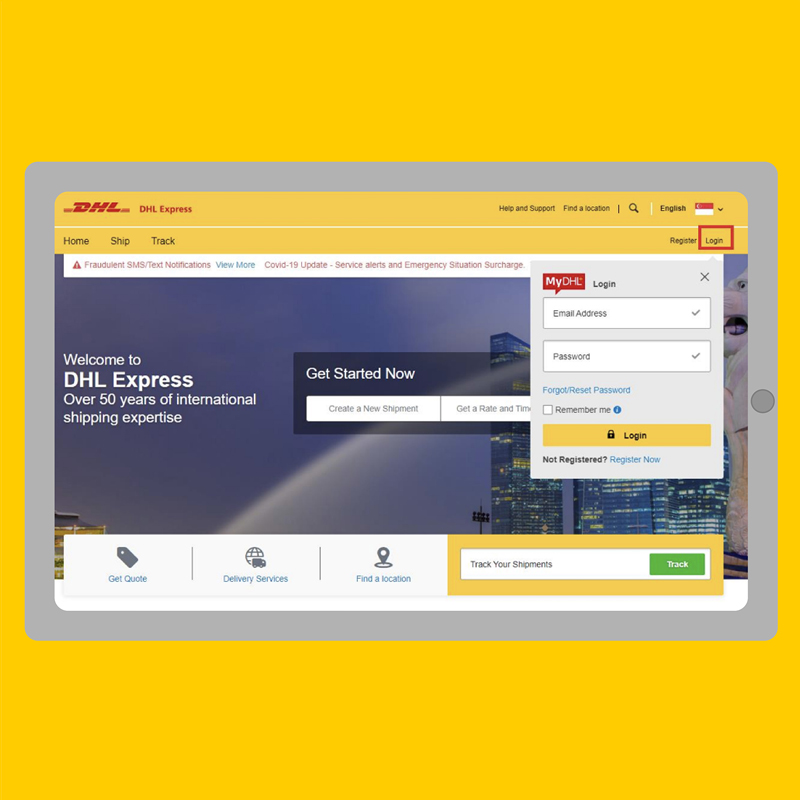
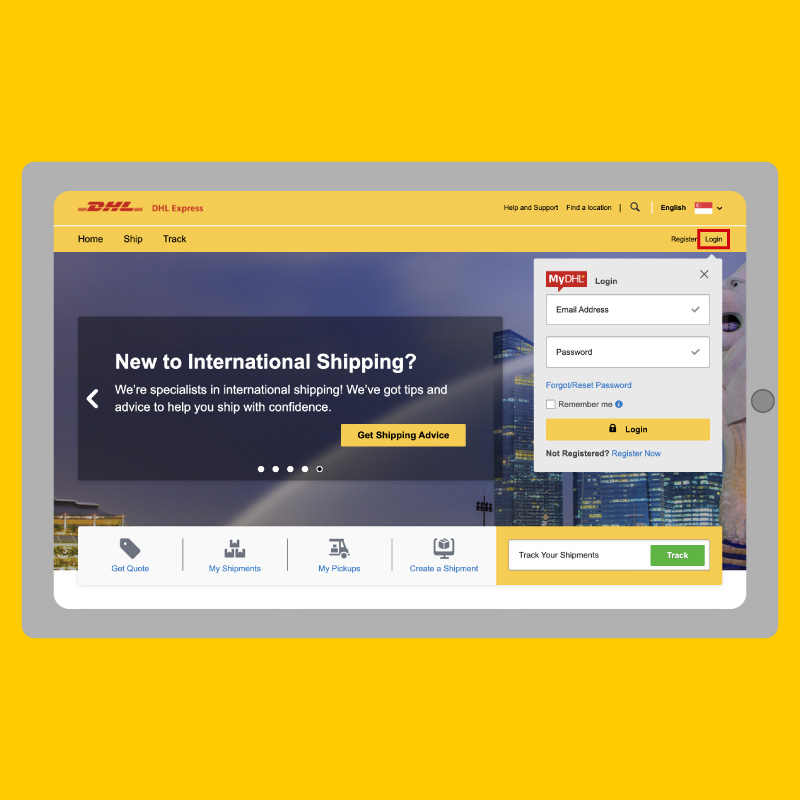
STEP 1:
Login to MyDHL+.
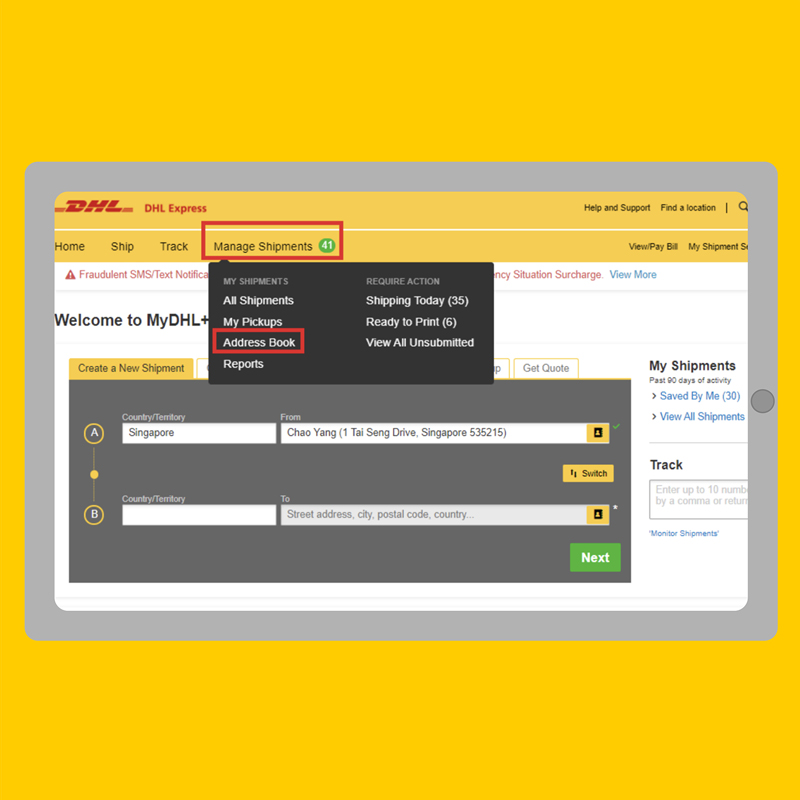
STEP 2:
Click Manage Shipments / Address Book.
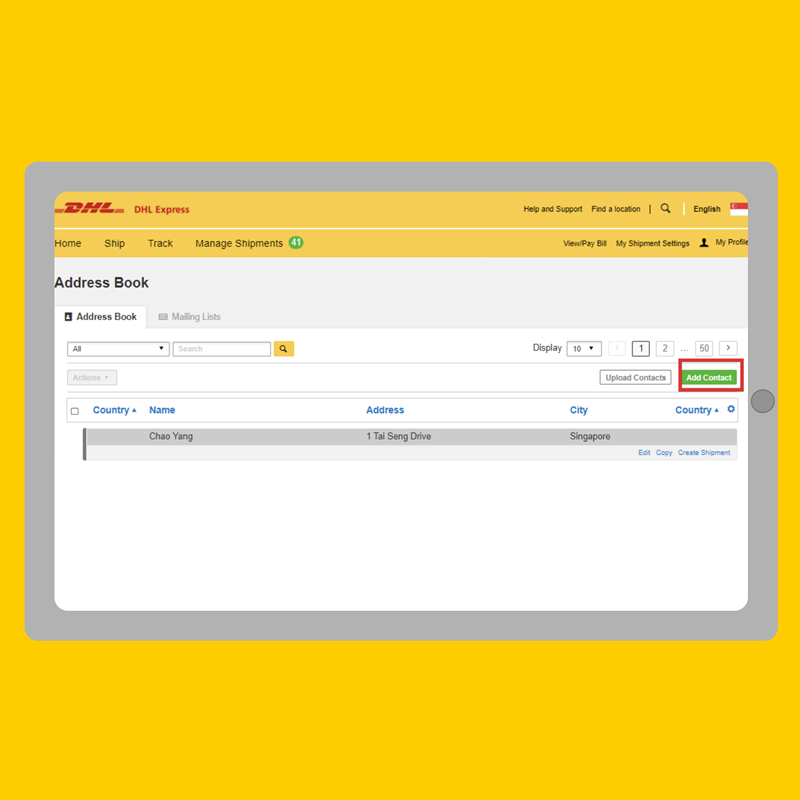
STEP 3:
Click Add Contact.
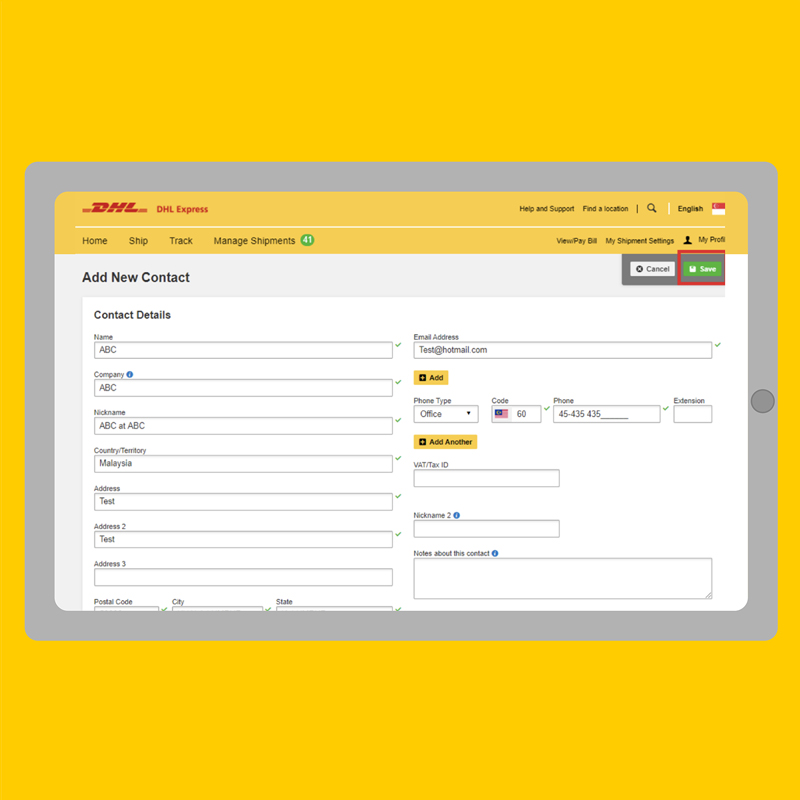
STEP 4:
Fill in your contact’s details and click Save.
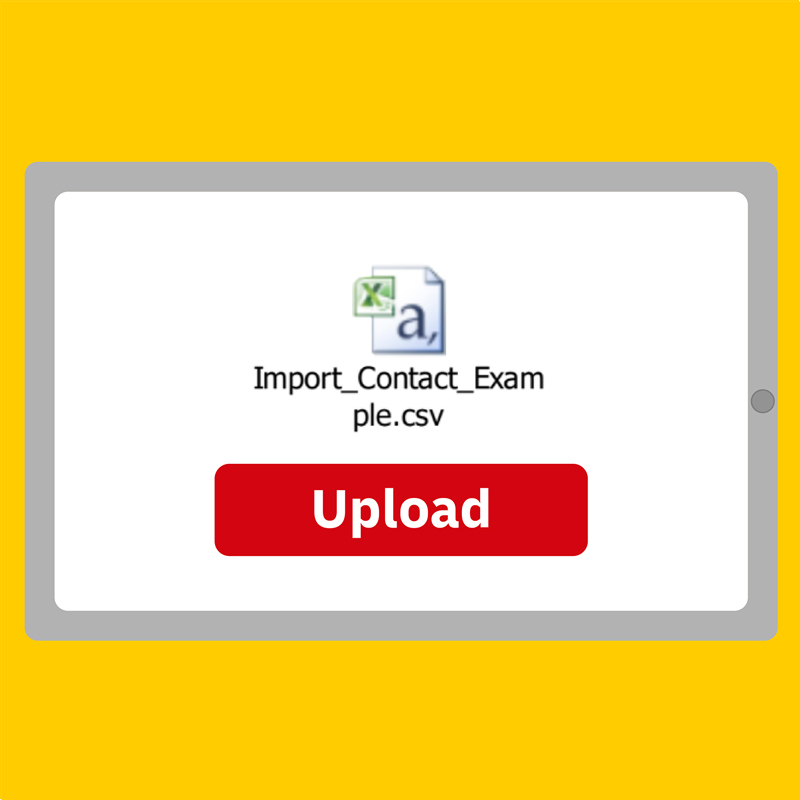
You may also upload more than one address by downloading all your contacts into a “.csv” file.

STEP 1:
Click Manage Shipments / Address Book / Upload Contacts.

STEP 2:
Click Upload My File.
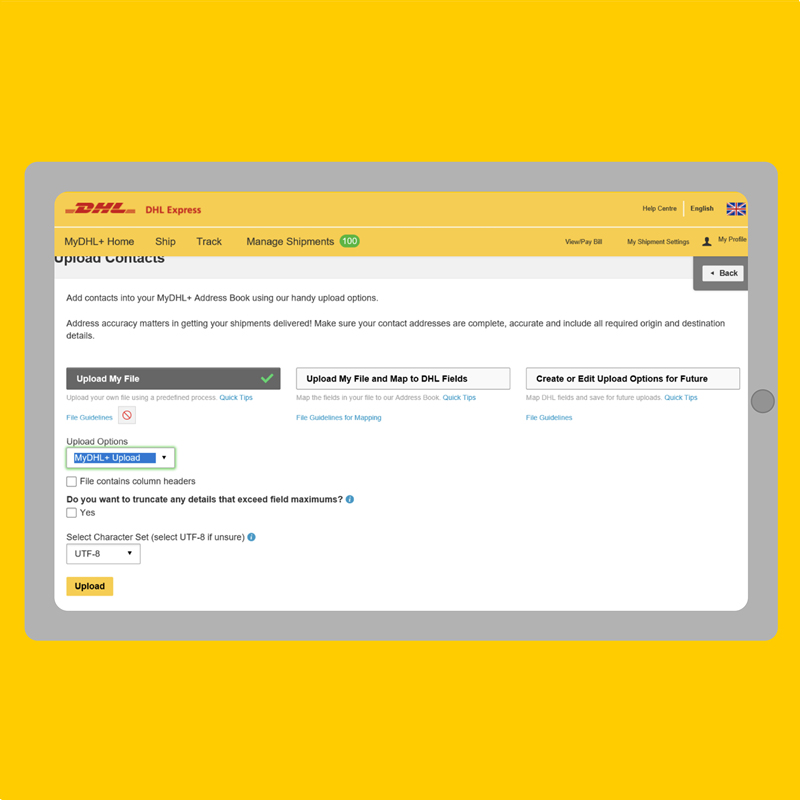
STEP 3:
Click MyDHL+ Upload.
STEP 4:
Select your CSV file and click Upload.
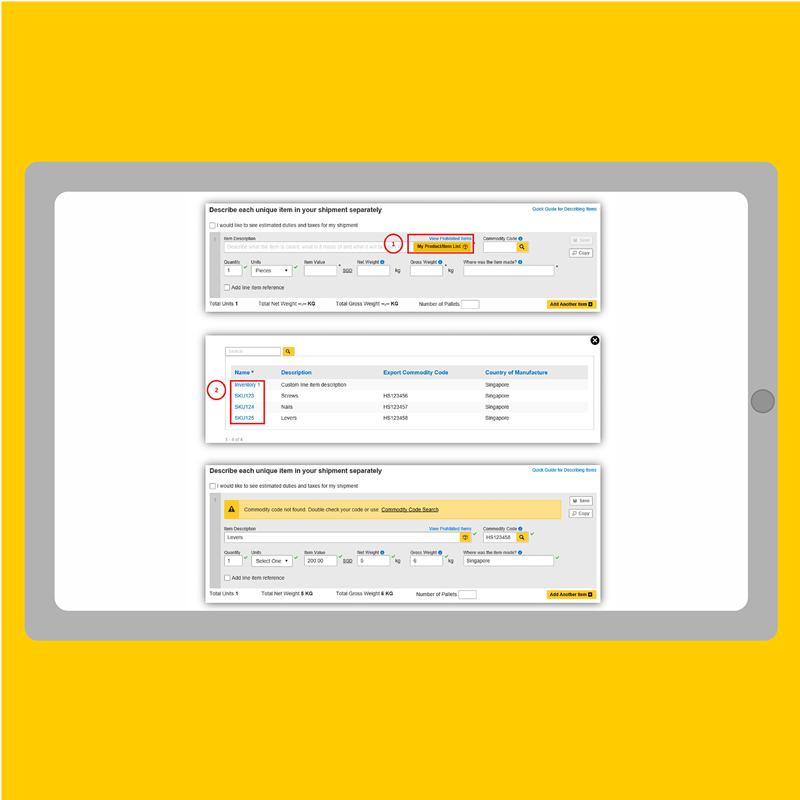
Providing Customs Invoice Data
Manual
Entry
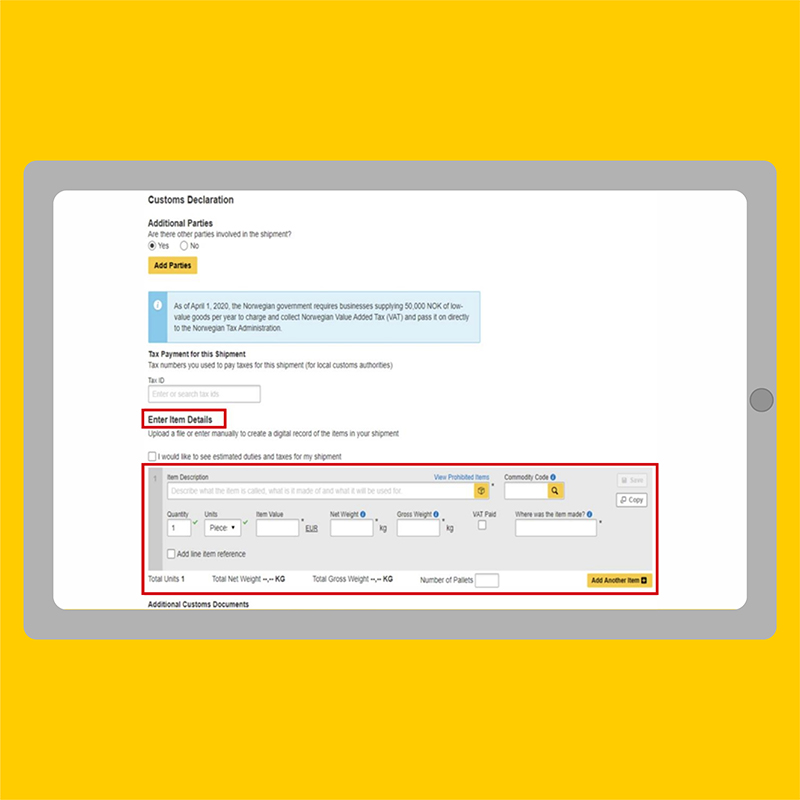
STEP 1:
Click Add items and complete the required fields. Click Add Another Item as needed.
Create via Customs Invoice Template
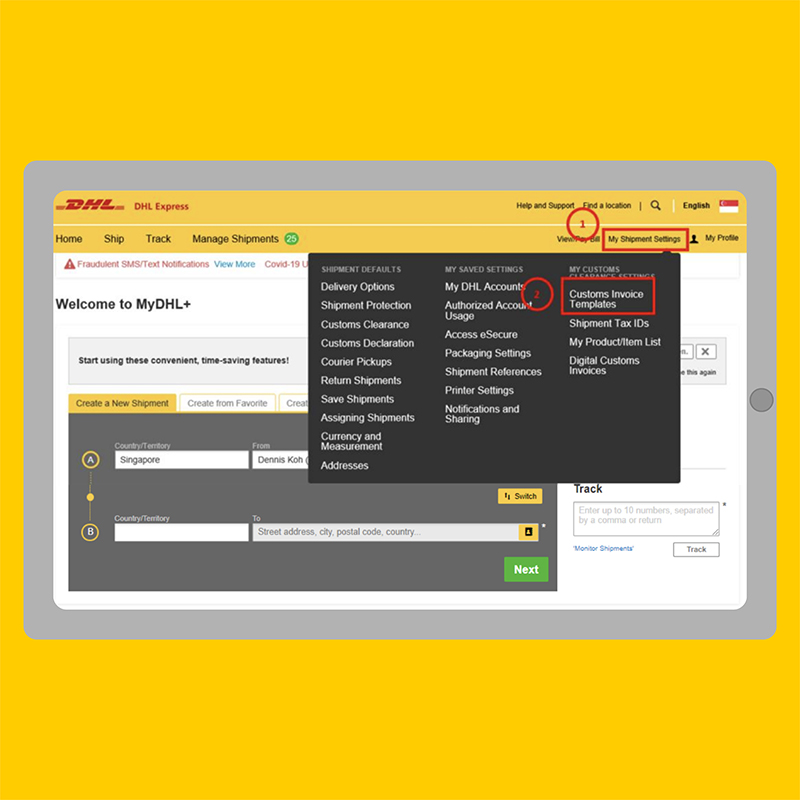
STEP 1:
Login to MyDHL+ and click My Shipment Settings / Customs Invoice Templates.
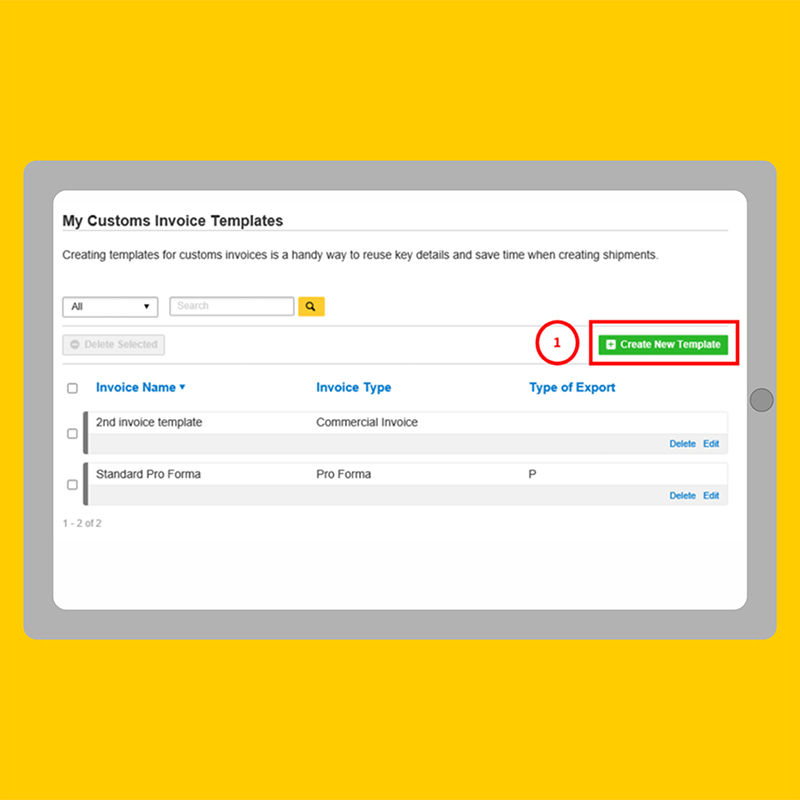
STEP 2:
Click Create New Template.
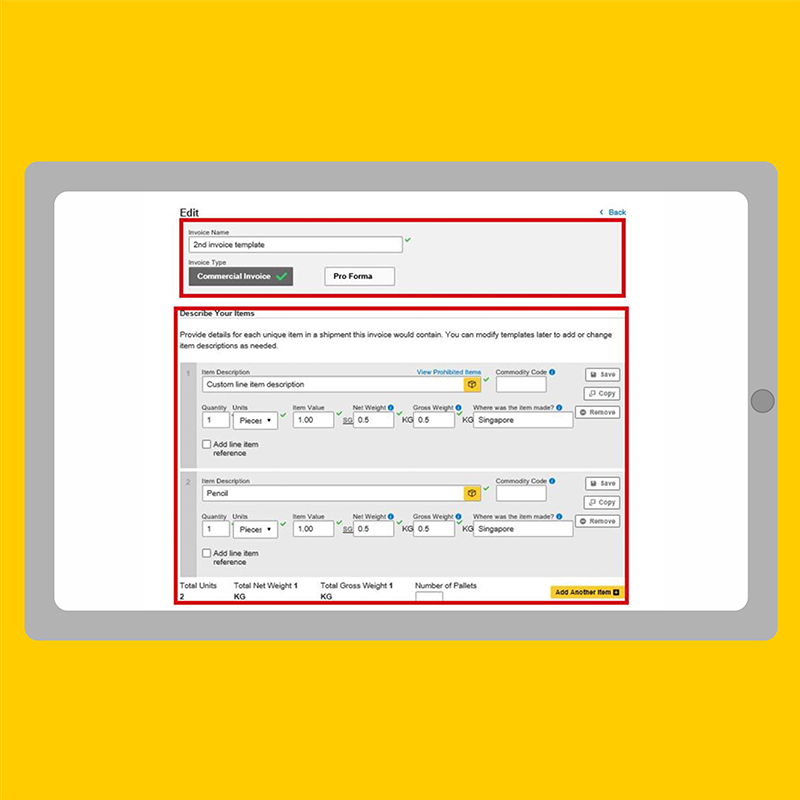
STEP 3:
Fill out all relevant details completely.
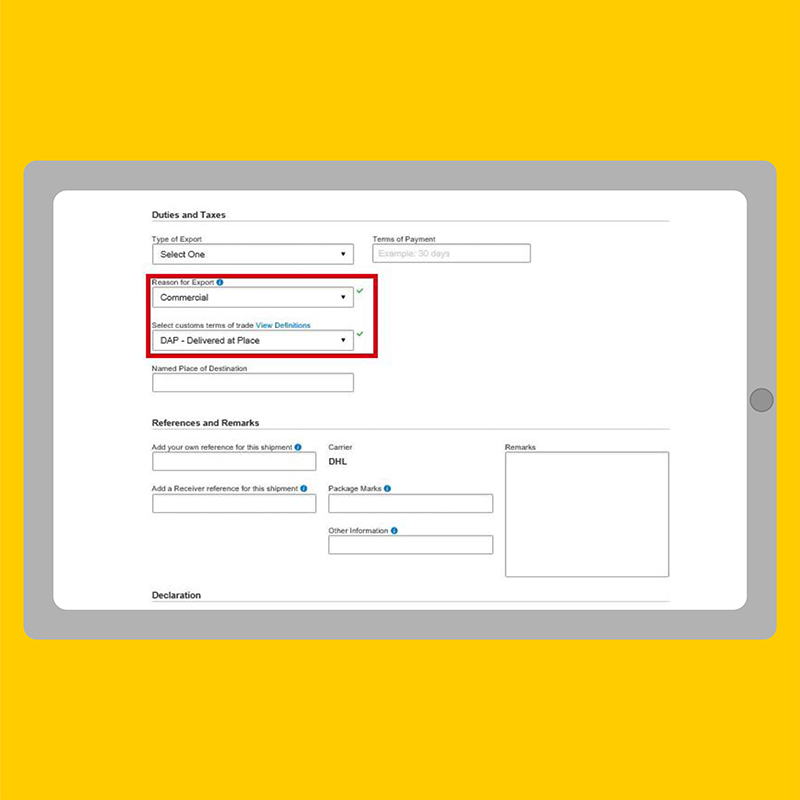
STEP 4:
Indicate Reason for Export and Select customs terms of trade. Update and Save when completed.
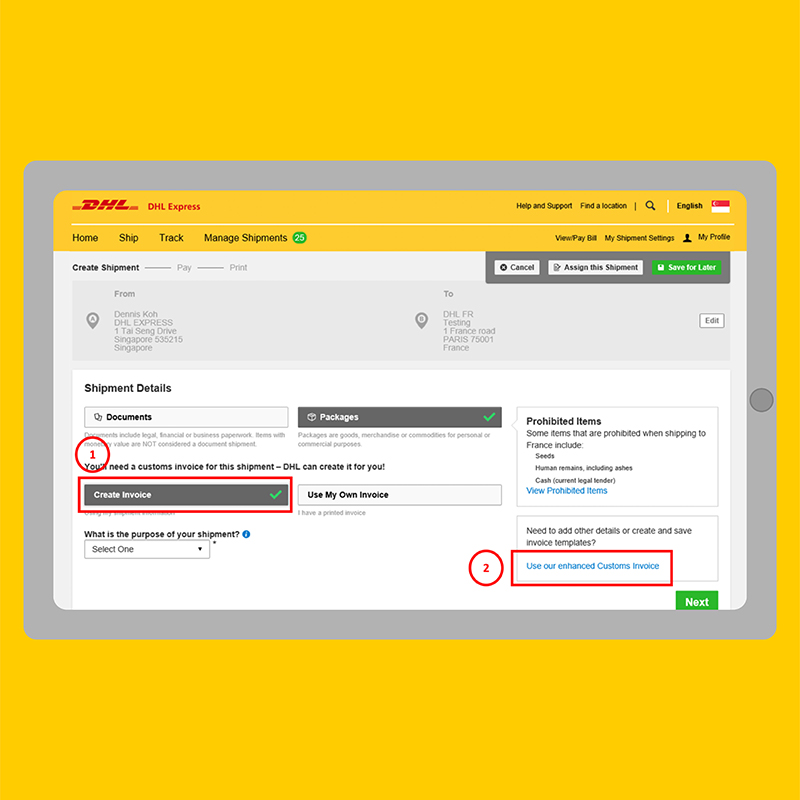
STEP 5:
To use your Customs Invoice Template, click Create Invoice and use our enhanced Customs Invoice Template during shipment preparation.
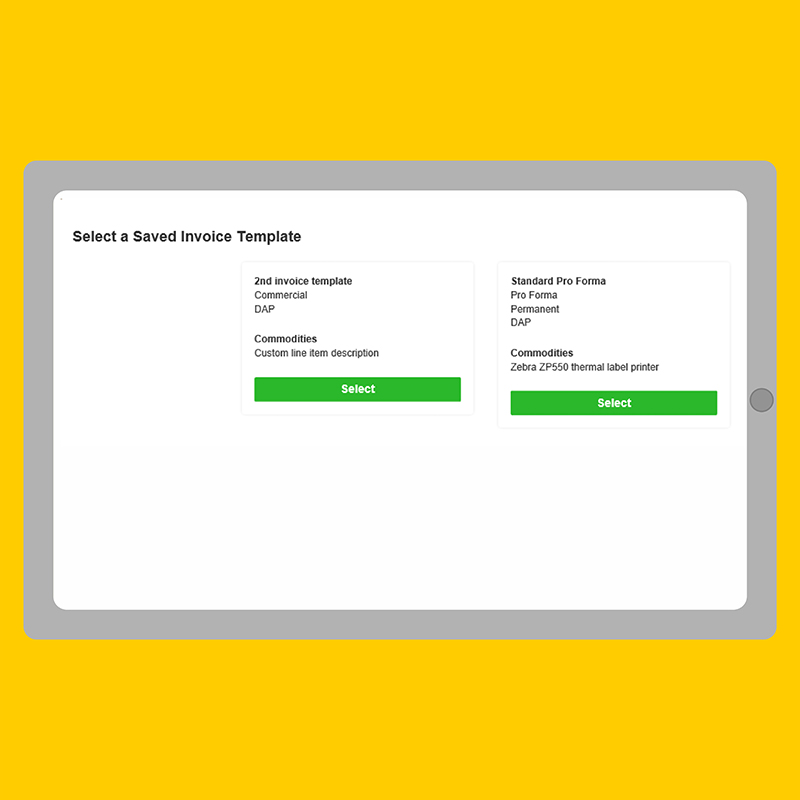
STEP 6:
Select the Invoice Template you saved.
UPLOAD A PRODUCT/ITEM LIST FOR EASY SHIPMENT PREPARATION WITH CUSTOMS INVOICE ELECTRONIC DATA
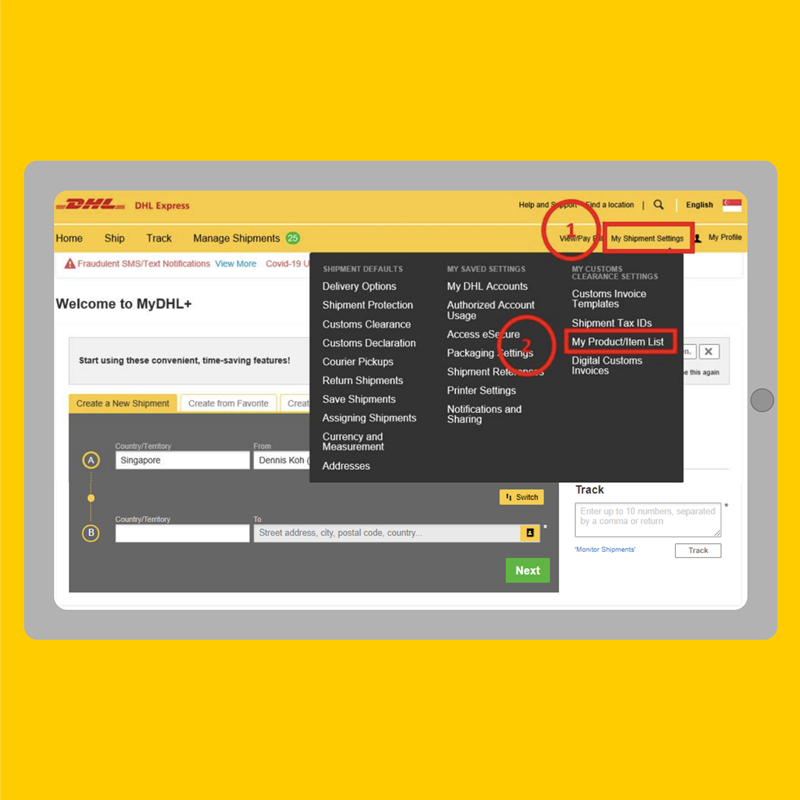
STEP 1:
Login to MyDHL+. Click My Shipment Settings / My Product/item list.
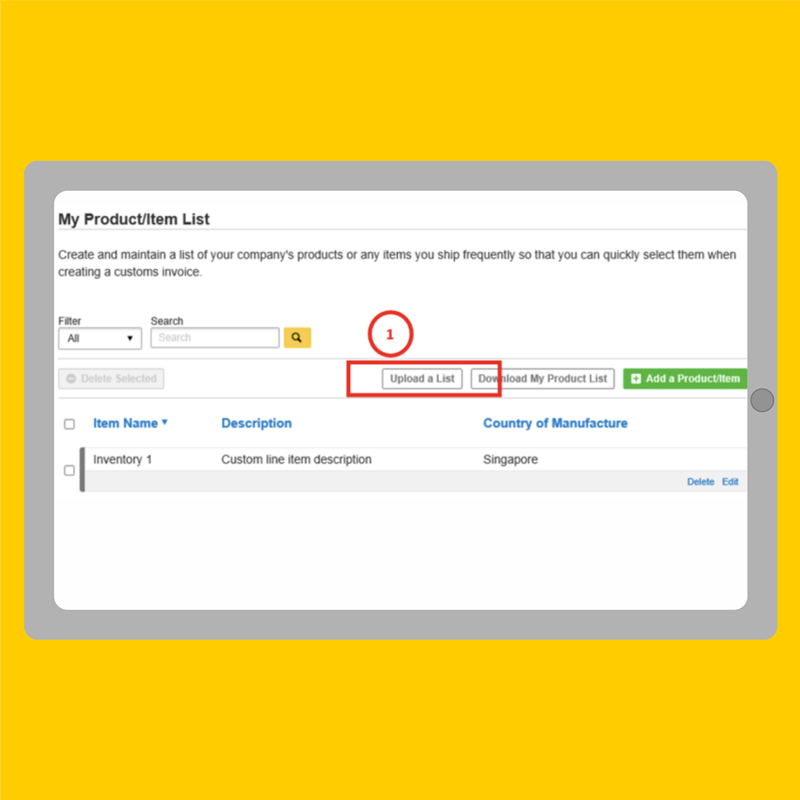
STEP 2:
Click Upload a list.
STEP 3:
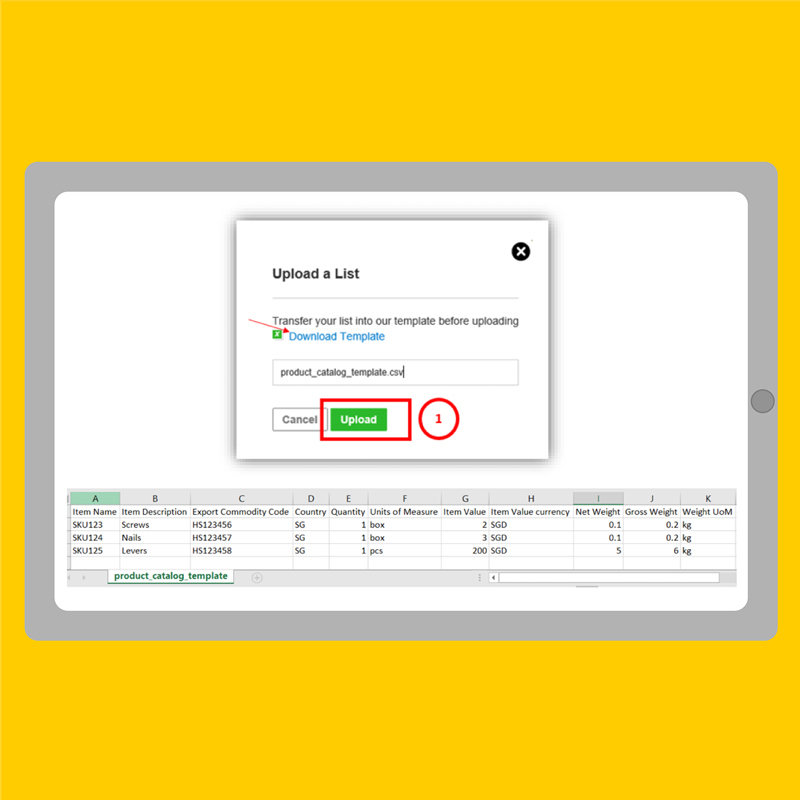
Click Browse. Locate and select your product template csv file. Click Upload.
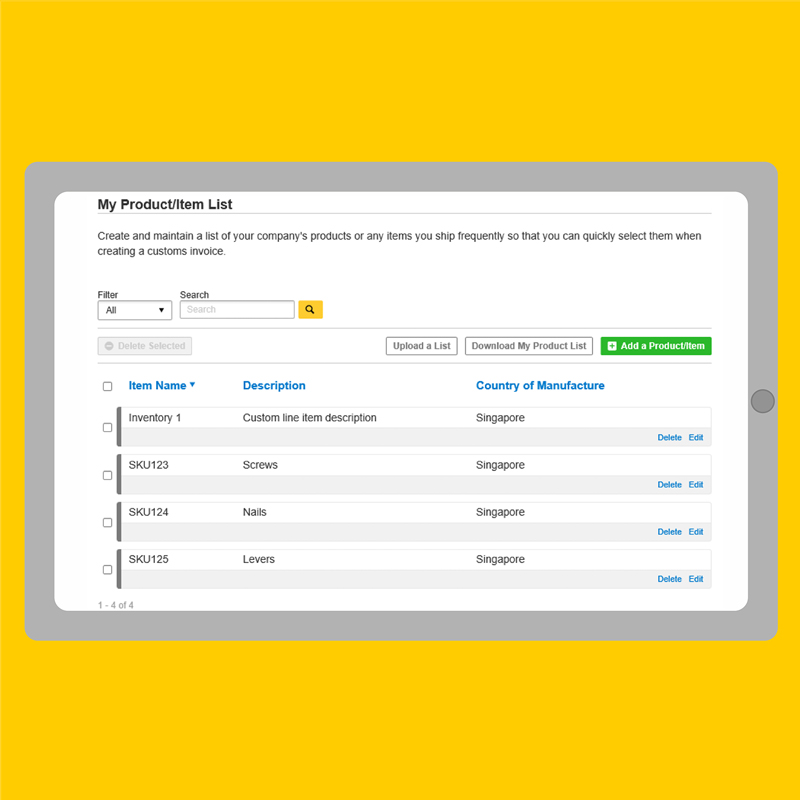
STEP 4:
Your product/item list is now populated and ready to be accessed on your next manual Customs Invoice entry.
STEP 5:
Access your list when creating a Customs Invoice by clicking My Product/Item list and select the list you uploaded.
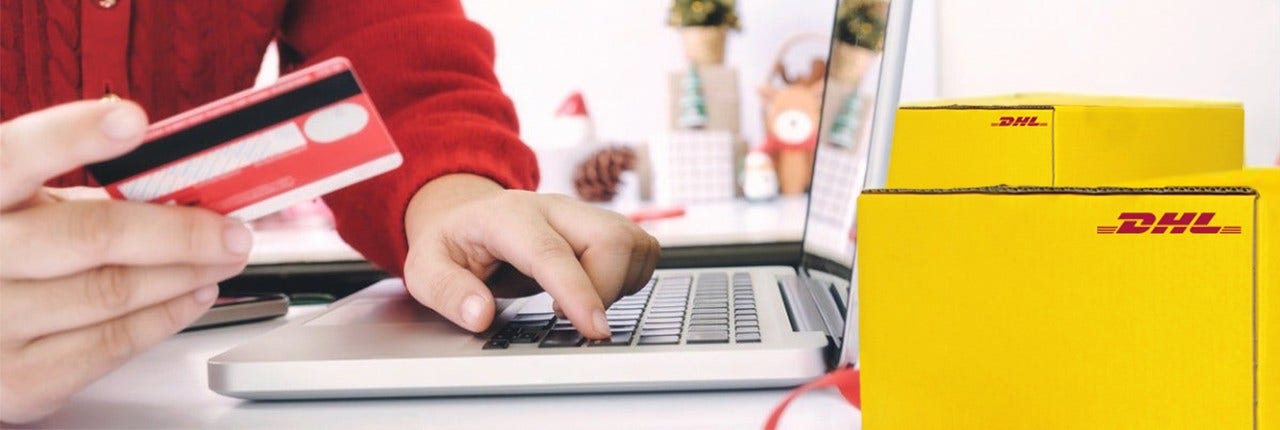
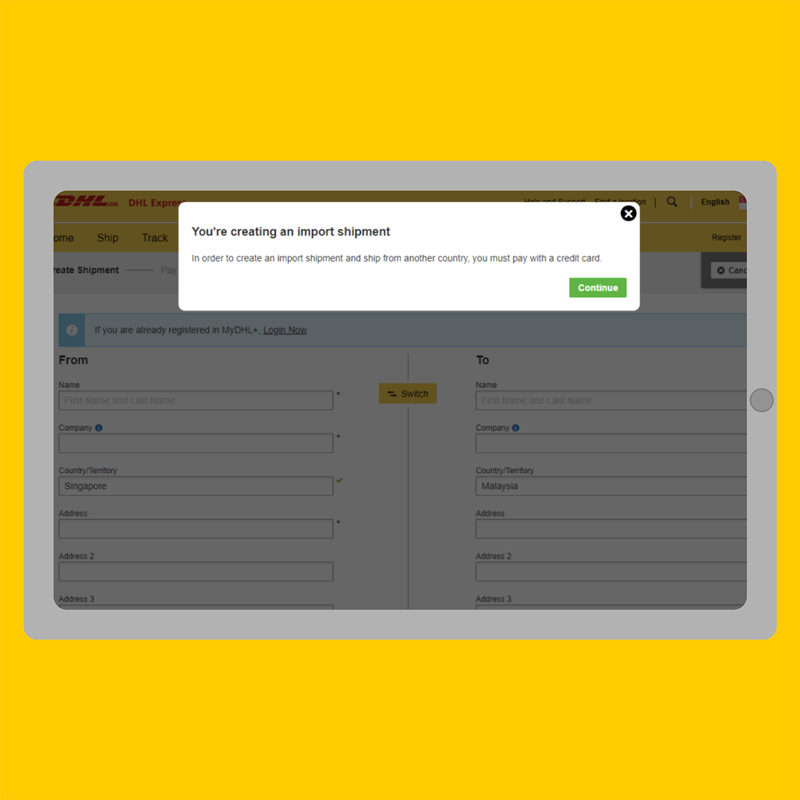
Shipping And Paying By Credit Card
Login to MyDHL+. If you have not yet done so, follow steps to register here.
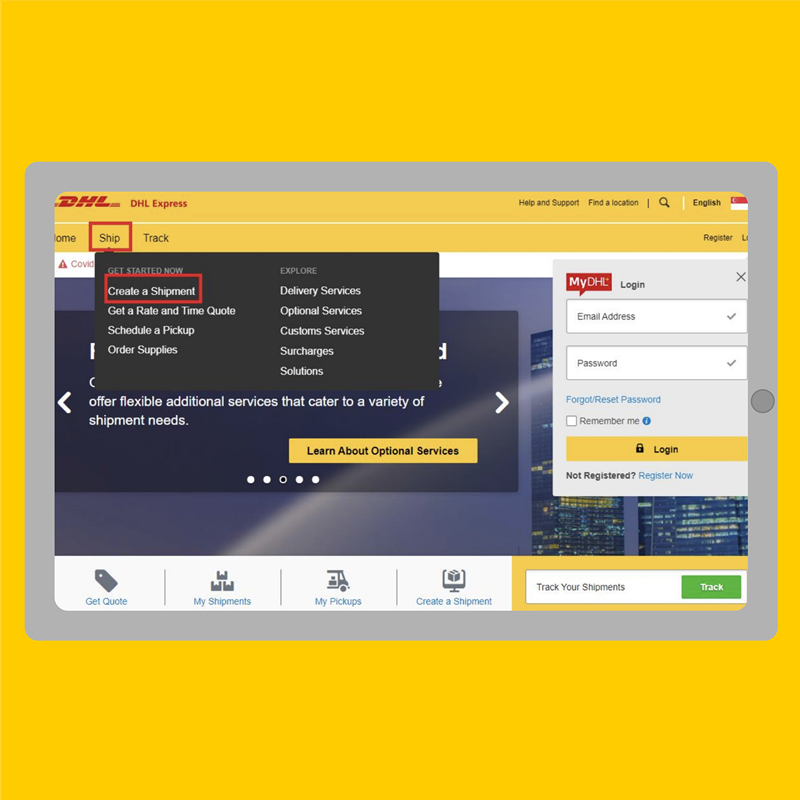
STEP 1:
Click Ship / Create a Shipment.
STEP 2:
Click Continue. Fill out all fields and click Next.
STEP 3:
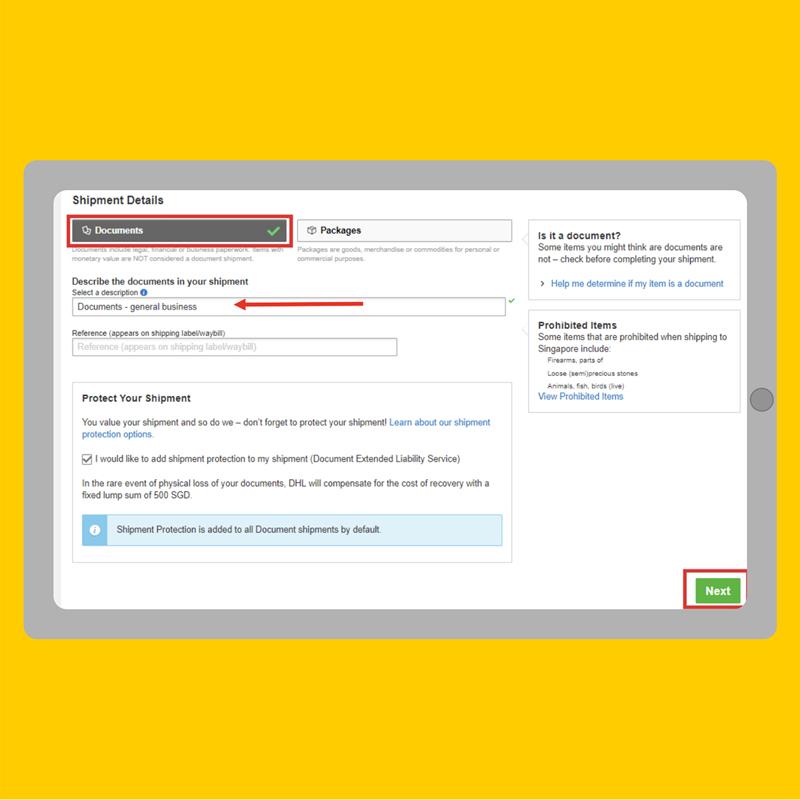
Select Documents. Then select the description that describes your shipment. Click Next.
STEP 4:
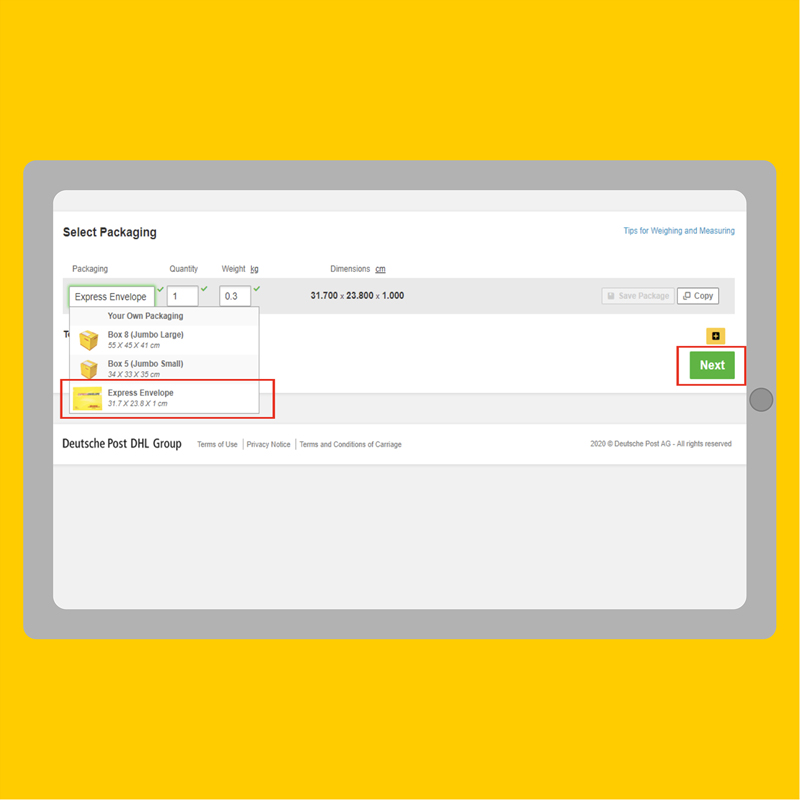
Select Packaging type and click Next.
STEP 5:
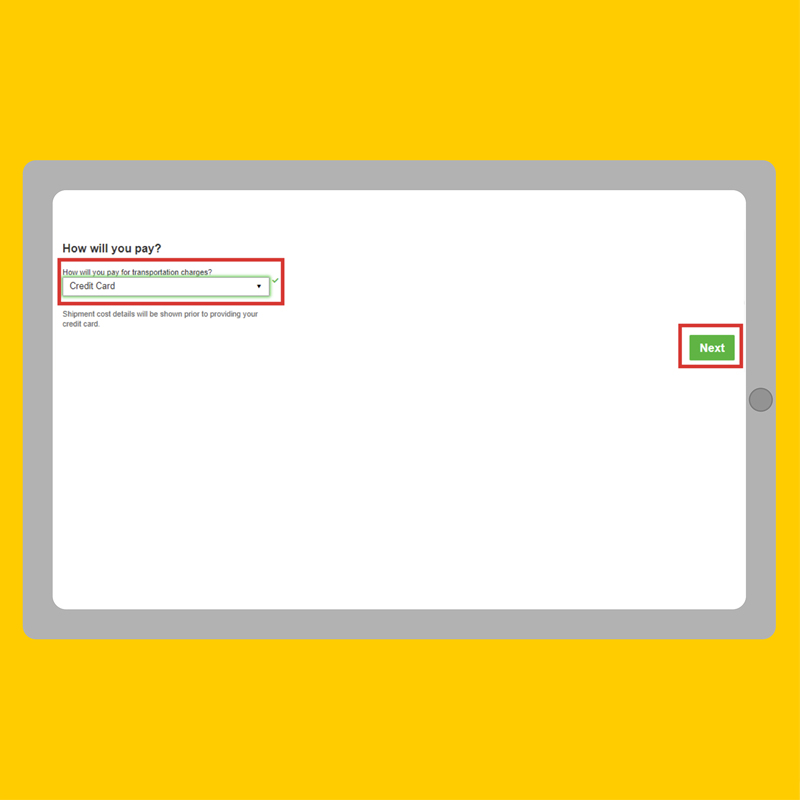
Specify which Credit Card to pay for this shipment, then click Next.

STEP 6:
Click Shipment Date. Choose from the Delivery Date options shown to set the date of your shipment. Click Select.
STEP 7:
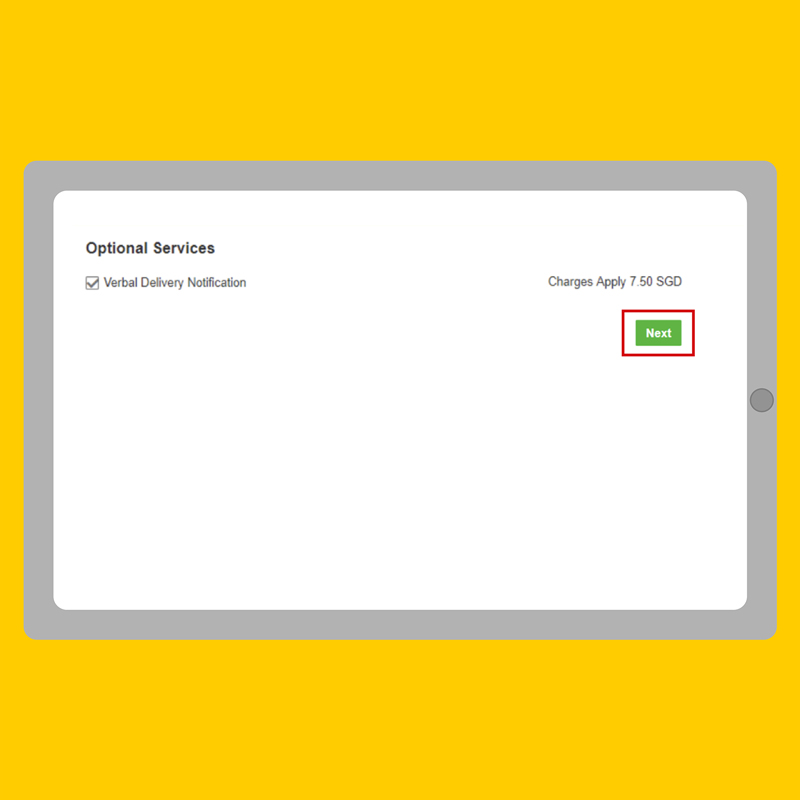
You may opt to select Optional Services per your shipment needs. Added charges may apply. Click Next.
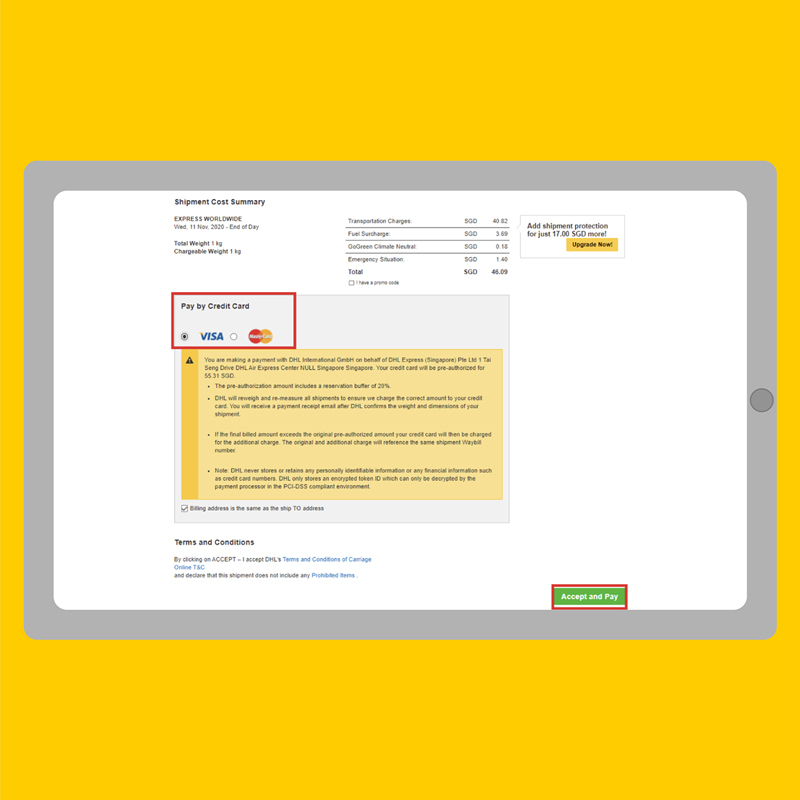
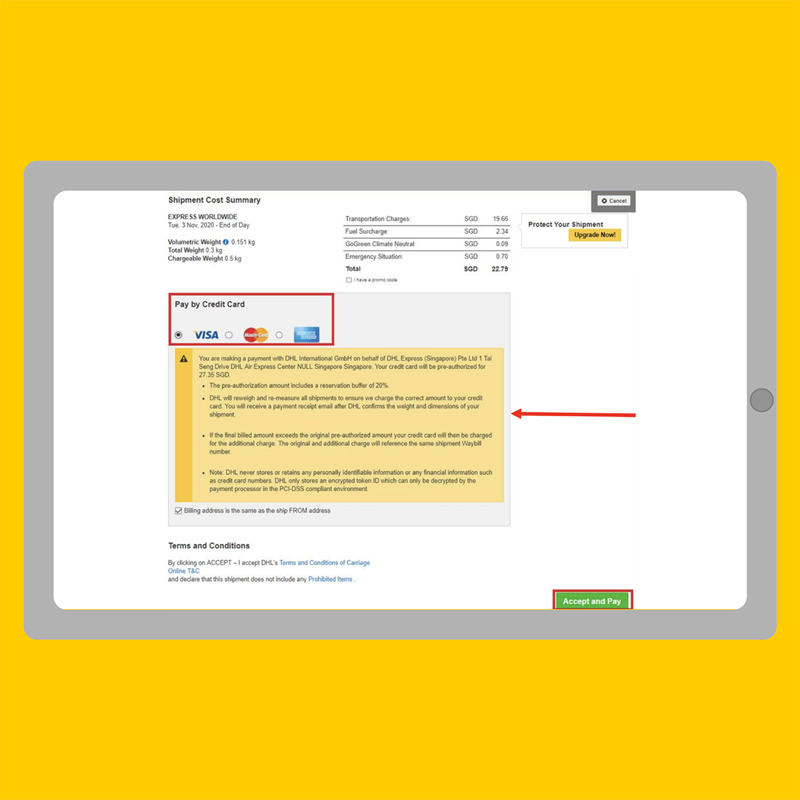
STEP 8:
Check the Estimated Charges. Choose to pay by Visa or Mastercard. Click Accept and Pay.
STEP 9:
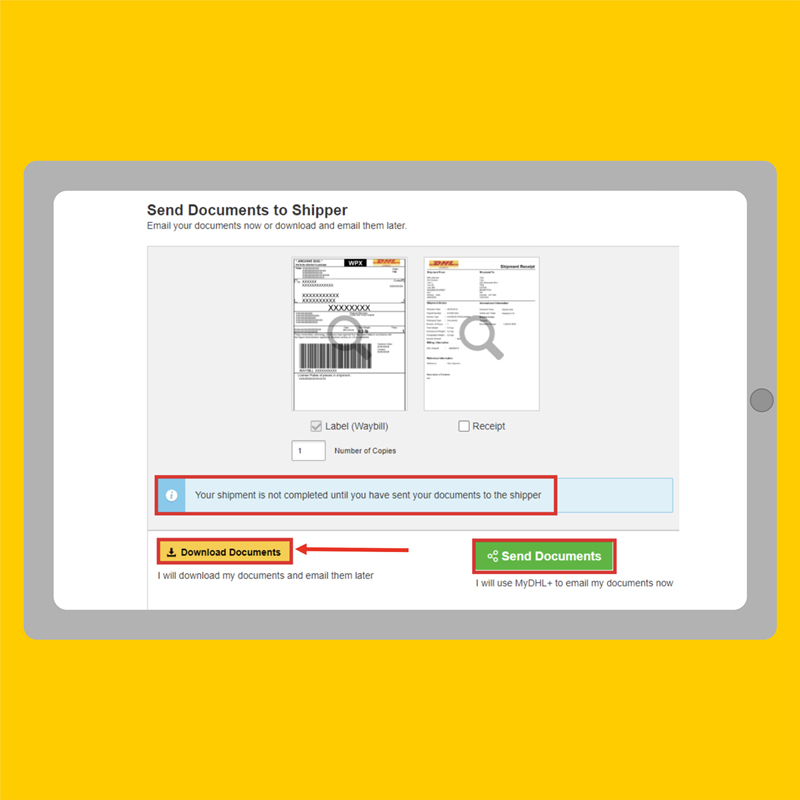
Click Send Documents to the shipper to provide to the courier.
STEP 10:
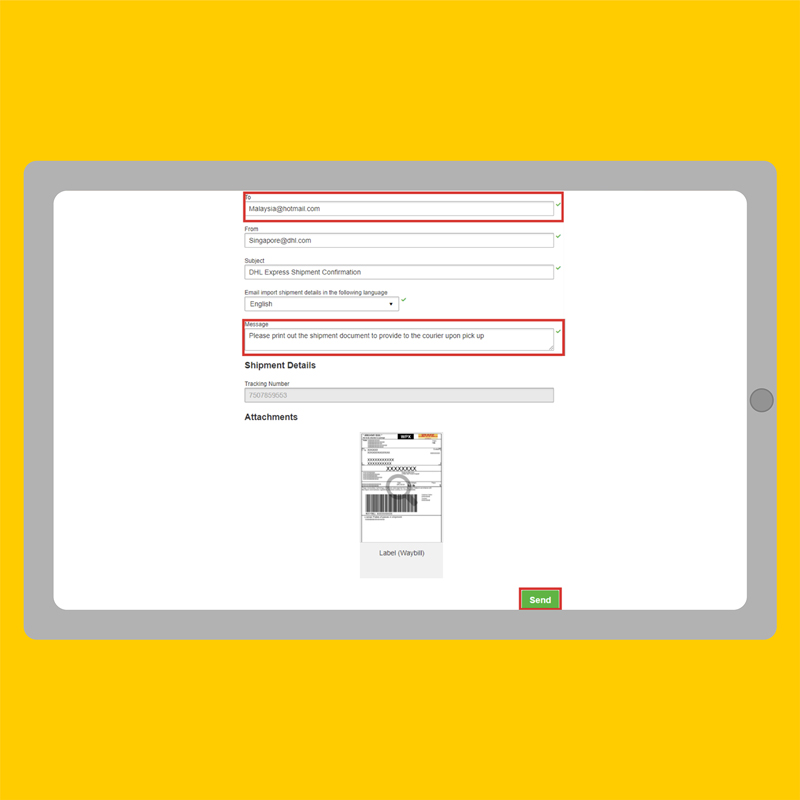
Fill out the Shipper Email and the Message to inform the shipper to print out the shipping document.
STEP 11:
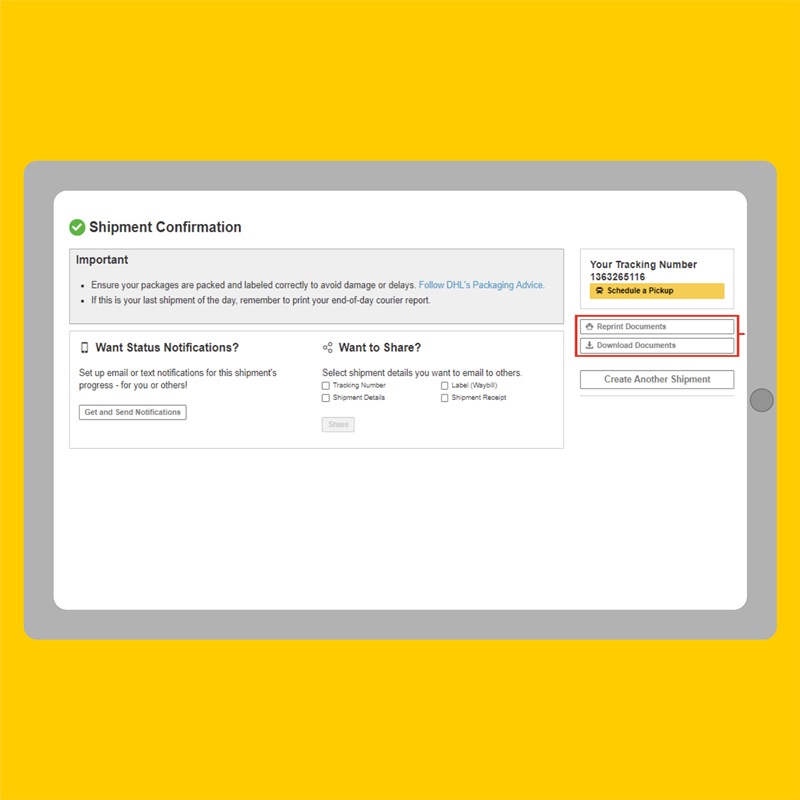
Reprint Documents or Download a copy of the documents.
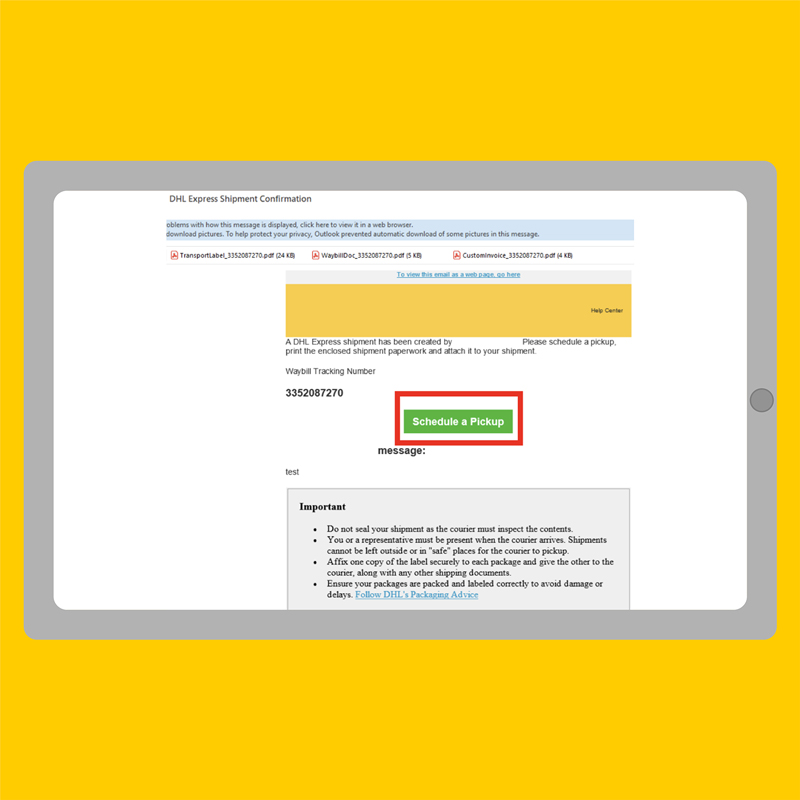
STEP 12:
Click Schedule a Pickup.
EXPORT
Follow ‘IMPORT’ steps 1-7.

STEP 8:
Click Yes - Schedule a Pickup. Drag the yellow tag on the timeline to set your Pickup time range. Choose Pickup specific location and click Next.
STEP 9:
Check the Estimated Charges. Choose to pay by Visa or Mastercard. Click Accept and Pay.
STEP 10:
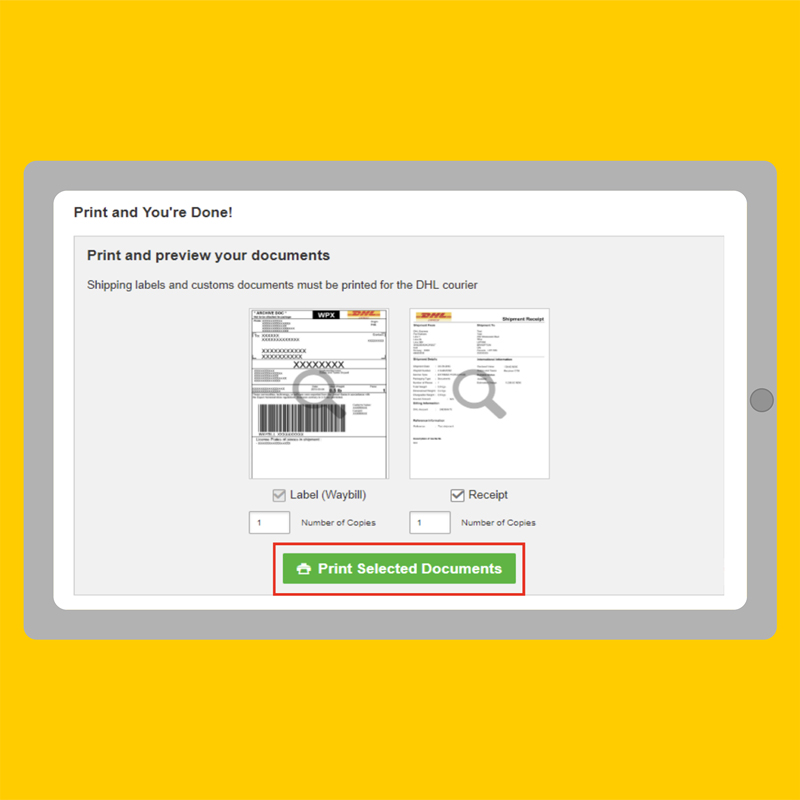
Click Print Selected Documents to provide copies of the Air Waybill and Waybill Document for courier upon pickup.
Note: Please allow pop up and Java Script to function.

STEP 11:
Reprint Documents or Download copies of the documents for yourself.
Shipment Upload Guide
Uploading shipments into MyDHL+ is quick and easy once you’ve imported and mapped a file for the first time. The easiest way to mass upload shipments is to use the MyDHL+ Upload option.
UPLOAD AND MAP A SHIPMENT FILE (FIRST TIME)
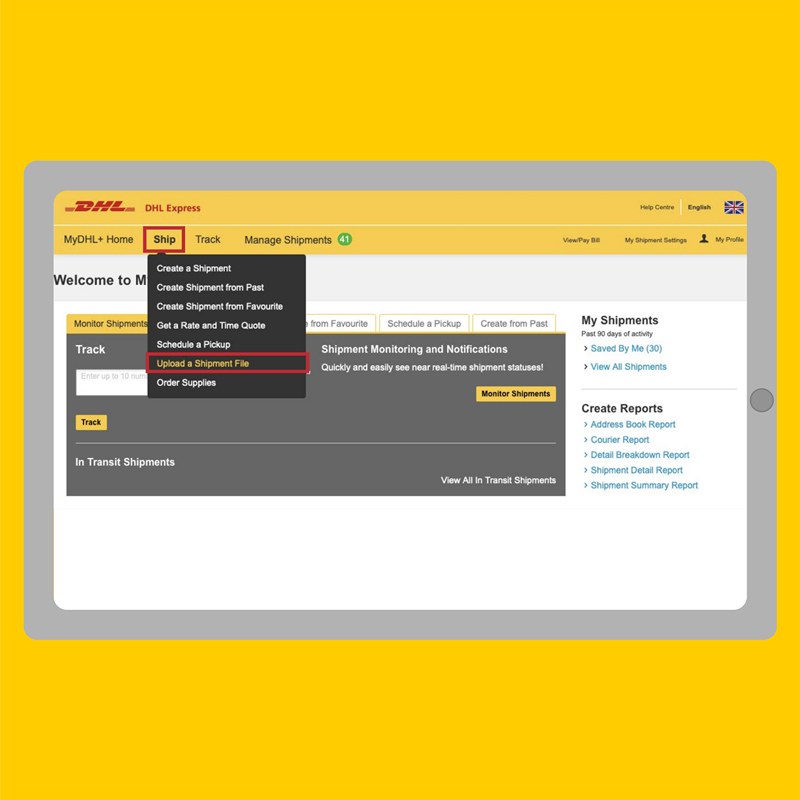
STEP 1:
Click Ship / Upload a Shipment File.
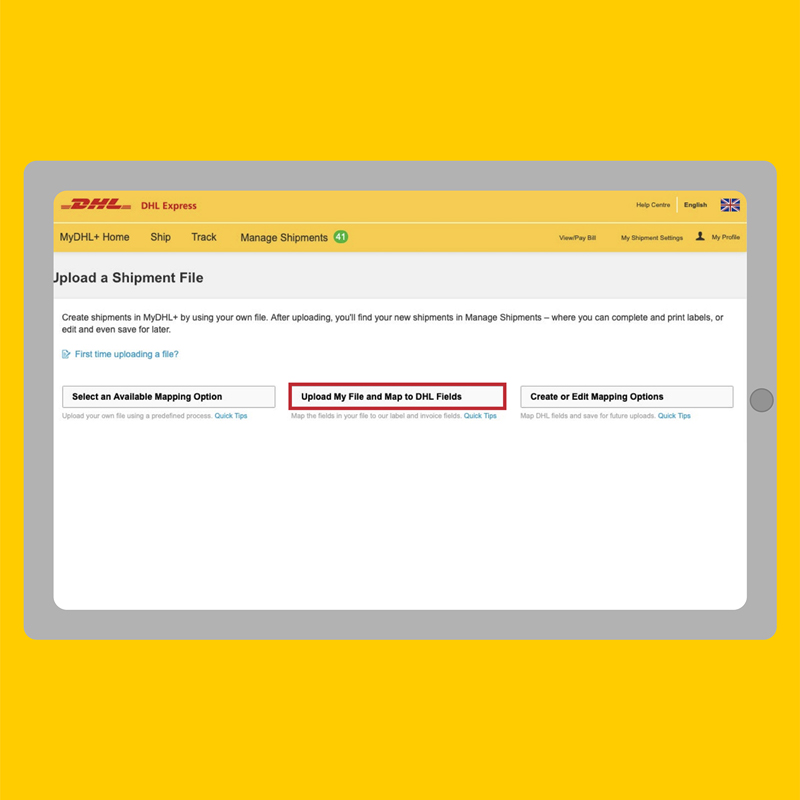
STEP 2:
Select Upload My File and Map to DHL Fields.
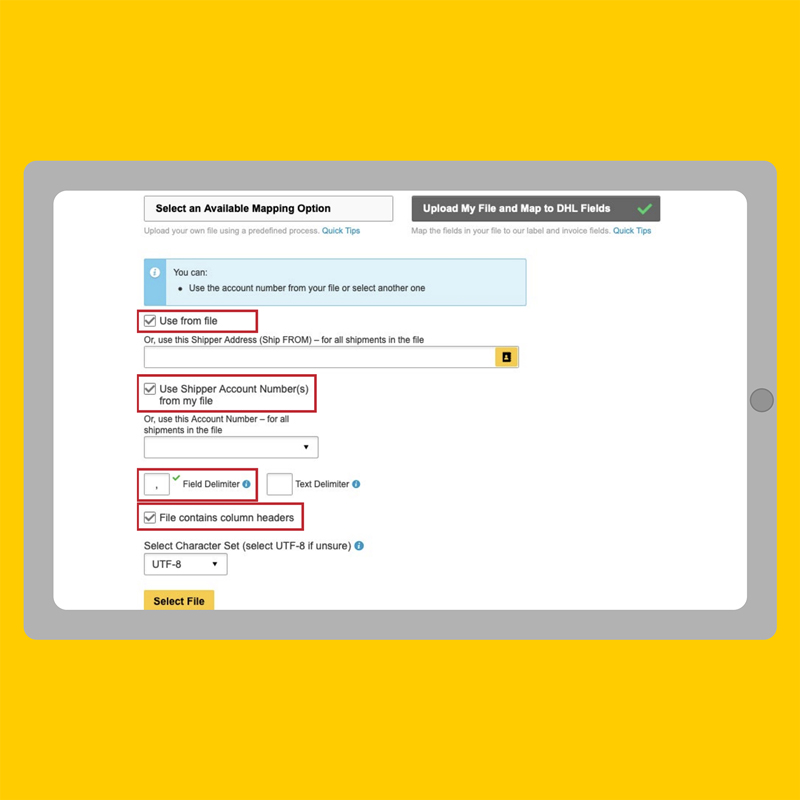
STEP 3:
Set the parameters for your shipment file upload, then click Select File.

STEP 4:
Locate your csv file and click Choose / Open.
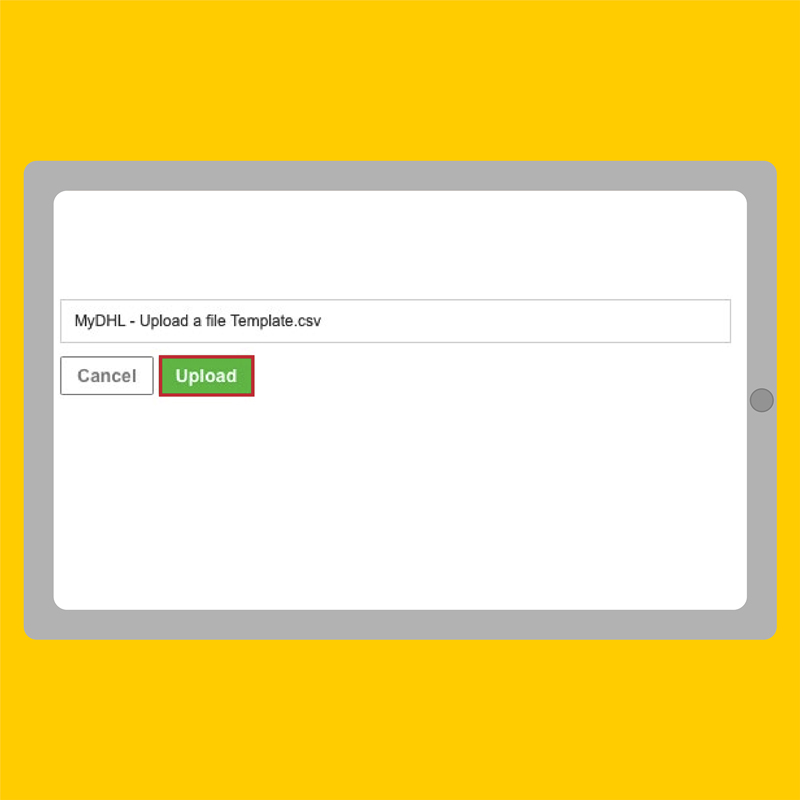
STEP 5:
Click Upload.
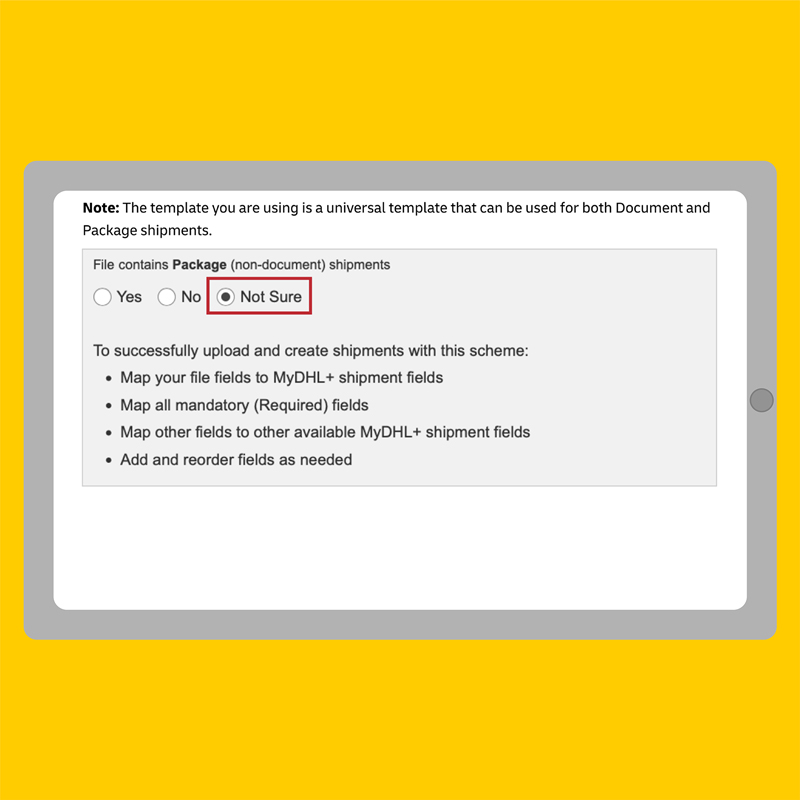
STEP 6:
To ensure successful uploads, select Not Sure.
STEP 7:
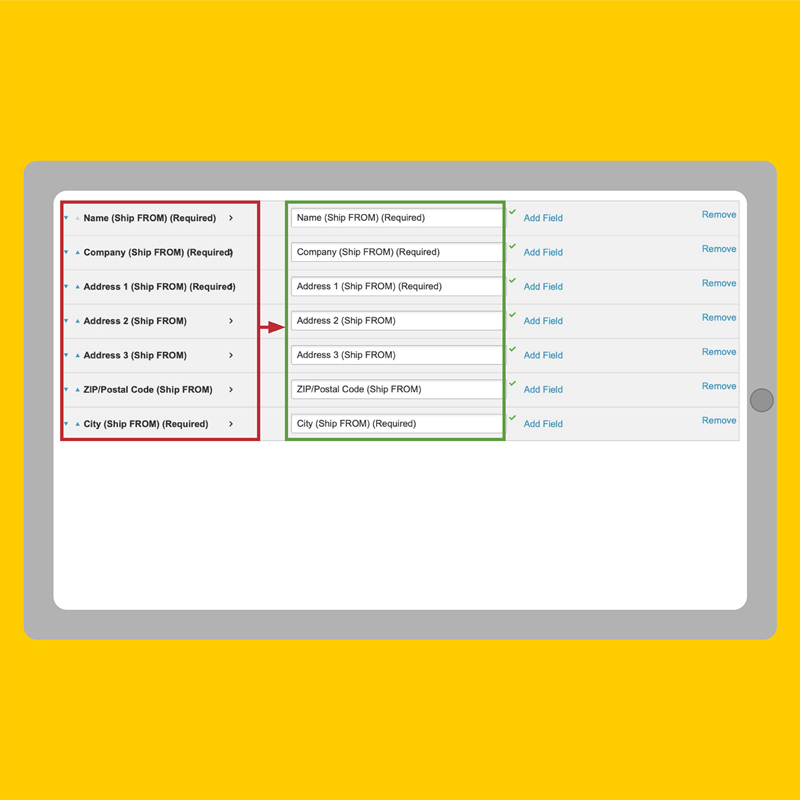
Map all CSV fields on the left to the MyDHL+ fields on the right.
Note: The wordings will be exactly the same between each column.
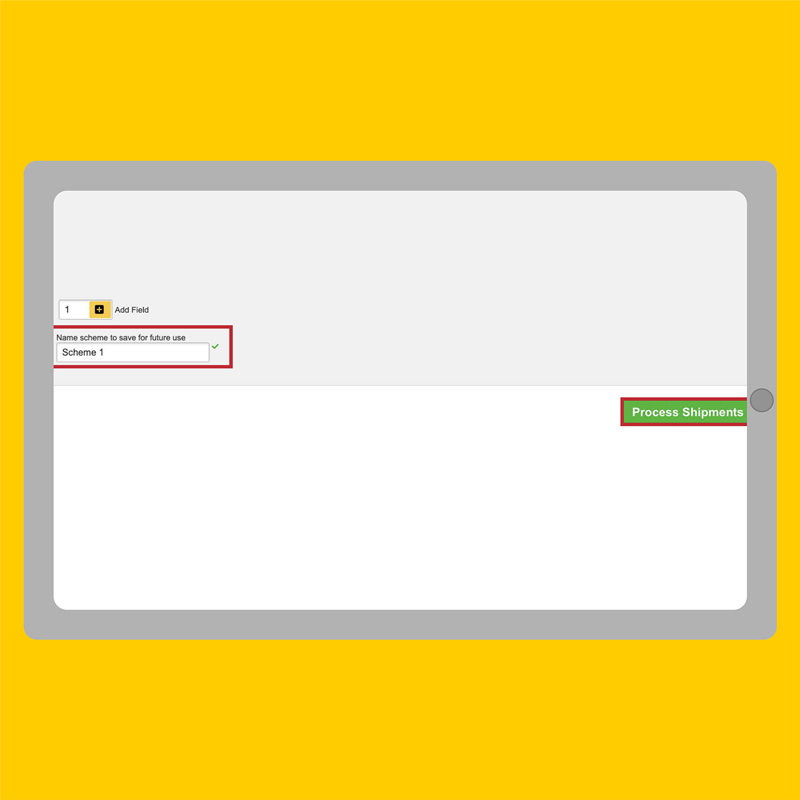
STEP 8:
Name your scheme and save. Select Process Shipments.
IMPORTANT: Saving the mapping scheme (E.g. Scheme 1, 2) before you process shipments ensures you need not repeat the process in your next upload.

STEP 9:
A report will appear for successful and unsuccessful uploads for correction and re-upload.
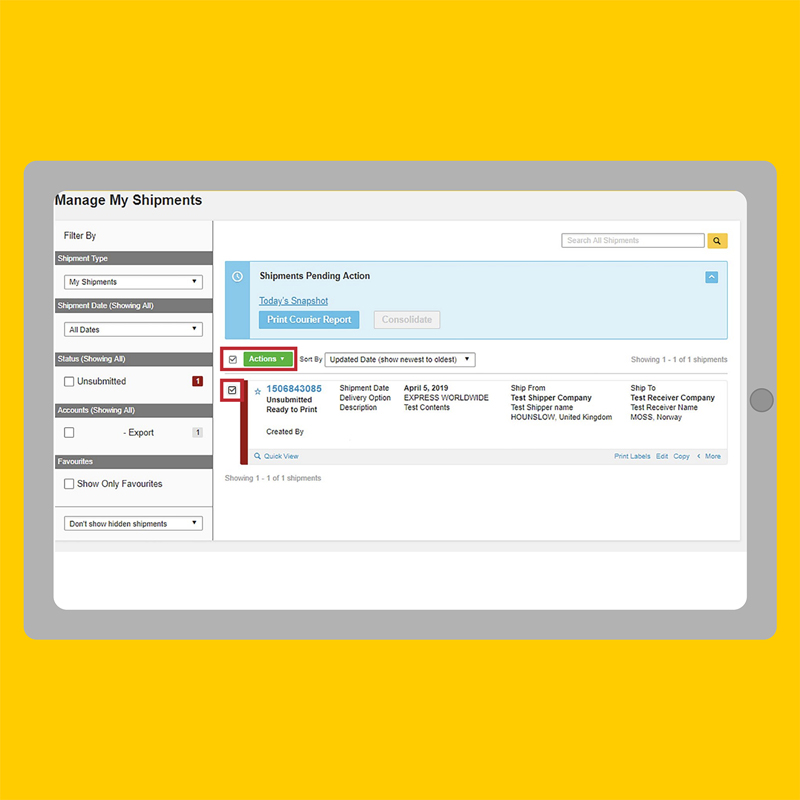
STEP 10:
Access Manage My Shipments to edit your upload error. Otherwise, select all shipments you need printed and select Print from the Actions button.
UPLOAD A SHIPMENT FILE WITH SAVED MAPPING

STEP 1:
Click Ship / Upload a Shipment File.
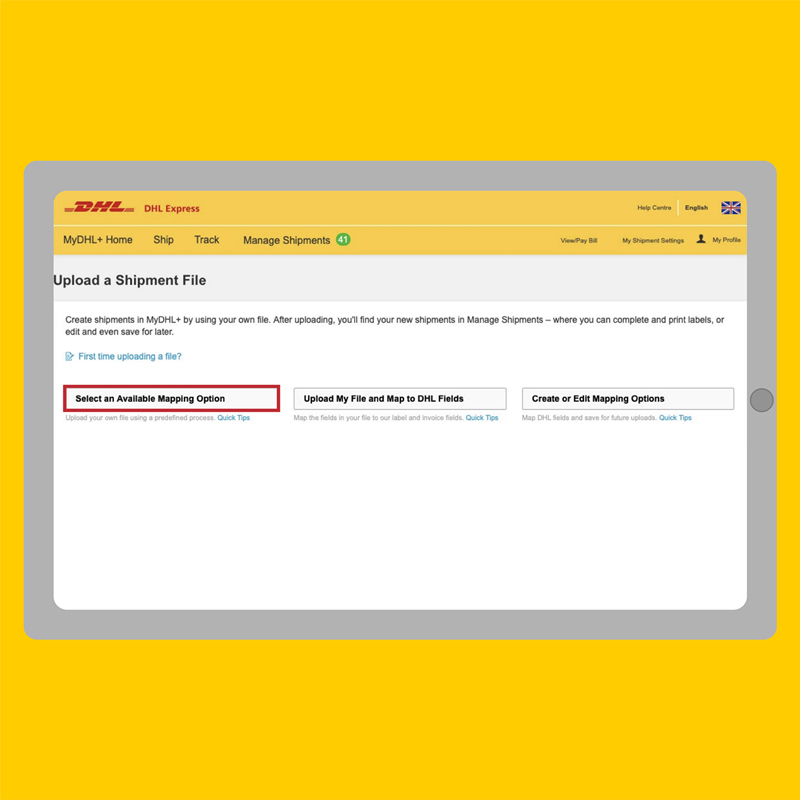
STEP 2:
Select Select an Available Mapping Option.
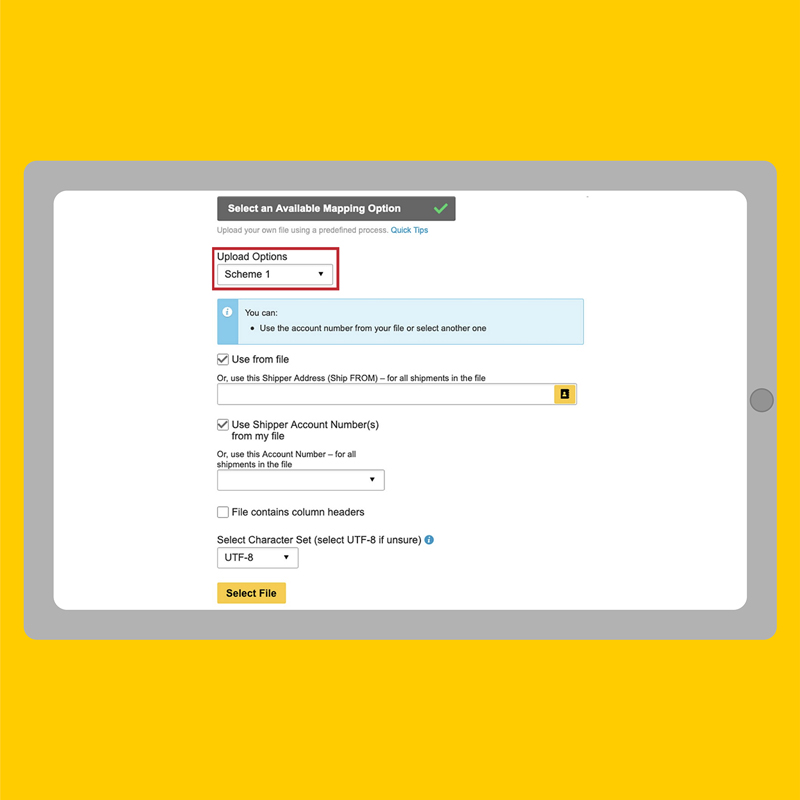
STEP 3:
Select your scheme from Upload Options and set the parameters of your upload.
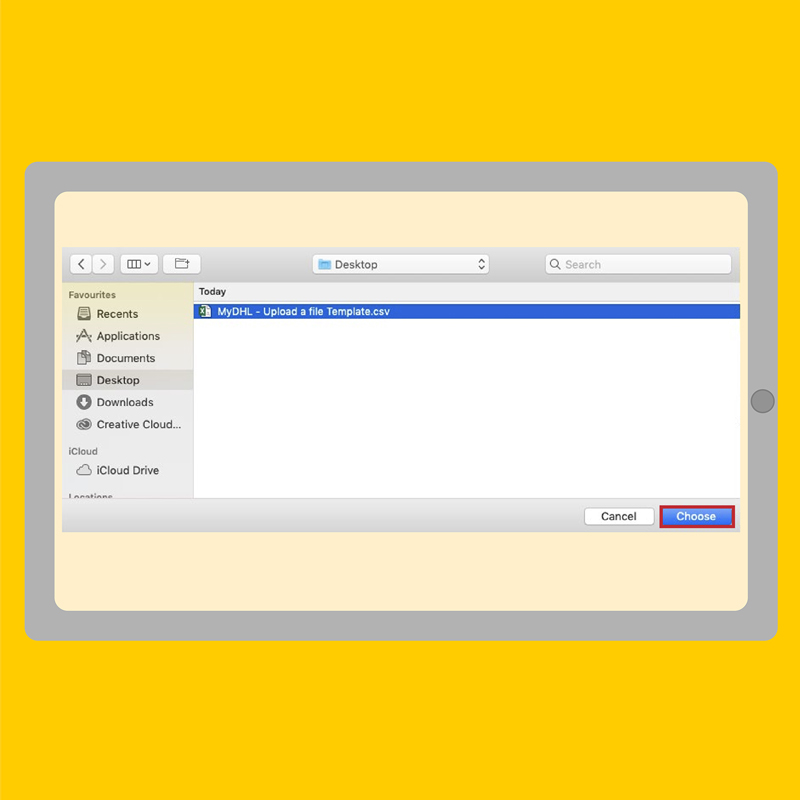
STEP 4:
Locate your csv file and click Choose / Open.
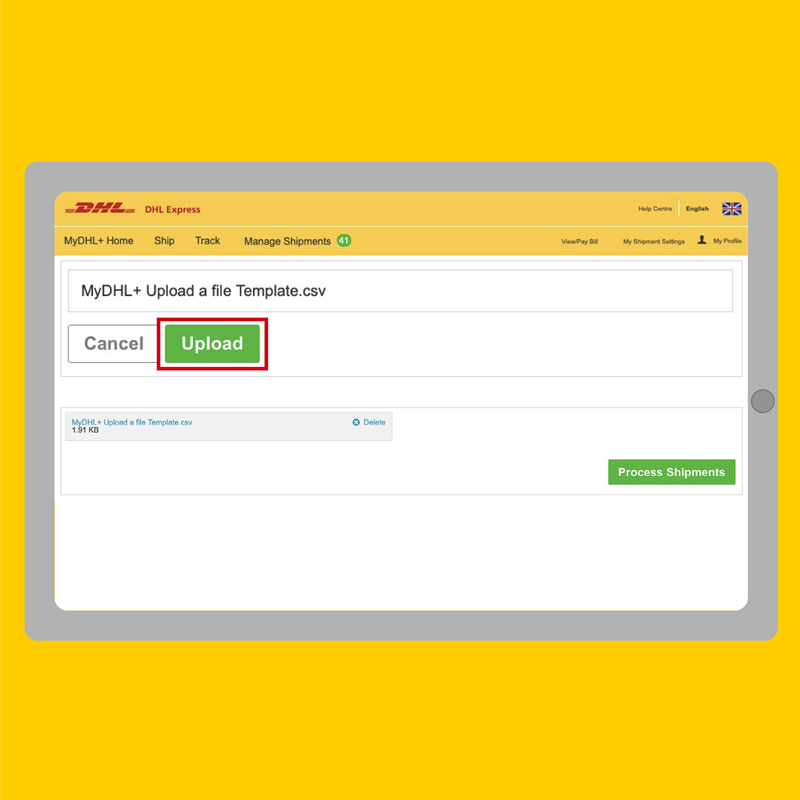
STEP 5:
Click Upload.
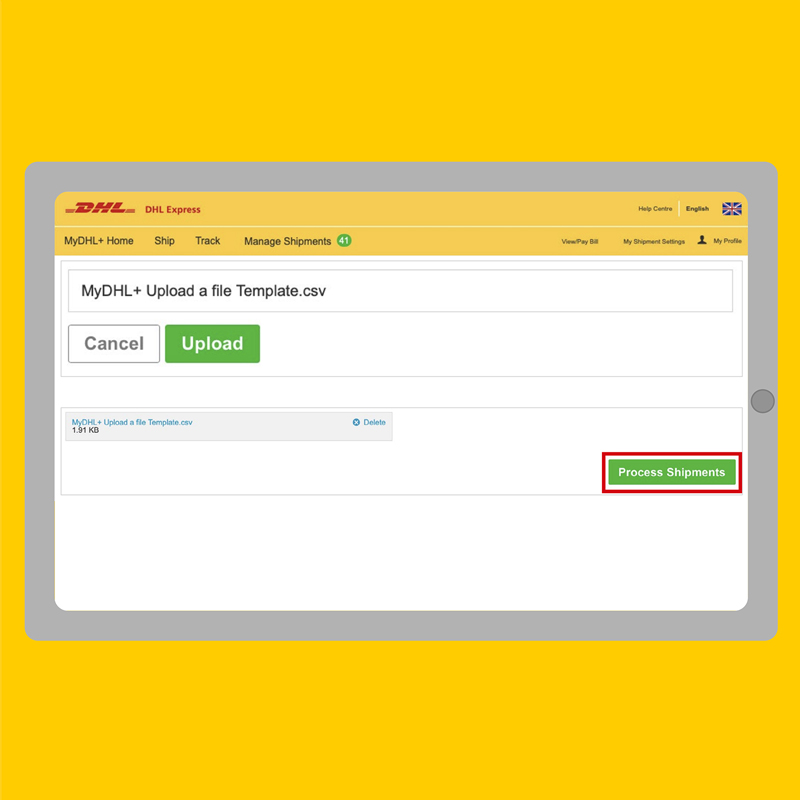
STEP 6:
Click Process Shipments.
Setting Up Shipment Notification On MyDHL+
Setting up Notifications (Default)
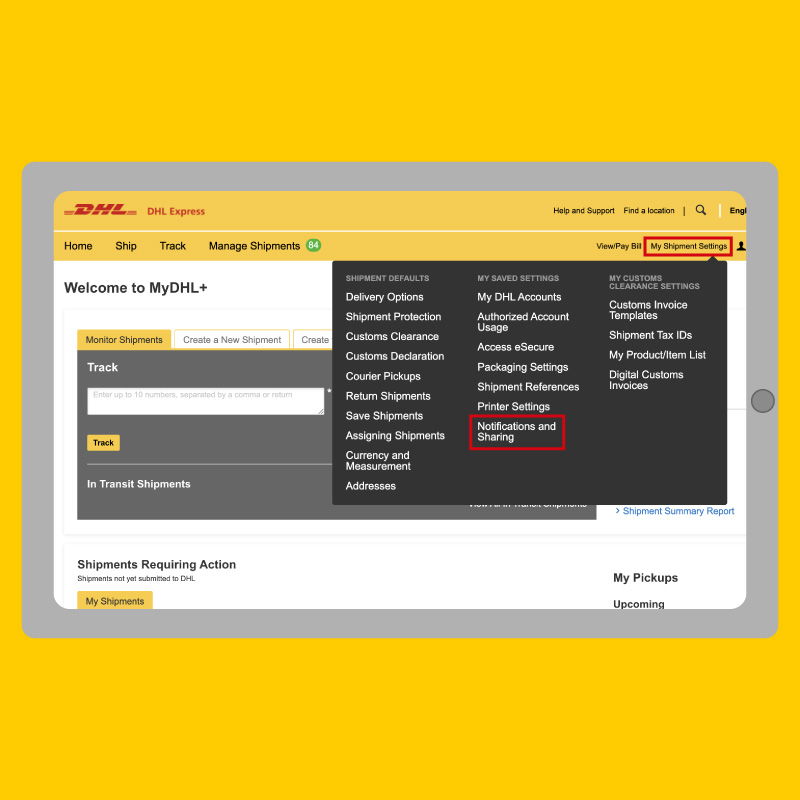
STEP 1:
Go to MyDHL+ and click Login.
STEP 2:
Click My Shipment Settings, select Notifications and Sharing.
STEP 3:
Shipment emails are sent from a DHL email address. Set up a different sender email address if preferred.
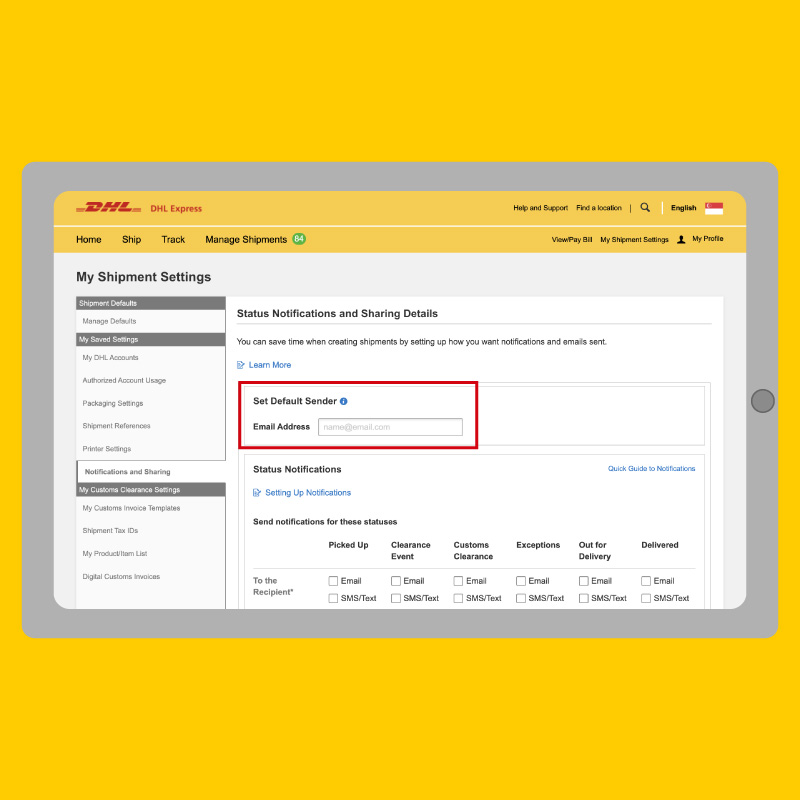
STEP 4:
Set up default notifications to keep up-to-date with the latest shipment status. Defaults created will apply to all shipments.
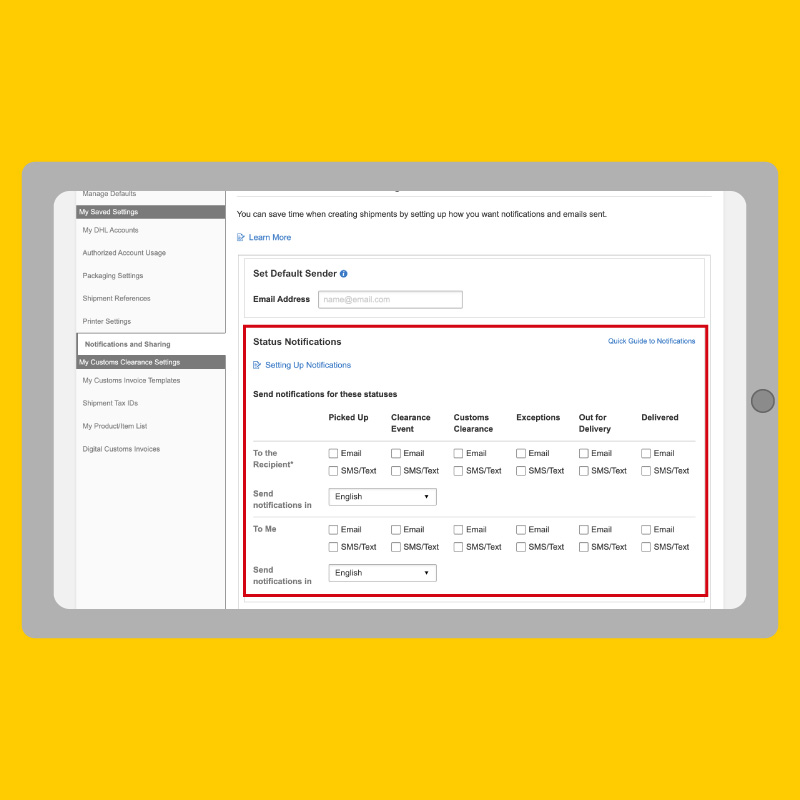
STEP 5:
Save changes by clicking Save at the bottom of the page.
Setting up Notifications (Per Shipment)

STEP 1:
Go to MyDHL+ and click Login.
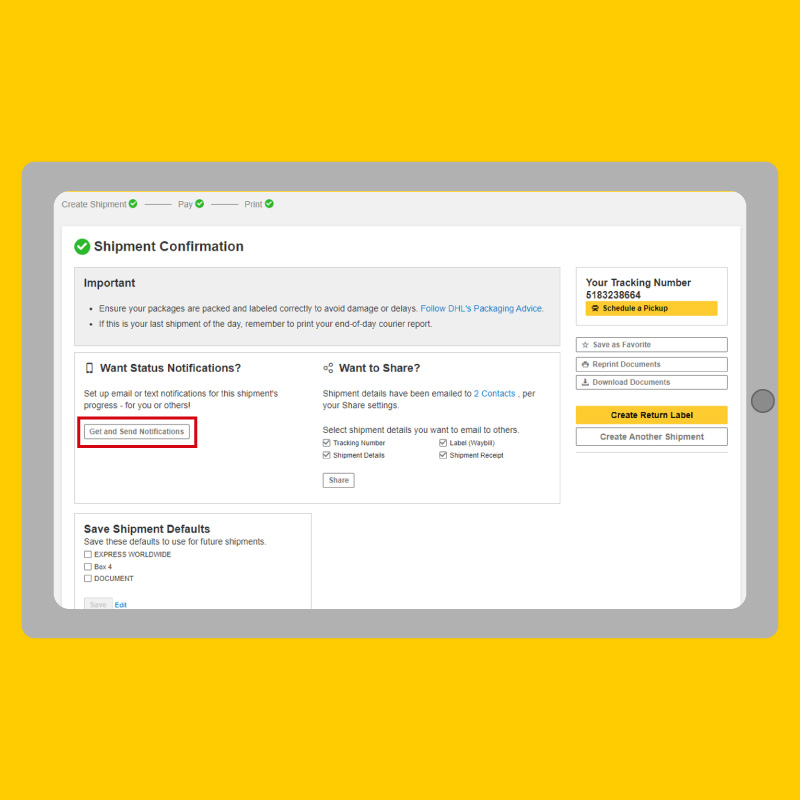
STEP 2:
Create a shipment and print the AWB, bringing you to this page. Click Get and Send Notifications.
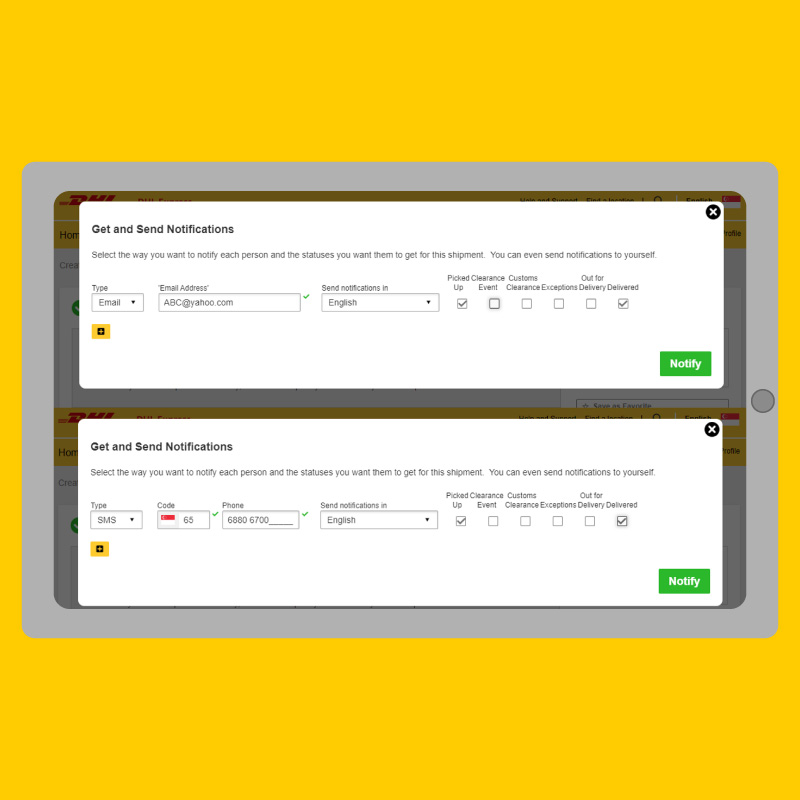
STEP 3:
Select notification type, details and checkpoints.
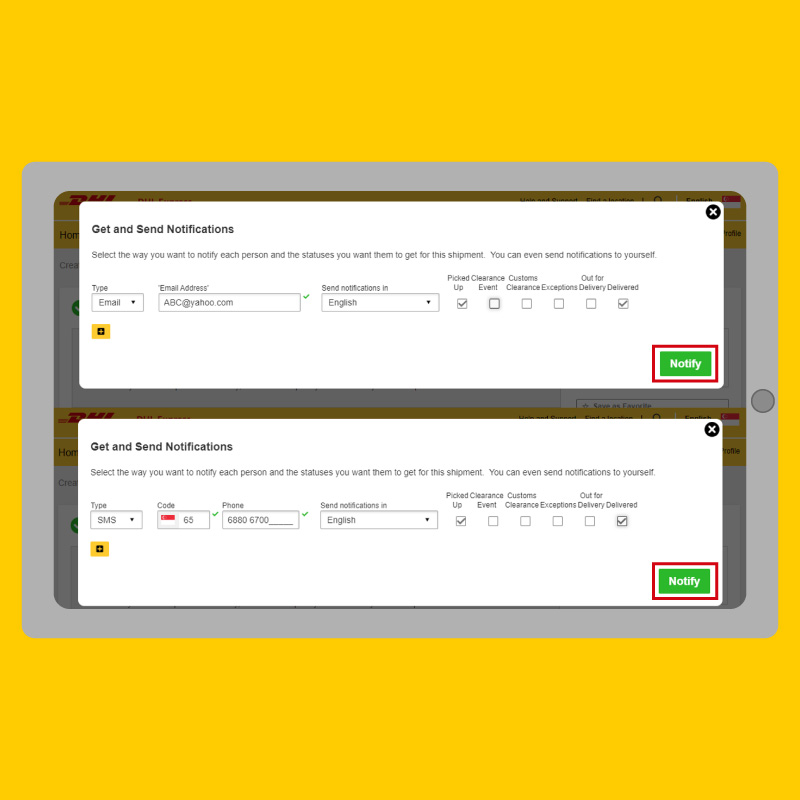
STEP 4:
Click Notify to save changes.
DHL Proview User Guide
Use DHL ProView™ and monitor your shipments statuses with individual PIN(s) for your account number(s).
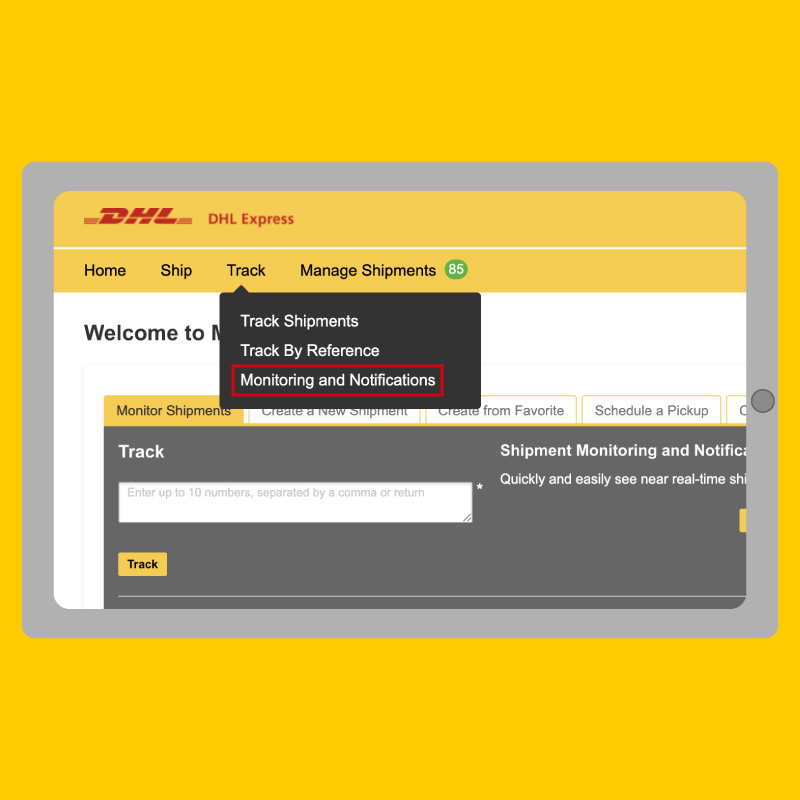
Access
Login to MyDHL+. Click Track, then Monitoring and Notifications.
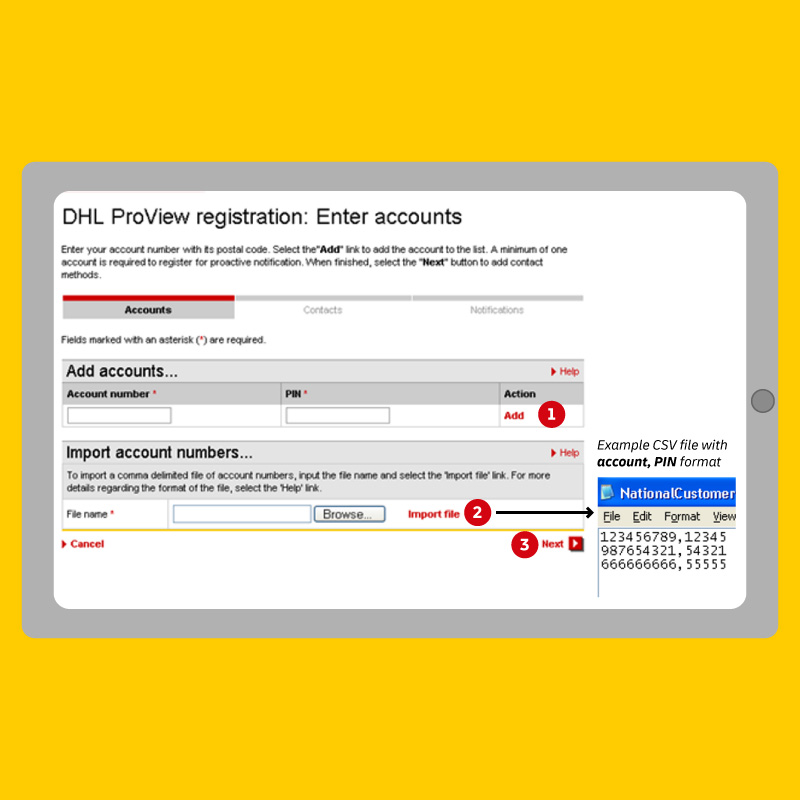
Registration
- Enter the account number and PIN* and click Add. * Note: To obtain PIN(s) for your accounts, contact Helpdesk ecommerce.sg@dhl.com
- If you have more than 5 accounts, use Import file and upload the account numbers and PINs by creating your own CSV file.
- Click Next to proceed.
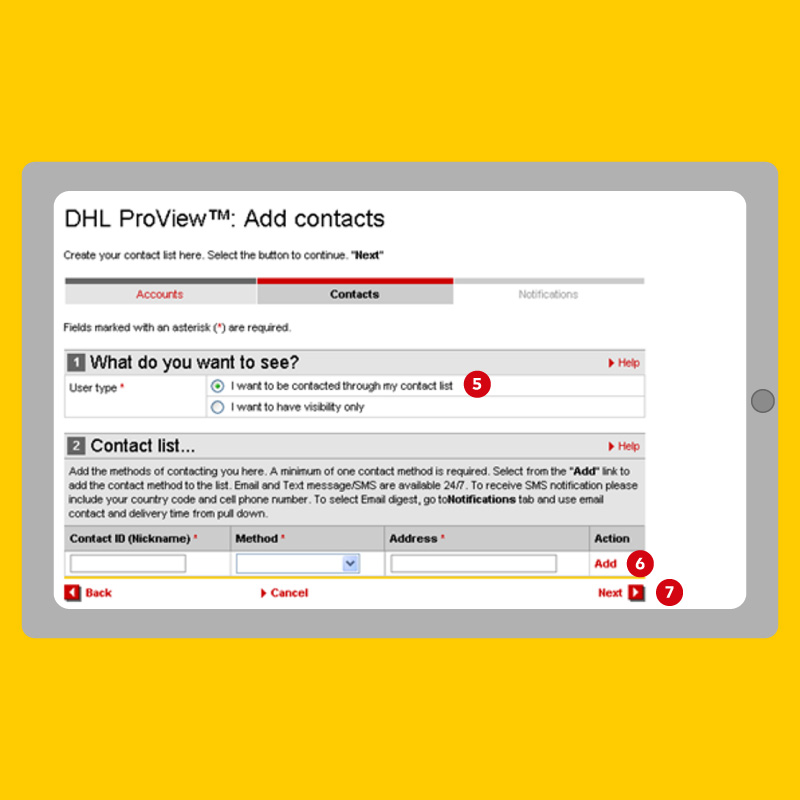
- Add contacts and mode of notifications if you want to sign up for notifications alert. Otherwise, select I want to have visibility only and click Next to complete the registration process.
- Select I want to be contacted through my contact list.
- Create your own Contact ID (which will be used later at Notifications setup) and input the mode of communication. Enter email address or mobile number depending on your preferred mode of communication.
- Click Next to proceed.
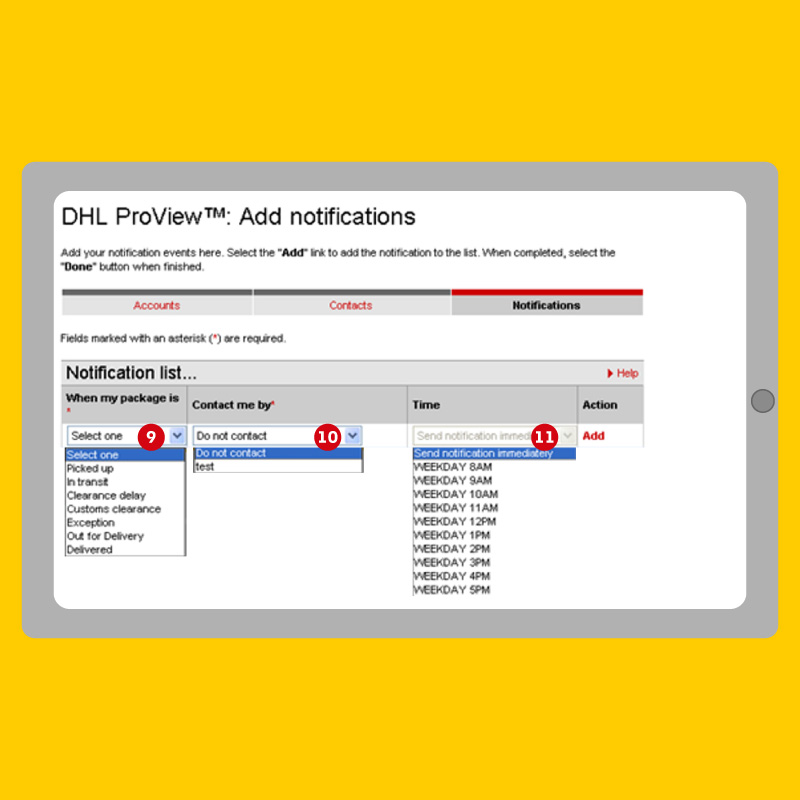
- Add notifications is only required if you want to receive notifications as emails or SMSes.
- Select the type of shipment status* that you wish to be notified.
* Note: Select carefully as this may generate a lot of emails in a day. - Select the Contact ID you have created in the previous step.
- Select the time of notification*.
* Note: Select carefully as this may generate a lot of emails in a day.
Navigation
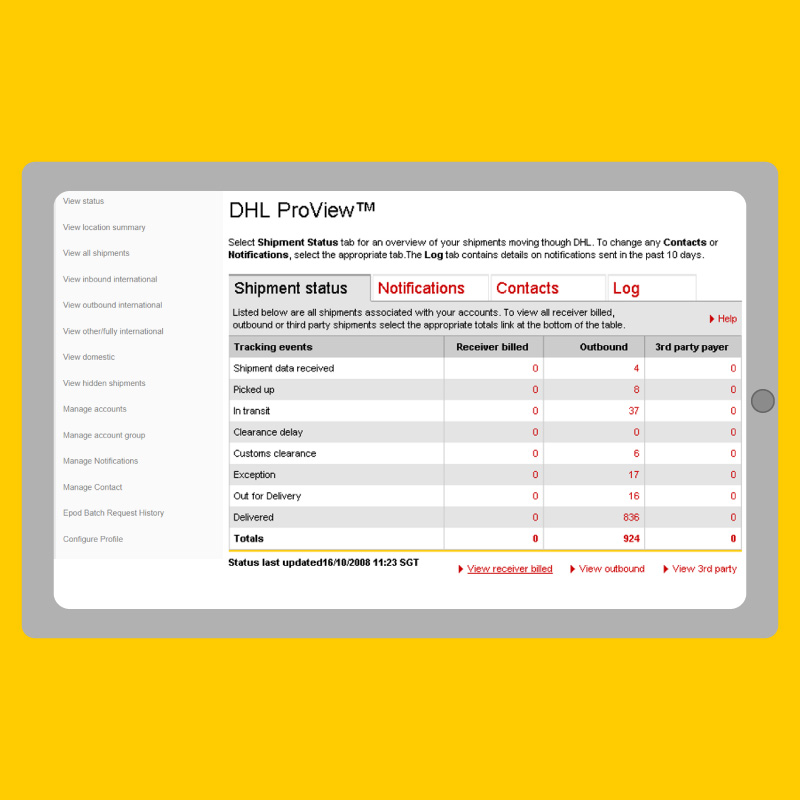
Log in to go to the main page. Menu is on the left and Summary of all shipment statuses is on the right.
To manage notifications, click the Manage accounts, Notifications, or Contacts.
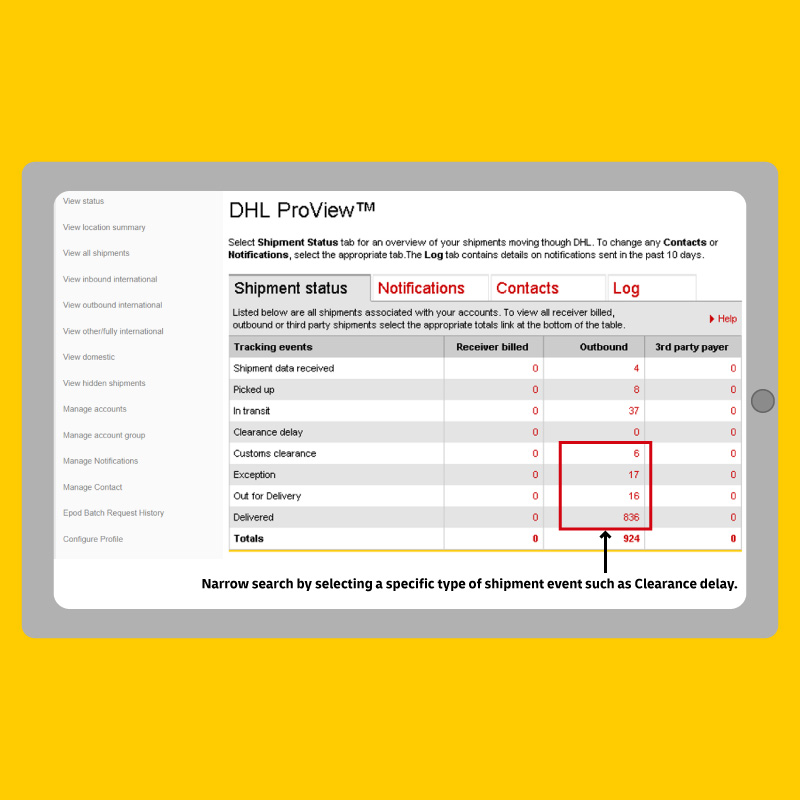
To view more details on the different type of shipments, click View receiver billed, View Outbound, or View 3rd party.
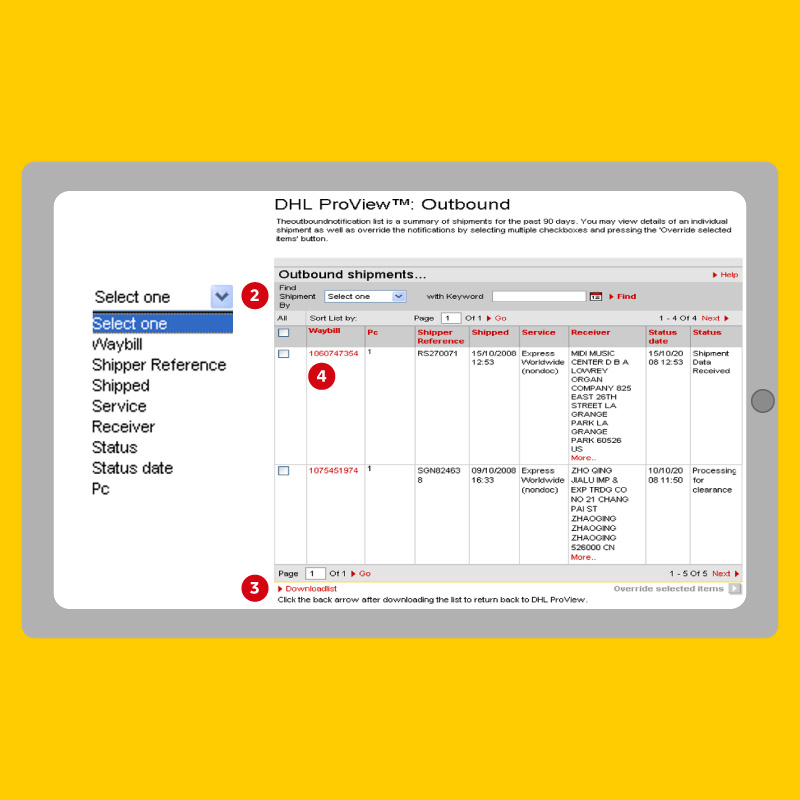
Download & Track
- Click any type of shipment to go to shipment detail screen.
- Search for specific shipments by using Find Shipment By.
- Use Download List to download data in Excel spreadsheet.
- Click the Waybill number to track and retrieve the detailed movement of a shipment.
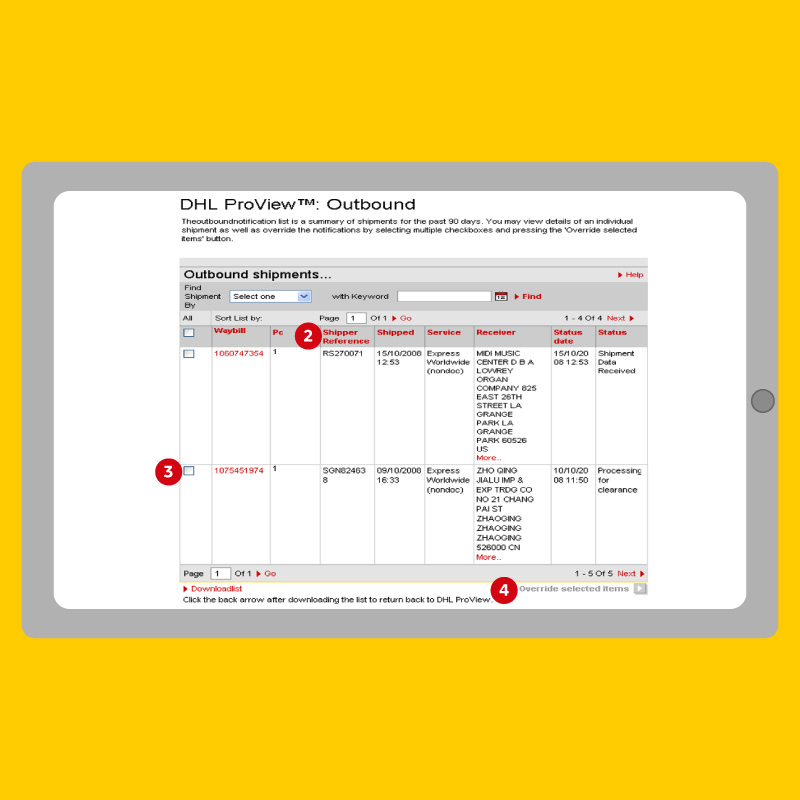
Notification for a specific shipment
- Click any type of shipment to go to shipment detail screen.
- Sort displayed results by clicking one of the table headers.
- Mark the checkbox to the left of the air waybill to receive event notifications for an exceptionally time-critical shipment.
- Click Override selected items to override the default notification setting for just that shipment.
Notifiable Shipment Statuses
Picked Up
The shipment has been picked up by a DHL courier.
Clearance Event
An event during the customs clearance process that may require the shipper or receiver’s attention to avoid unnecessary delays.
Customs Clearance
The shipment has been released from customs.
Out for Delivery
The shipment is with the delivering courier.
Delivered
The shipment has been delivered to the destination address stated on the shipping label (or to an alternative address if agreed with DHL).
Exceptions
Unforeseen events which may adversely affect the normal delivery progress of a shipment, such as a weather delay or the delivery address being closed upon arrival.
If this is your first time preparing a DHL Express parcel for shipping, you can learn more about how the process works by reading our how-to guides on multiple topics, such as how to send a package with DHL Express and how to use MyDHL+, or by reading our shipment preparation guide. If you need to get in touch with us, you can do so via chat or message.

Similar Stories